🧢 Beautiful ✨ Detailed πŸ’ Adorable

Chick Amigurumi Pattern

Chick Amigurumi Pattern
4.3β˜… Rating
5-7 Hours Time Needed
3.4K Made This
βœ‚οΈ

Intermediate Level

Ideal for those with basic crochet experience, featuring slightly more advanced stitches and techniques to expand your skills.

⏱️

Weekend Treat

Takes 5-7 hours, making it an enjoyable project to finish over a couple of days.

πŸ₯

Charming Critter

Delightful animal designs with sweet details that capture the essence of your favorite woodland and farmyard friends.

About This Chick Amigurumi Pattern

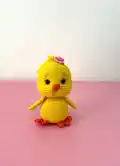
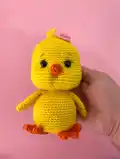
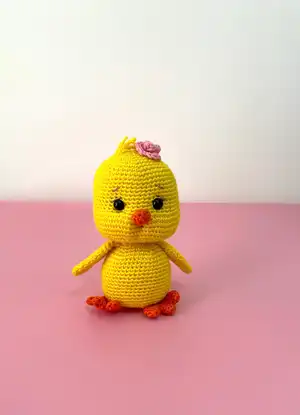
This pattern creates a sweet little chick amigurumi with a round head, plump body, wings, three-toed feet, a tiny beak and a delicate flower for the head. The instructions include every round for each piece so you can follow along easily. Photos show finished details and placement to help with assembly and finishing.

Chick Amigurumi Pattern crochet pattern - detailed view of completed project

Worked in continuous rounds with single crochet shaping, this pattern uses a small hook for a neat finish. Suitable for crocheters comfortable with increases, decreases and basic assembly.

Why You'll Love This Chick Amigurumi Pattern

I absolutely love this pattern because it captures a lot of personality in a very small crochet project. I enjoy the simple shaping that still gives the chick a rounded, clean silhouette and expressive face. The little flower and toes are tiny touches that make each finished chick feel special and gift-ready. I find it relaxing to work through the repetitive rounds and rewarding to see the pieces come together quickly.

Chick Amigurumi Pattern step 1 - construction progress Chick Amigurumi Pattern step 2 - assembly progress Chick Amigurumi Pattern step 3 - details and accessories Chick Amigurumi Pattern step 4 - final assembly and finishing

Switch Things Up

I love customizing this pattern by changing colors; try pastel shades for a gentle nursery friend or bright tones for a playful look.

I often make a mini version using finer yarn and a smaller hook to create keychain-sized chicks.

If I want a chunkier toy, I use a bulkier yarn and a larger hook to get a lovable, squishy version quickly.

I sometimes swap the safety eyes for embroidered eyes for a softer, baby-safe toy.

I enjoy adding wire to the wings for slight posability so the chick can hold tiny props or be slightly posed.

For seasonal variations, I make little hats or scarves to match holidays and create a whole set of themed chicks.

I experiment with facial expressions by changing eye placement or embroidering a small smile to give different personalities.

I like to add felt accessories or tiny crocheted props like a mini carrot or egg for playful storytelling displays.

To make gift sets, I crochet multiple chicks in coordinating colors and add handmade tags or small boxes for presentation.

When I teach this pattern, I encourage students to try different yarn textures for interesting surface effects and to make one-of-a-kind creations.

Common Mistakes & How to Fix Them

βœ— Placing safety eyes in the wrong round can shift facial placement; place the safety eyes between rounds 17-18 and ensure there are 8 sc between them. βœ— Forgetting to stuff gradually will create lumps and uneven shaping; stuff the head and body tightly but in small amounts while shaping to keep it smooth. βœ— Skipping stitch counts during increases and decreases causes uneven shaping; count your stitches at the end of each round to confirm the number in parentheses. βœ— Leaving thread ends too short when finishing small pieces makes sewing difficult; leave a long thread end on small parts such as beak, wings and nails for easier sewing. βœ— Not straightening or aligning two-layer pieces before closing can result in misaligned edges; when instructed to straighten and sink the needle into both layers, take time to flatten and align layers carefully before fastening off.

Chick Amigurumi Pattern

Make an adorable crocheted chick that is perfect for gifts, nursery decor, or a cuddly collectible. This pattern guides you through shaping the head, body, wings, feet, beak and a tiny flower detail. You'll find clear round-by-round instructions, helpful photos, and simple finishing tips to assemble your chick with confidence.

Intermediate 5-7 Hours

Materials Needed for Chick Amigurumi Pattern

β€” Main Fabric

  • 01
    Yarn suitable for 2.5 mm hook (use a yarn that gives a firm fabric with a 2.5 mm hook)
  • 02
    Main Color: Yellow (used for head, body, wings)
  • 03
    A: Orange (used for beak and feet/nails)
  • 04
    B: Pink (used for flower)
  • 05
    C: Lilac (optional accent color mentioned)

β€” Tools Required

  • 01
    Crochet hook size 2.5 mm (or a size that fits your yarn)
  • 02
    Scissors
  • 03
    Polyester stuffing
  • 04
    Tapestry needle for sewing and weaving ends
  • 05
    Stitch marker
  • 06
    Pins for assembly
  • 07
    Safety eyes (size not specified in pattern)

Progress Tracker

0% Complete

β€” Head & Body :

Rnd 1-6 :

sc in a mr

Rnd 2 :

6 sc inc(12)

Rnd 3 :

(6 times)1 sc into sc next inc(18)

Rnd 4 :

(6 times)2 sc into sc next inc(24)

Rnd 5 :

(6 times)3 sc into sc next inc(30)

Rnd 6 :

(6 times)4 sc into sc next inc(36)

Rnd 7 :

(6 times)5 sc into sc next inc(42)

Rnd 8 :

(6 times)6 sc into sc next inc(48)

Rnd 9 :

(6 times)7 sc into sc next inc(54)

Rnd 10-19 :

(10 ring)sc into sc(54) Place the safe eyes between rnd 17-18. There should be 8 sc in between.

Rnd 20-18 :

sc into sc(18 sc inc)18 sc into sc(72)

Rnd 21-26 :

(6 ring)sc into sc(72)

Rnd 27-18 :

sc into sc(18 sc dec)18 sc into sc(54)

Rnd 28 :

(6 times)7 sc into sc next dec(48)

Rnd 29 :

(6 times)6 sc into sc next dec(42)

Rnd 30 :

(6 times)5 sc into sc next dec(36)

Rnd 31 :

(6 times)4 sc into sc next dec(30)

Info :

Stuff the head tightly. keep filling as you go.

Rnd 32 :

(6 times)3 sc into sc next dec(24)

Rnd 33 :

(6 times)2 sc into sc next dec(18)

Rnd 34-35 :

(2 ring)sc into sc(18)

Rnd 35 :

(6 times)2 sc into sc next inc(24)

Rnd 36 :

(6 times)3 sc into sc next inc(30)

Rnd 37 :

(6 times)4 sc into sc next inc(36)

Rnd 38 :

(6 times)5 sc into sc next inc(42)

Rnd 39 :

(6 times)6 sc into sc next inc(48)

Rnd 40-51 :

(12 ring)sc into sc(48)

Rnd 52 :

(6 times)6 sc into sc next dec(42)

Rnd 53 :

(6 times)5 sc into sc next dec(36)

Rnd 54 :

(6 times)4 sc into sc next dec(30)

Rnd 55 :

(6 times)3 sc into sc next dec(24)

Info :

Stuff the body tightly. keep filling as you go.

Rnd 56 :

(6 times)2 sc into sc next dec(18)

Rnd 57 :

(6 times)1 sc into sc next dec(12)

Rnd 58 :

6 sc dec fo.clean the end of the thread.

β€” Beak :

Info :

A COLOR

Rnd 1-6 :

sc in a mr

Rnd 2 :

sc into sc(6)

Rnd 3 :

2 sc inc(8)

Rnd 4-5 :

(2 ring)sc into sc(8)fo.Leave a long thread end to sew.

β€” Wings :

Info :

MAIN COLOR - MAKE 2

Rnd 1-6 :

sc in a mr

Rnd 2 :

2 sc inc(8)

Rnd 3 :

sc into sc(8)

Rnd 4 :

2 sc inc(10)

Rnd 5 :

sc into sc(10)

Rnd 6 :

2 sc inc(12)

Rnd 7 :

2 sc inc(14)

Rnd 8 :

2 sc inc(16)

Rnd 9 :

2 sc inc(18)

Rnd 10 :

2 sc inc(20)

Rnd 11-13 :

(3 ring)sc into sc(20)

Rnd 14 :

2 sc dec(18)

Rnd 15 :

2 sc dec(16)

Rnd 16 :

2 sc dec(14)

Rnd 17 :

Straighten it. sink the needle into both layers. 7 sc fo.

Info :

Leave a long thread end to sew.

β€” Feet - Nails :

Info :

MAKE 2 A COLOR

Info :

NAILS - MAKE 3

Rnd 1-6 :

sc in a mr

Rnd 2-4 :

(3 ring)sc into sc(6)

Rnd 5 :

Birleştirin sc into sc(18)

Rnd 6-8 :

(3 ring)sc into sc(18)

Rnd 9 :

Straighten it. sink the needle into both layers. 8 sc fo.

Info :

Leave a long thread end to sew.

β€” Flower :

Info :

B COLOR

Rnd 1-17 :

ch.turn

Rnd 2 :

(8 times)1 ch into sc 1 ch into 4 cr fo.Leave a long thread end to sew.

Assembly Instructions

  • Place the safety eyes between rounds 17-18 of the head so there are 8 single crochets between them; secure the eyes before stuffing the head fully.
  • Sew the beak to the center of the face using the long tail left from the beak; position it slightly below the eyes and sew neatly with small whipstitches.
  • Attach each wing to the sides of the body at the junction where head and body meet or where it looks balanced in your piece; use pins to check placement and sew with the long tail.
  • Make two feet and three nails per foot; position the feet at the bottom of the body and sew securely so the chick can sit upright.
  • Sew the small flower to the top of the head using the long thread end, and secure any loose yarn tails by weaving them into the head with a tapestry needle.

Important Notes

  • πŸ’‘Place safety eyes between rounds 17-18 and ensure there are exactly 8 sc between them for correct facial placement.
  • πŸ’‘Stuff the head and body gradually and firmly but not overstuffed to maintain the chick's shape.
  • πŸ’‘Leave long thread ends on small pieces (beak, wings, nails, flower) to make sewing them on much easier.
  • πŸ’‘Use stitch markers to keep track of the beginning of rounds since the pattern is worked in continuous rounds.
  • πŸ’‘Pin parts in place and check symmetry before sewing to achieve an even, balanced finished toy.

This delightful Chick Amigurumi is perfect for gifting or brightening a nursery β€” handmade charm in every stitch. πŸ₯ Follow the step-by-step rounds and photos to create a neat, professional finish that you can be proud of. 🌸 Enjoy the process, customize the colors, and share your tiny chick with someone special. 🧢

You ask,

we answer.

FAQs

What size will the finished piece be?

The finished amigurumi measures around 20 cm in circumference and about 10 cm in length using the recommended yarn and a 2.5 mm hook.

Can I use different yarn weights for this pattern?

Yes, you can use different yarn weights, but the final size and stitch counts may change; choose an appropriate hook for your yarn and expect a different finished size.

Do I need prior crochet experience for this pattern?

This pattern is rated intermediate, so basic knowledge of single crochet, increases, decreases, and working in continuous rounds is recommended.

How long does this project typically take to complete?

Most crocheters complete this project in 5-7 hours, though time may vary based on experience level and how carefully you assemble pieces.