๐Ÿงถ Beautiful โœจ Detailed ๐Ÿ’ Adorable

Christmas Tree Hat Clothes Amigurumi Pattern

Christmas Tree Hat Clothes Amigurumi Pattern
4.4โ˜… Rating
5-7 Hours Time Needed
1.2K Made This
โœ‚๏ธ

Intermediate Level

Ideal for those with basic crochet experience, featuring slightly more advanced stitches and techniques to expand your skills.

โฑ๏ธ

Weekend Treat

Takes 5-7 hours, making it an enjoyable project to finish over a couple of days.

โœจ

Stylish Touch

An elegant detail to elevate any look, combining traditional techniques with contemporary design sensibilities.

About This Christmas Tree Hat Clothes Amigurumi Pattern

This pattern teaches you how to crochet a festive Christmas-tree style hat and coordinating clothes for an 18 cm amigurumi toy. It includes detailed round-by-round instructions for the hat, pompon, nose, eyes, legs, cardigan and underpants. The guide also covers simple assembly steps like inserting wire into the hat and sewing on facial features for a finished look.

Christmas Tree Hat Clothes Amigurumi Pattern crochet pattern - detailed view of completed project

All pieces are made with YarnArt Jeans and a 2 mm hook for crisp stitches and firm shaping. Photos and clear stitch counts help you place eyes, glue beads and finish decorations with confidence.

Why You'll Love This Christmas Tree Hat Clothes Amigurumi Pattern

I absolutely love this pattern because it transforms a simple amigurumi into a playful holiday character with a few small accessories. I enjoy the shaping used in the tree hat โ€” it feels like sculpting with crochet. The wireed pompom gives the hat personality and makes each finished toy unique. I also appreciate that the pattern includes matching clothing pieces so your finished amigurumi looks complete and gift-ready.

Christmas Tree Hat Clothes Amigurumi Pattern step 1 - construction progress Christmas Tree Hat Clothes Amigurumi Pattern step 2 - assembly progress Christmas Tree Hat Clothes Amigurumi Pattern step 3 - details and accessories Christmas Tree Hat Clothes Amigurumi Pattern step 4 - final assembly and finishing

Switch Things Up

I love how easy it is to customize this pattern โ€” I often change the hat color to a deep forest green, or try pastel shades for a softer look.

I sometimes swap the thin wire for a flexible pipe cleaner for quick shaping, or omit the wire entirely to make the pompom a simple ball.

To change the character, I vary the nose color and the eye spacing to create different expressions โ€” small adjustments make a big personality shift.

I like to add tiny crocheted accessories like a mini scarf or a pocket on the cardigan for extra charm.

To make a mini keychain version, I use thinner yarn and a smaller hook and reduce rounds until the hat fits my palm.

For a chunkier holiday version, I use a bulkier yarn and a larger hook, which gives a cuddly, plush hat that looks great on larger toys.

I often embroider simple patterns โ€” stars or a snowflake โ€” on the hat using white contrast thread for a festive touch.

Try adding beads or sequins to the hat for sparkle, or use variegated yarn to add unexpected color changes while you crochet.

If you want posable limbs, replace filling with a wire armature inside the legs before sewing them onto the garment.

I recommend experimenting with textured stitches for the cardigan edges โ€” a picot or crab stitch can give a lovely finished look.

Common Mistakes & How to Fix Them

โœ— Skipping stitch counts during increases causes uneven shaping on the hat; count every increase round carefully and mark the start with a stitch marker. โœ— Not securing the wire properly leads to a loose pompom or wobble; fold the wire, insert it from the wrong side and fix it well before wrapping with thread and glue. โœ— Overstuffing the pompom can distort its round shape; stuff lightly and shape gradually while closing the last round. โœ— Forgetting to change to white thread for the cardigan edge will make the trim look unfinished; follow the color-change note and switch exactly where indicated to get the clean white border.

Christmas Tree Hat Clothes Amigurumi Pattern

Make a charming Christmas tree hat and matching clothes for your amigurumi with clear step-by-step instructions. This pattern includes a shaped tree hat, pompom, nose, eyes, legs, cardigan and underpants so you can dress your toy for the holidays. You'll find stitch counts, placement notes and simple assembly tips to finish a polished, festive look for your toy. Perfect for gifting or seasonal displays.

Intermediate 5-7 Hours

Materials Needed for Christmas Tree Hat Clothes Amigurumi Pattern

โ€” Main Fabric

  • 01
    YarnArt Jeans No: 01 (small amount for details)
  • 02
    YarnArt Jeans No: 56 (small amount for green main hat/body)
  • 03
    YarnArt Jeans No: 69 (small amount for brown details)
  • 04
    YarnArt Jeans No: 88 (small amount for red nose/mouth)
  • 05
    YarnArt Jeans No: 40 (small amount for yellow pompon)
  • 06
    Polyester filler for pompon (small amount)

โ€” Tools Required

  • 01
    Needle
  • 02
    Hook 2 mm
  • 03
    Scissors
  • 04
    Buttons 2 pieces
  • 05
    Second glue
  • 06
    Thin wire
  • 07
    Contour (paint) universal, white
  • 08
    Black beads - 2 pieces
  • 09
    Stitch markers
  • 10
    Yarn needle for sewing

Progress Tracker

0% Complete

โ€” Christmas tree-hat :

Round 1 :

6 sc into the adjustable ring

Round 2 :

(1 sc, inc) x 3 times = 9 sc

Round 3 :

(2 sc, inc) x 3 times = 12 sc

Round 4 :

(1 sc, inc) x 6 times = 18 sc

Round 5 :

1 sc, inc, (2 sc, inc) x 5 times, 1 sc = 24 sc

Round 6-7 :

24 sc

Round 8 :

(3 sc, inc) x 6 times = 30 sc

Round 9 :

30 sc

Round 10 :

2 sc, inc, (4 sc, inc) x 5 times, 2 sc = 36 sc

Round 11 :

(5 sc, inc) x 6 times = 42 sc

Round 12 :

3 sc, inc, (6 sc, inc) x 5 times, 3 sc = 48 sc

Round 13-16 :

48 sc

Round 17 :

(7 sc, inc) x 6 times = 54 sc

Round 18 :

54 sc

Round 19 :

4 sc, inc, (8 sc, inc) x 5 times, 4 sc = 60 sc

Round 20 :

60 sc

Round 21 :

(9 sc, inc) x 6 times = 66 sc

Round 22 :

66 sc

Round 23 :

5 sc, inc, (10 sc, inc) x 5 times, 5 sc = 72 sc

Round 24 :

72 sc

Round 25 :

(11 sc, inc) x 6 times = 78 sc

Round 26 :

78 sc

Round 27 :

6 sc, inc, (12 sc, inc) x 5 times, 6 sc = 84 sc

Round 28 :

84 sc

Round 29 :

(13 sc, inc) x 6 times = 90 sc

Round 30 :

90 sc

Info :

Trim the thread, fix the loop.

Info :

Next, we take the wire, fold it in half and insert it from the wrong side into the cap, fix it, but not to the end, in the future we will insert the ends of the wire into the pompom. We postpone the detail for a while.

โ€” Pompon :

Round 1 :

6 sc into the adjustable ring

Round 2 :

(inc) x 6 times = 12 sc

Round 3 :

(3 sc, inc) x 3 times = 15 sc

Round 4-5 :

15 sc

Info :

We insert the ends of the wire from the cap into the pompom and fix it.

Round 6 :

(3 sc, dec) x 3 times = 12 sc

Info :

Stuff

Round 7 :

(dec) x 6 times = 6 sc

Info :

Close 6 loops.

Info :

We wrap the whole wire with a thread and fix it with glue.
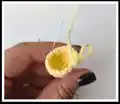
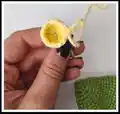
โ€” Nose :

Round 1 :

8 ch, inc, 5 sc, 4 sc in one loop, 5 sc, inc = 18 sc

Round 2 :

(2 sc, inc) x 6 times = 24 sc

Round 3 :

24 sc

Info :

We cut the thread, fix the loop. Draw a white stripe on the nose.

โ€” Legs (2 parts) :

Round 1 :

10 ch, inc, 7 sc, 4 sc in one loop, 7 sc, inc = 22 sc

Round 2 :

2 inc, 6 sc, 6 inc dc, 6 sc, 2 inc = 32 loops

Info :

We cut the thread, fix the loop. We draw white stripes.

โ€” Eyes (2 details) :

Round 1 :

6 sc into the adjustable ring

Round 2 :

(inc) x 6 times = 12 sc

Round 3 :

(1 sc, inc) x 6 times = 18 sc

Info :

Trim the thread, fix the loop.

Info :

Glue the white eyes, slightly on top of each other, in the 10th row from the top of the cap.

Info :

Glue the nose.

Info :

Glue the legs.

Info :

We glue or sew black beads, embroider the mouth and eyebrows.

โ€” Cardigan :

Item Name (P1) :

45 ch: 10 dc, arch (hdc, ch, hdc), 5 dc (sleeve), arch, 10 dc, arch, 5 dc (sleeve), arch, 10 dc

Round 1 :

round: 2 ch, turning detail, 11 dc, arch, 7 dc (sleeve), arch, 12 dc, arch, 7 dc (sleeve), arch, 11 dc

Row 2 :

2 ch, turning detail, 12 dc, 3 ch, 10 loops skip and starting from 11 loops crochet 16 dc, 3 ch, 10 loops skip and starting from 11 loops crochet 12 dc = 46 loops

Row 3 :

1 ch, turning detail, 9 sc, (inc, 2 sc) x 9 times, 10 sc = 55 sc

Row 4 :

1 ch, turning detail, 10 sc, (inc, 3 sc) x 9 times, 9 sc = 64 sc

Row 5-9 :

(1 ch, turning detail, 64 sc) x 5 rounds

Info :

We change the color of the thread to white

Row 10-11 :

(1 ch, turning detail, 64 sc) x 2 rounds

Info :

Next, go to the side of the part and crochet button loops: 4 ch, 3 loops skip and starting with 4 crochet loops: 10 sc, 4 ch, 3 loops skip and in the last loop crochet sl st. We cut the thread, fix the loop. We sew buttons.

โ€” Underpants, use the green thread :

Round 1 :

33 ch, 32 sc

Round 2 :

(1 ch, turning detail, 32 sc) x 2 rounds

Round 3 :

1 ch, turning detail, 1 sc, dec, 26 sc, dec, 1 sc = 30 sc

Round 4 :

1 ch, turning detail, 1 sc, dec, 24 sc, dec, 1 sc = 28 sc

Round 5 :

1 ch, turning detail, 1 sc, dec, 22 sc, dec, 1 sc = 26 sc

Round 6 :

1 ch, turning detail, 1 sc, dec, 20 sc, dec, 1 sc = 24 sc

Round 7 :

1 ch, turning detail, 1 sc, dec, 18 sc, dec, 1 sc = 22 sc

Round 8 :

1 ch, turning detail, 1 sc, dec, 16 sc, dec, 1 sc = 20 sc

Round 9 :

1 ch, turning detail, 1 sc, dec, 14 sc, dec, 1 sc = 18 sc

Round 10 :

1 ch, turning detail, 1 sc, dec, 12 sc, dec, 1 sc = 16 sc

Round 11 :

1 ch, turning detail, 1 sc, dec, 10 sc, dec, 1 sc = 14 sc

Round 12 :

(1 ch, turning detail, 14 sc) x 10 rounds

Round 13 :

1 ch, turning detail, 1 sc, inc, 10 sc, inc, 1 sc = 16 sc

Round 14 :

1 ch, turning detail, 1 sc, inc, 12 sc, inc, 1 sc = 18 sc

Round 15 :

1 ch, turning detail, 1 sc, inc, 14 sc, inc, 1 sc = 20 sc

Round 16 :

1 ch, turning detail, 1 sc, inc, 16 sc, inc, 1 sc = 22 sc

Round 17 :

1 ch, turning detail, 1 sc, inc, 18 sc, inc, 1 sc = 24 sc

Round 18 :

1 ch, turning detail, 1 sc, inc, 20 sc, inc, 1 sc = 26 sc

Round 19 :

1 ch, turning detail, 1 sc, inc, 22 sc, inc, 1 sc = 28 sc

Round 20 :

1 ch, turning detail, 1 sc, inc, 24 sc, inc, 1 sc = 30 sc

Round 21 :

1 ch, turning detail, 1 sc, inc, 26 sc, inc, 1 sc = 32 sc

Round 22-24 :

(1 ch, turning detail, 32 sc) x 3 rounds

Info :

We cut the thread, fix the loop.

Assembly Instructions

  • Glue the white eyes slightly on top of each other and position them in the 10th row from the top of the cap, then secure with glue or sew them in place for extra strength.
  • Insert the folded thin wire from the wrong side through the top of the hat, secure it inside the cap, and later insert and fix the wire ends into the pompom before closing.
  • Glue or sew the red nose below the eyes and draw the white stripe detail on the nose using white contour paint.
  • Sew the two leg details to the bottom edge of the hat as shown in photos, and embroider the white stripe details on the legs after attachment.
  • Attach the cardigan by sewing buttons into the button loops created; reinforce loops and ends and weave in all loose ends.

Important Notes

  • ๐Ÿ’กUse stitch markers to mark the start of rounds for the hat increases so the shaping stays consistent from top to brim.
  • ๐Ÿ’กFold and temporarily fix the wire inside the hat before finishing the pompom to avoid shifting while finishing the cap.
  • ๐Ÿ’กChange to the white thread on the cardigan exactly where noted to create a crisp, contrasting edge for the trim.

This festive clothes set includes a shaped tree-style hat, a wired pompom, expressive face details, and tiny wearable garments for your 18 cm amigurumi. Make it for seasonal displays, thoughtful handmade gifts, or to dress up a toy for holiday photos. Have fun with colors, embroidery and tiny trims to personalize each piece. ๐ŸŽ„๐Ÿงถ

You ask,

we answer.

FAQs

What size will the finished hat be?

The finished tree hat measures to fit an approximately 18 cm tall toy when using YarnArt Jeans and a 2 mm hook as recommended.

Can I make the hat larger or smaller?

Yes, changing the yarn weight and hook size will alter the final size; thicker yarn with a larger hook creates a bigger, bulkier hat while thinner yarn makes a smaller one.

Do I need to use wire for the pompom?

Using thin wire gives a whimsical posable stem for the pompom, but you can omit the wire and attach the pompom directly if you prefer a simpler finish.

Is the cardigan reversible or does it have right and wrong sides?

The cardigan is worked in rows with a white trim added; it is intended to show the finished right side with the white edging and button loops, so position it with the right side out when attaching.

How do I secure small details like beads and the nose?

Glue can be used for fast assembly but sewing small beads and the nose with a needle and strong thread provides better long-term security, especially for toys handled by children.