🧢 Beautiful ✨ Detailed πŸ’ Adorable

Cinnamon Beret Pattern

Cinnamon Beret Pattern
4.8β˜… Rating
2-3 Hours Time Needed
3.4K Made This
βœ‚οΈ

Beginner Friendly Level

Perfect for those just starting their crochet journey, with clear instructions and simple techniques

⏱️

Bite-Sized Project

Finishes in 2-4 hoursβ€”perfect for an afternoon of creative relaxation.

🧢

Effortless Style

Simple lines for everyday wear, focusing on quality stitchwork and timeless appeal that never goes out of fashion.

About This Cinnamon Beret Pattern

This pattern creates a classic beret worked from the center outwards using single crochet in continuous rounds. It uses Aran-weight yarn and a 3.5 mm hook to achieve a structured yet soft shape. The design is quick and straightforward, making it suitable for a relaxed weekend project. Perfect for customizing with colors or small embellishments.

Cinnamon Beret Pattern crochet pattern - detailed view of completed project

Worked entirely in single crochet with simple increases and decreases, this beret produces a neat spiral crown. The pattern includes full round-by-round instructions, finishing notes, and gauge for consistent results.

Why You'll Love This Cinnamon Beret Pattern

I absolutely love this pattern because it makes a timeless beret with minimal effort and maximum style. I enjoy how the piece grows from the center outwards into a perfectly shaped crown β€” it feels rewarding stitch by stitch. The simple construction and single-crochet texture mean I can chat or watch TV while working and still get great results. I also love that it adapts easily to different yarns and sizes, so I can make a matching set or try bold colors.

Cinnamon Beret Pattern step 1 - construction progress Cinnamon Beret Pattern step 2 - assembly progress Cinnamon Beret Pattern step 3 - details and accessories Cinnamon Beret Pattern step 4 - final assembly and finishing

Switch Things Up

I love customizing this beret by changing colors for stripes or a two-tone crown, which gives each version a fresh personality.

I often try different yarn weights and adjust hook size; using thicker yarn makes a chunkier, warmer beret while thinner yarn produces a delicate version.

I sometimes add a small crocheted flower or an embroidered motif to the side for a feminine touch and extra detail.

I recommend blocking differently to alter the flare of the brim β€” a wider block creates a more dramatic beret, while a tighter block gives a snug look.

I also experiment with adding a soft ribbon or grosgrain band inside the brim to make the beret sit more securely on the head.

I enjoy making mini versions as keychains by using finer yarn and a smaller hook for a charming miniature keepsake.

I occasionally substitute the single crochet rounds with half double crochet for a denser texture, but always check gauge when changing stitches.

I like to try subtle color shifts like ombre or heathered yarn to create depth without changing the basic pattern stitches.

I sometimes line the beret with a lightweight fabric for extra warmth and a tidy inside finish β€” it also helps the beret hold its shape longer.

I recommend trying a contrast edging in a different color for a modern finish that frames the beret beautifully.

I often give these as gifts and play with decorative options like buttons, tassels, or a tiny pom-pom to match the recipient's style.

Common Mistakes & How to Fix Them

βœ— Skipping the magic loop setup can make the center hole visible; use a tight magic loop and pull it closed securely to hide the center. βœ— Forgetting to insert or move a marker leads to missed increases; place a stitch marker after Round 1 and move it each round to mark the start. βœ— Working with inconsistent tension creates a lumpy or uneven crown; maintain even tension throughout and check gauge before starting. βœ— Not closing rounds properly can distort the spiral and join points; close each round with sl st as instructed and place the marker carefully. βœ— Neglecting to block or wash the finished beret results in a less polished shape; wash and block the beret to relax stitches and shape it correctly.

Cinnamon Beret Pattern

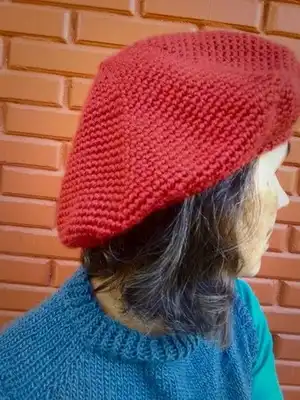
Make a classic Cinnamon Beret crafted from the center outwards. This easy, stylish beret uses single crochet worked in rounds and finishes with a neat, wearable shape. You can complete this quick weekend project with basic stitches and a few simple tools. Perfect for gifting or adding a handmade touch to your wardrobe.

Beginner Friendly 2-3 Hours

Materials Needed for Cinnamon Beret Pattern

β€” Main Fabric

  • 01
    Cisne Cetim yarn, 100g/170m per skein, composition: 70% acrylic, 30% wool, Aran (8 wpi)
  • 02
    Final yarn used: approximately 113 g (one to two 100 g skeins depending on tension and blocking)

β€” Tools Required

  • 01
    Crochet hook 3.5 mm (or to obtain gauge)
  • 02
    Marker (stitch marker)
  • 03
    Tapestry needle to weave in ends

Progress Tracker

0% Complete

β€” Start :

Info :

Crochet a Magic Loop

Info :

Note: Close all rounds with sl st..

Round 1 :

6 sc, sl st. Then insert the marker.

Round 2 :

6 inc, sl st. Total 12 sc.

Round 3 :

*1 inc, 1 sc*, repeat from * to * across, sl st. Total 18 sts.

Info :

Continue to increase 6 sts in each Round.

Round 4 :

*1 inc, 2 sc*, repeat from * to * across, sl st. Total 24 sts.

Round 5 :

*1 inc, 3 sc*, repeat from * to * across, sl st. Total 30 sts.

Round 6 :

*1 inc, 4 sc*, repeat from * to * across, sl st. Total 36 sts.

Round 7 :

*1 inc, 5 sc*, repeat from * to * across, sl st. Total 42 sts.

Round 8 :

*1 inc, 6 sc*, repeat from * to * across, sl st. Total 48 sts.

Round 9 :

*1 inc, 7 sc*, repeat from * to * across, sl st. Total 54 sts.

Round 10 :

*1 inc, 8 sc*, repeat from * to * across, sl st. Total 60 sts.

Round 11 :

*1 inc, 9 sc*, repeat from * to * across, sl st. Total 66 sts.

Round 12 :

*1 inc, 10 sc*, repeat from * to * across, sl st. Total 72 sts.

Round 13 :

*1 inc, 11 sc*, repeat from * to * across, sl st. Total 78 sts.

Round 14 :

*1 inc, 12 sc*, repeat from * to * across, sl st. Total 84 sts.

Round 15 :

*1 inc, 13 sc*, repeat from * to * across, sl st. Total 90 sts.

Round 16 :

*1 inc, 14 sc*, repeat from * to * across, sl st. Total 96 sts.

Round 17 :

*1 inc, 15 sc*, repeat from * to * across, sl st. Total 102 sts.

Round 18 :

*1 inc, 16 sc*, repeat from * to * across, sl st. Total 108 sts.

Round 19 :

*1 inc, 17 sc*, repeat from * to * across, sl st. Total 114 sts.

Round 20 :

*1 inc, 18 sc*, repeat from * to * across, sl st. Total 120 sts.

Round 21 :

*1 inc, 19 sc*, repeat from * to * across, sl st. Total 126 sts.

Round 22 :

*1 inc, 20 sc*, repeat from * to * across, sl st. Total 132 sts.

Round 23 :

*1 inc, 21 sc*, repeat from * to * across, sl st. Total 138 sts.

Round 24 :

*1 inc, 22 sc*, repeat from * to * across, sl st. Total 144 sts.

Round 25 :

*1 inc, 23 sc*, repeat from * to * across, sl st. Total 150 sts.

Round 26 :

*1 inc, 24 sc*, repeat from * to * across, sl st. Total 156 sts.

Info :

Total 26 Rounds with increases.

β€” Decreases :

Round 27 :

*sc2tog, 24 sc*, repeat from * to * across, sl st. Total 150 sts.

Round 28 :

*sc2tog, 23 sc*, repeat from * to * across, sl st. Total 144 sts.

Round 29 :

*sc2tog, 22 sc*, repeat from * to * across, sl st. Total 138 sts.

Round 30 :

*sc2tog, 21 sc*, repeat from * to * across, sl st. Total 132 sts.

Round 31 :

*sc2tog, 20 sc*, repeat from * to * across, sl st. Total 126 sts.

Round 32 :

*sc2tog, 19 sc*, repeat from * to * across, sl st. Total 120 sts.

Round 33 :

*sc2tog, 1 sc, sc2tog, 15 sc*, repeat from * to * across, sl st. Total 108 sts.

Round 34 :

*sc2tog, 1 sc, sc2tog, 13 sc*, repeat from * to * across, sl st. Total 96 sts.

Round 35 :

*sc2tog, 1 sc, sc2tog, 11 sc*, repeat from * to * across, sl st. Total 84 sts.

Round 36 :

Last Round: *1 sl st, ch1*, repeat from * to * across, sl st.

β€” To Finish :

Info :

Weave in all ends. Wash and block.

Assembly Instructions

  • Insert a stitch marker after Round 1 to mark the beginning of rounds and move it up each round for accurate shaping.
  • Close each round with a slip stitch as instructed to maintain the spiral and avoid visible joins while you work.
  • Weave in all yarn ends securely with a tapestry needle once the beret is complete to prevent unraveling.
  • Wash and block the finished beret to relax the stitches and shape it into a smooth, wearable form.

Important Notes

  • πŸ’‘Gauge: 18 sts and 18 rows per 10 cm / 4" in Single crochet (sc) after washing and blocking β€” check gauge before starting.
  • πŸ’‘Close all rounds with slip stitch as instructed to keep a neat spiral and even shaping.
  • πŸ’‘Use a stitch marker to mark the beginning of each round and move it as you progress to avoid miscounts.
  • πŸ’‘Weave in all ends and block the finished beret for the best final shape and drape.

This Cinnamon Beret pattern is a simple and elegant project you can finish quickly and proudly display. It works up from the center outwards for a clean spiral crown and classic beret silhouette. Make one for yourself or as a thoughtful handmade gift β€” share your photos and tag #natrilhadosfios so I can see your creations! 🧢✨

You ask,

we answer.

FAQs

What size will the finished piece be?

The finished beret measures approximately 28 cm overall width and fits a head contour of about 52 cm (one size).

Can I use different yarn weights for this pattern?

Yes, you can substitute yarn weights, but the finished size will change; use an appropriate hook and check gauge to match the recommended measurements.

Do I need prior crochet experience for this pattern?

This pattern is rated Beginner Friendly; you should know how to work a magic loop, single crochet, increases and simple decreases.

How long does this project typically take to complete?

Most crocheters complete this project in 2-3 hours, though time may vary depending on experience and pace.