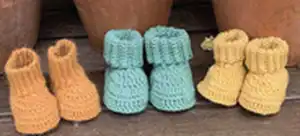
Make these timeless crochet baby booties in three sizes (newborn to 4-6 months). The pattern includes complete step-by-step instructions, helpful photos, and options for a short or folded cuff. Youll enjoy making cozy, practical booties perfect for gifts or keepsakes using 4ply, 8ply or 10ply yarn.
Progress Tracker
0% Complete
— Pattern - Size 2,3,4 Instructions :
Info :
We begin at the centre of the sole, using correct hook for your size - see pg1 chain11
Round 1 :
2hdc into 2nd chain from your hook Pic 1, then hdc in next 8st, 5hdc into last stitch (which will take you around the corner, and take the 'tail' with you Pic 2), hdc into each of the 8 lower loops of the ch, (taking the tail with you to neatly conceal it), Pic 3, 3hdc in last st Pic 4, join with sl st into 1st hdc (26 st)
Round 2 :
ch1 and 2hdc in same stitch Pic 5, 2hdc in next, hdc in next 9sts, 2hdc into the next 5sts, hdc in next 9sts, 2hdc into the next 2sts, (worked in join stitch), join with sl st into first hdc Pic 6 (36 st)
Round 3 :
ch1 and 1hdc in same stitch, 2hdc in next st, 1hdc, 2hdc, hdc in next 8st, 1dc, *2dc,1dc,2dc,1dc,2dc* repeat, 1dc, hdc in next 8st, *2hdc,1hdc* repeat x1, finishing in the last st, sl st into 1st hdc Pic 7 (46 st)
Info :
Now we will move onto the upper part of the bootie
Round 4 :
ch1 keep loose Pic 8: Back Post hdc (BPhdc) into each stitch of Round 3 Pic 9,10, join with sl st into first hdc Pics 11-12 (46st) Tutorial for hdc in backposts https://www.youtube.com/watch?v=yKfXAsHmg5o NOTE: the first stitch is quite tricky to pull through, but the rest are much easier.
Round 5 :
ch1, sc into same st as ch1, sc in next 45sts, join with sl st into first sc (46st)
Round 6 :
ch1, sc into same st as ch1, sc in next 10sts, hdc in next 2st, dc2tog 10x Pic13, hdc in next 2sts, sc in next 11sts, join with sl st into first sc (36st)
Round 7 :
ch1, sc into same st as ch1, sc in next 9st, hdc in next 2st, dc2tog 6x, hdc in next 2st, sc in next 10st, join with sl st into first sc (30st) Pic14,15,16
Round 8 :
ch1, sc into same st as ch1, sc in next 11sts, dc2tog 3x, sc in next 12sts, join with sl st into first sc (27st) Pic 17
— The Cuff :
Info :
Cuff is made with 'rib st' In this technique you simply work a sc into each of the back loops of the sc on the previous row, then turn and repeat. We make a chain - the number of st (+1) for the desired depth of the rib, and then every odd row we 'join as we go' by picking up the st's from Round 8 as described below in 'Row1' Pic19,20
Info :
NOTE: do not cut yarn ch15 for fold down cuff, Pic18, ch9 for shorter cuff (st number in brackets)
Row 1 :
sc in 2nd ch from hook, sc in each ch, (back to bootie). Working on RS, pick up a loop from very first st of Round 8, and pick up a loop from next 2sts of Rnd 8, (Pic19 4 loops on hook) yo and pull through all 4 loops Pic20 14st rib (8st rib)
Row 2 :
turn, sc in BLO of each of the 14(8)sts, ch1 Pic21 14st rib (8 st rib)
Row 3 :
turn, sc in BLO of each of the 14(8)sts, ch1, (back to bootie), pick up a loop (from same st of Round 8 where last loop was picked up from), and pick up a loop from next 2sts of Rnd 8, (4 loops on hook) Pic19 yo and pull through all 4 loops Pic20 14st rib (8st rib) PicA shows short cuff option NOTE: count each stitch in your odd rows ...st 14(8) can be hard to find, you may need to 'dig' for it Pic22
Row 4 :
turn, sc in BLO of each of the 14(8)sts, ch1
Row 5-26 :
Repeat Row 3,4 11x (to Row26) Pic23
Row 27 :
This row we will join to the unused loops of the ch (which we worked Row 1 into) to join up the cuff. turn, and place a SM (SM1) in the back loop of the first stitch you will work into for the next row. Pic24 Red SM, now turn boot inside out, count the unused loops of the chain, down to the boot and mark the 13th (7th) one with another SM (SM2) Pic24 Black SM, sc through first loop Pic24 needle showing, AND back loop of first st of Row 26 (this is the loop with SM1), sc through (ch loop and Row 26 BLO) for 12 (6) more sts, working last sc into the 13th (7th) loop with the SM2 [14th (8th)st does not need to be worked - it is v hard to find]. Cut a tail, Pic25 and sew it into boot and this will act as the 14th(8th)st Pic26,27 Secure and trim off loose end. Pic28 shows boot RS
Info :
Make second boot using same instructions
— Pattern - Size 1 (Fingering/4ply yarn) Instructions :
Info :
We begin at the centre of the sole, using 4ply/Fingering yarn and 3.25mm hook chain13
Round 1 :
2dc into 2nd chain from your hook Pic 29, then dc into next 10sts, 5dc into last st (which will take you around the corner. Take the 'tail' with you Pic 30) dc into each of the 10 lower loops of the chs, (taking the tail with you to neatly conceal it Pic 31), 3dc in last st, join with sl st into ch before first dc Pic 32 (30st)
Round 2 :
ch1 and 2hdc in same st Pic 33, 2hdc in next, hdc in next 10sts, 2hdc into the next 5sts, hdc in next 11sts, 2hdc into the next 2sts, join with sl st into first hdc Pic 34 (39 st)
Round 3 :
ch1 and 1hdc in same st, 2hdc in next st, 1hdc, 2hdc in the next st, hdc in next 10sts, 1dc, *2dc,1dc,2dc,1dc,2dc* repeat from *to* x1, 1dc, hdc in next 10sts, 2hdc, 1hdc, 2hdc, sl st join of previous round, sl st into first hdc Pic35 (50st)
Info :
NOTES: You can cut off loose tail from beginning of sole at this point, as we have carried it through. Pics 31-37 show RS, Pic 38 shows WS (inside of bootie)
Round 4 :
ch1, Back Post hdc (BPhdc) into each st of Round 3 Pic 36 (needle showing), Pic 37, join with sl st into first hdc Pic38 (50st) Tutorial for BPhdc https://www.youtube.com/watch?v=yKfXAsHmg5o NOTE: the first stitch is quite tricky to pull through, but the rest are much easier.
Round 5 :
ch1, hdc in same st as ch1, hdc into each stitch, join with sl st into 1st hdc (50st) Pic 39
Round 6 :
ch1, sc into same st as ch1, sc in next 11sts, hdc in next 2sts, dc2tog 11x, hdc in next 2sts, sc in next 13sts, (last st in join) join with sl st into first sc (40st) Pic 40
Round 7 :
ch1, sc into same st as ch1, sc in next 10sts, hdc in next 3sts, dc2tog 6x, hdc in next 3sts, sc in next 11sts, join with sl st into first sc (34st) Pic 41
Round 8 :
ch1, sc into same st as ch1, sc in next 11sts, hdc in next 2sts, dc2tog 3x, hdc in next 2sts, sc in next 12sts, join with sl st into first sc (31st) Pic 42
— The Cuff (rib st described on pg3) :
Info :
NOTE: do not cut yarn ch15 for fold down cuff, ch9 for shorter cuff (st number in brackets)
Row 1 :
sc in 2nd ch from hook, sc in each ch, (back to bootie) Pic43. Working on RS, pick up a loop from very first st of Rnd 8, and pick up a loop from next 2sts of Rnd 8, (Pic44 4 loops on hook) yo and pull through all 4 loops Pic45 14st rib (8st rib)
Row 2 :
turn, sc in BLO of each of the 14(8)sts, ch1 Pic46 14 st rib (8 st rib)
Row 3 :
turn, sc in BLO of each of the 14(8)sts, ch1, (back to bootie), pick up a loop (from same st of Rnd 8 where last loop of Row 1 join was picked up) Pic47 needle showing, and pick up a loop from next 2sts of Rnd 8, (4 loops on hook) Pic44 yo and pull through all 4 loops Pic45 14st rib (8st rib) NOTE: count each st in your odd rows - st14(8) can be hard to find, you may need to 'dig' for it Pic48 needle showing
Row 4 :
turn, sc in BLO of each of the 14(8)sts, ch1
Row 5-30 :
Repeat Row 3,4 13x (to row30) Pic49
Row 31 :
This row we join to the unworked loops of the chain (which we worked Row 1 into) turn, and place a SM (SM1) in the back loop of the first stitch you will work into for the next row Pic49 red SM. now turn boot inside out, count the back loops of the chain, down from the top and mark the 13th (7th) one with a SM (SM2) Pic49 silver SM, sc through first loop Pic49 needle showing, AND back loop of first st of Row 30 (this is the loop with SM1), sc through (ch loop and corresponding Row 30 BLO) for 12(6) more sts back to boot, working last sc into the 13th (7th) loop with the SM Pic50 [14th (8th)st does not need to be worked - it is very hard to find]. Cut a tail, and sew it into boot and this will act as the 14th (8th)st. Pic51,52 Secure and trim off loose end. Pic53 shows boot RS
Info :
Make second boot using same instructions
These classic booties are a delightful, timeless baby gift that you can make in an afternoon. Handcrafted with simple shaping and a cosy ribbed cuff, they look beautiful in natural or bright shades. Make a pair in each size and keep a stash of newborn gifts ready to go! 🧶👣