🧢 Beautiful ✨ Detailed πŸ’ Adorable

Claude the Cloud Amigurumi Pattern

Claude the Cloud Amigurumi Pattern
4.4β˜… Rating
2-3 Hours Time Needed
3.9K Made This
βœ‚οΈ

Beginner Friendly Level

Perfect for those just starting their crochet journey, with clear instructions and simple techniques

⏱️

Bite-Sized Project

Finishes in 2-4 hoursβ€”perfect for an afternoon of creative relaxation.

🧸

Cute Companion

An adorable friend to cherish, handcrafted with love to bring comfort and joy for years to come.

About This Claude the Cloud Amigurumi Pattern

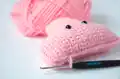
Claude the Cloud is a small, no-sew amigurumi cloud you crochet in rows and assemble by crocheting the pieces together. The pattern creates a soft, rounded cloud with embroidered cheeks and mouth and safety eyes for a cute face. It uses basic single crochet, increases and decreases, making it ideal for new crocheters.

Claude the Cloud Amigurumi Pattern crochet pattern - detailed view of completed project

You make two identical pieces and join them with single crochet while stuffing for a seamless finish. The pattern is easy to customize with different colors or yarn weights to change the final size.

Why You'll Love This Claude the Cloud Amigurumi Pattern

I absolutely love this pattern because it turns a few simple rows of single crochet into an irresistibly cute cloud with personality. I enjoy that it requires no sewing β€” you crochet the two pieces together for a neat finish. The design is quick to make, so you can finish one in an afternoon and gift it right away. It also invites so many fun customizations, from color choices to tiny embroidered expressions.

Claude the Cloud Amigurumi Pattern step 1 - construction progress Claude the Cloud Amigurumi Pattern step 2 - assembly progress Claude the Cloud Amigurumi Pattern step 3 - details and accessories Claude the Cloud Amigurumi Pattern step 4 - final assembly and finishing

Switch Things Up

I love how easy it is to customize this pattern by changing colors β€” try soft pastels, rainbow stripes, or even a variegated yarn for a unique cloud.

To make the cloud bigger or smaller, I change the yarn weight and hook size; using bulky yarn creates a squishy, larger cloud while fingering weight makes a tiny pocket version.

I often replace safety eyes with embroidered eyes for a baby-safe toy or use smaller safety eyes for a different expression.

Try adding a small loop at the top to turn the cloud into a keychain or bag charm β€” just crochet a few extra stitches and secure firmly.

For extra texture, I sometimes work the pieces in half double crochet or use a bobble stitch on the front piece to give a fluffy surface.

I like to experiment with different mouth styles β€” a simple straight stitch, a smile, or a surprised 'O' completely changes the cloud's personality.

If I want a posable piece, I add thin wire into the stuffing of the bottom edge or inside the sides so I can slightly bend the cloud into a display shape.

Make a matching set in complementary colors and embroider different cheek styles β€” tiny hearts, freckles, or blush dabs are all adorable.

Try substituting a fuzzy or boucle yarn for a super soft, plush cloud β€” just be careful with small safety eyes on very fuzzy yarns.

I also like turning the cloud into seasonal decor by adding tiny felt raindrops, a miniature hat, or an appliqued moon for a nighttime theme.

Common Mistakes & How to Fix Them

βœ— Skipping stitch markers during the row-to-row work leads to losing track of your turns; place a stitch marker in the last stitch of each row and move it as instructed to keep your counts accurate. βœ— Not stuffing as you join the pieces makes shaping difficult and leaves lumps; stuff gradually while crocheting the two pieces together, focusing on the three corners to get the round shape. βœ— Placing safety eyes too close or uneven causes an unbalanced face; add the safety eyes between rows 11 and 12 and between rows 17 and 18, checking height and vertical centering before securing them. βœ— Cutting yarn and hiding ends too late can tangle your work and complicate finishing; cut the yarn and hide ends as directed at the end of the front piece and after completing the back piece to keep things tidy.

Claude the Cloud Amigurumi Pattern

Make an adorable Claude the Cloud with this beginner-friendly amigurumi pattern. You will crochet two identical cloud pieces and join them together β€” no sewing required. The design is small and portable, perfect for gifts or a quick handmade project. Clear round-by-round instructions and simple materials make this a relaxing, satisfying make.

Beginner Friendly 2-3 Hours

Materials Needed for Claude the Cloud Amigurumi Pattern

β€” Main Fabric

  • 01
    Yarn in the colors: blue/white/rose or any other color you want your cloud to be
  • 02
    Yarn strength: DK, light worsted, number 3 yarn (approx 120-150m/50g)
  • 03
    Small amounts of black yarn or embroidery floss for the mouth
  • 04
    Small amounts of rose or pink yarn or embroidery floss for the cheeks

β€” Tools Required

  • 01
    Crochet hook size 3 mm (US C/2 or D depending on brand)
  • 02
    Stitch markers (use a stitch marker in the last stitch of each round, moving it up as you go)
  • 03
    Safety eyes 9 mm (2 pieces)
  • 04
    Embroidery needle
  • 05
    Yarn needle for sewing in ends
  • 06
    Scissors
  • 07
    Polyester stuffing

Progress Tracker

0% Complete

β€” Cloud Front-Piece :

Round 1 :

Ch 9, turn (9)

Round 2 :

Inc, 7 sc, turn (9)

Round 3 :

Ch 1, 8 sc, inc, turn (10)

Round 4 :

Ch 1, inc, 9, turn (11)

Round 5 :

Ch 1, 10 sc, inc, turn (12)

Round 6 :

Ch 1, 12 sc, turn (12)

Round 7 :

Ch 1, 12 sc, turn (12)

Round 8 :

Ch 1, inc, 11 sc, turn (13)

Round 9 :

Ch 1, 13 sc, ch 6, turn (19)

Round 10 :

1 sc, in second ch from hook, and next 17 sc (18)

Round 11 :

Ch 1, 17 sc, inc, turn (19)

Round 12-18 :

Ch 1, 19 sc, turn (19)

Round 19 :

Ch 1, 17 sc, dec turn (18)

Round 20 :

Ch 1, dec, 16 sc (17)

Round 21 :

Ch 1, 13 sc, keeping the last 4 stitches unstitched (13)

Round 22 :

Ch 1, dec, 11 sc, turn (12)

Round 23 :

Ch 1, 12 sc, turn (12)

Round 24 :

Ch 1, dec, 10 sc, turn (11)

Round 25 :

Ch 1, 9 sc, dec, turn (10)

Round 26 :

Ch 1, dec, 8 sc, turn (9)

Round 27 :

no chain, 7 sc, dec, turn (8)

Round 28 :

no chain, dec, 6 sc (7)

Info :

Cut yarn. Hide yarn ends.

β€” Cloud Back-Piece :

Info :

Make the back-piece the same way as the front-piece, but don't cut the yarn.

Info :

Once the second piece is finished, hide the other yarn end.

Info :

Add the safety eyes in one of the pieces, between row 11 and 12 and 17 and 18. Check that the eyes are on the same height and vertically in the middle of the piece.

Info :

Lay the pieces flat onto each other. Now crochet them together with a sc. We begin where we made the last stitch. Continue to stuff the cloud while crocheting along.

Info :

Make sure, the cloud is very firmly stuffed, especially add stuffing at the three corners. This way the cloud gets the cute round three-dimensional shape that we want.

Info :

Cut a piece of black yarn or embroidery-floss and embroider on the mouth. Then embroider on the cheeks with a few stitches.

Assembly Instructions

  • Add the safety eyes between rows 11 and 12 and between rows 17 and 18 on one piece, ensuring they are at the same height and centered vertically.
  • Lay the front and back pieces flat together, aligning edges, and begin crocheting them together with single crochet where the last stitch was made.
  • Stuff the cloud gradually while you crochet the two pieces together, adding extra stuffing at the three rounded corners for a full three-dimensional shape.
  • Make sure to stuff the cloud firmly but evenly to avoid lumps; continue stuffing as you work along the edge before closing fully.
  • Embroider the mouth with black yarn or floss and add a few stitches of pink or rose yarn for the cheeks once the cloud is closed.

Important Notes

  • πŸ’‘Use a stitch marker in the last stitch of each row and move it as you work to keep track of your turning and stitch counts.
  • πŸ’‘Turning-chains are not counted as a stitch in this pattern; follow row instructions exactly to maintain correct shaping.
  • πŸ’‘You crochet two identical pieces and join them together with single crochet, so no sewing is required for assembly.
  • πŸ’‘Stuff the cloud firmly, especially at the three corners, to achieve the cute rounded three-dimensional shape shown.

Claude the Cloud is a tiny, delightful amigurumi perfect for gifting or decorating nurseries and desks. Make one in pastel pink, baby blue, or any color you love and watch it bring smiles. Share your finished cloud with me β€” I love seeing your creations! 🧢 ☁️

You ask,

we answer.

FAQs

What size will the finished piece be?

The size of the finished cloud is approximately 7 cm x 13 cm when using DK/light worsted yarn and a 3 mm hook, as noted in the pattern.

Can I use different yarn weights for this pattern?

Yes, you can use different yarn weights but the final size will change; use an appropriate hook for your yarn and check proportions.

Do I need to sew pieces together for this no-sew pattern?

No, this pattern is designed to be crocheted together with single crochet along the edges, so no sewing is needed for assembly.

How long does this project typically take to complete?

Most crocheters finish this bite-sized project in about 2-3 hours, though time may vary based on experience and customization choices.