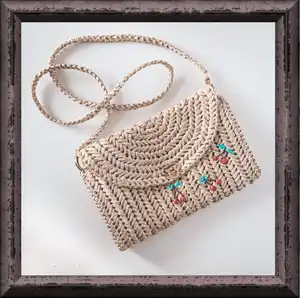
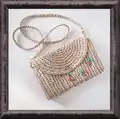
Make a stylish raffia clutch using simple crochet techniques and clear step-by-step photos. This pattern guides you through crocheting the canvas, shaping the base, adding side panels, and finishing with a lock, strap and charming embroidery. Youll learn tips for working with raffia yarn so your clutch looks neat and professional. Perfect for gifting or making a beautiful everyday accessory.
Progress Tracker
0% Complete
— Materials and tools :
Info :
Raffia yarn Fibranatura, 3 skein/ 90 m (or Ispie, 1 clean / 250 m). For example, I using raffia yarn Fibranatura, colour 116-02; Any raffia yarn of brown, red and green colour for embroidery; Hook N3 - 3 mm. You can take a hook 3 1/2-4 mm, if you crochet tightly; 2 snap hook rings with eyelet or 2 snap hook, 30 mm; 1 small lock; Scissors; 2 markers; Small Phillips screwdriver; Lining (the process of how to make the lining are not included in this tutorial); Sewing thread and needle; Iron.
— Recommendation for working with raffia yarn :
Infos :
1. Before crocheting with raffia, it must be straightened. If you have Fibranatura, then you need to «fluff» the yarn with your hands. If you have Ispie, you can steam yarn with an iron. 2. When crocheting with raffia, so that there are no holes in the canvas when crocheting the SC, we pull the working thread to the level of the hook. 3. When the thread runs out, you need to take a new skein and straighten the end of the thread. Put on the end of the working thread and the thread from a new skein with a clearance of 2/8 inches (1/2 cm). Glue together with PVA glue. After drying, lightly wrap the thread. 4. If you had to rip out your work, steam thread with an iron. The yarn will return to its original shape.
— Abbreviation :
Info :
CH - chain stitch, SLST - slip stitch, SC - single crochet, Inc - increase (2 SC in 1).
— Crochet the canvas :
Info :
Leave the end of the thread about 59 inches (1,5 m) long. Crochet the chain of 51 CH with 2 threads. For that: crochet CH, make the yarn over with the end of the thread, crochet 2 loops together. Make the yarn over again with the end of the thread, crochet and continue so on.
Info :
Crochet the clutch with «herringbone» stitch. For that, we need to insert the hook on the left leg of the previous SC and crochet next SC. The thread not be twisted. Be careful, that the thread is always facing with the front side to you. Crochet the stitches very loosely. Pull out the loop at least 25/64 inches (1 cm).
Round 1 :
Insert the hook in the 2nd stitch, pull out the loop. Insert the hook in the next stitch, pull out the loop. There are 3 loops on the hook now. Crochet these. Insert the hook in the left leg of the previous SC. Insert the hook under the next stitch, pull out the loop, crochet SC made out of the 3 loops and continue so on. There are 48 SC to the end of the chain. Crochet 4 SC in the last loop of the chain. Turn and crochet 49 SC (2 SC in the last loop), CH.
Info :
Place the markers in the 1st and 4th loops, where it is 4 SC in 1.
Round 2 :
Turn over the canvas wrong side to you. Yarn to front of work now. Crochet this and all even rows from yourselves. 48 SC (first SC on 2 loops), 4 Inc, rearrange the markers in the 1st and last loop of the increases, 49 SC (2 SC in the last loop), CH.
Round 3 :
48 SC (first SC on 2 loops), (Inc, SC)*4, rearrange the markers in the 1st and last loop of this part of the row, 49 SC (2 SC in the last loop), CH.
Round 4 :
48 SC (first SC on 2 loops), (Inc, 2 SC)*4, rearrange the markers in the 1st and last loop of this part of the row, 49 SC (2 SC in the last loop), CH.
Round 5 :
48 SC (first SC on 2 loops), (Inc, 3 SC)*4, rearrange the markers in the 1st and last loop of this part of the row, 49 SC (2 SC in the last loop), CH.
Round 6 :
48 SC (first SC on 2 loops), (Inc, 4. SC)*4, rearrange the markers in the 1st and last loop of this part of the row, 49 SC (2 SC in the last loop), CH.
Round 7 :
48 SC (first SC on 2 loops), (Inc, 5 SC)*4, rearrange the markers in the 1st and last loop of this part of the row, 49 SC (2 SC in the last loop), CH.
Round 8 :
48 SC (first SC on 2 loops), (Inc, 6 SC)*4, rearrange the markers in the 1st and last loop of this part of the row, 49 SC (2 SC in the last loop), CH.
Round 9 :
48 SC (first SC on 2 loops), (Inc, 7 SC)*4, rearrange the markers in the 1st and last loop of this part of the row, 49 SC (2 SC in the last loop), CH.
Round 10 :
48 SC (first SC on 2 loops), Inc, rearrange the marker in 1st loop of the Inc, 8 SC, Inc, 5 SC, 2 CH, skip 2 loops of the previous row, SC on the 2 loops, SC in 2nd loop, 8 SC, Inc, 8 SC, rearrange the marker in the 8th SC, 49 SC (2 SC in the last loop), CH.
Round 11 :
48 SC (first SC on 2 loops), Inc, remove the marker, 9 SC, Inc, 9 SC, crochet 2 SC over CH, Inc, 9 SC, Inc, 6 SC, remove the 2nd marker, 49 SC (2 SC in the last loop).
Info :
Don't cut the thread. Crochet more rows, if you want a bigger clutch. Crochet +1 SC between increases in the each next row.
— Crochet the base trim :
Info :
3 SC in 1 (last loop of the row), 19 SC in the each row, 3 SC in 1. Cut the thread, pull out the end in the loop. Insert the hook under the 1st loop of the row, pull out the end, tighten the end back to the wrong side. Strengthen and hide the end.
Info :
Steam with an iron on the wrong side. Then, shape with hands. The raffia yarn easily takes shape.
— Install the top part of the lock :
Info :
Insert the top part of the lock in the hole. Straighten the yarn from the wrong side, so that the canvas does not cover the holes. Cover the second part of the lock. Insert the bolts and tighten with a small Phillips screwdriver.
— Side part (*2) :
Info :
Leave the end of the thread about 12 inches (30 cm) long. Crochet the chain of 20 CH with 2 threads.
Round 1 :
Crochet from 2nd loop of the hook: 17 SC, 4 SC in 1, 18 SC, CH.
Info :
Place the markers in the 1st and 4th loops, where it is 4 SC in 1.
Round 2 :
17 SC, 4 Inc, 18 SC (2 SC in the last loop). Cut the thread. Pull out the end trough the last loop. Tie the knot with the both ends on the wrong side, cut and hide the end. Crochet the second another side part.
Info :
Steam with an iron both the side parts.
— Assembly :
Info :
Join the canvas and the right side part by its wrong sides to each other. Insert the hook on both parts in the top corner, pull out the loop. Crochet 19 SC in the each loop on the both parts. Then crochet 2 SC in 1 loop of the side part, but in the each loop of the canvas (to form a bend). Next, crochet 3 SC on both parts, and again, crochet 2 SC in 1 loop of the side part, but in the each loop of the canvas (to form a 2nd bend). Then 18 SC on both parts. Cut the thread. Make a fastening stitches at the beginning and at the end of crocheting. Shape the seam with hands.
Info :
Count 45 loops on the other side of the canvas. Place the marker. Put the ruler perpendicular to the canvas and check that the marker is on the opposite side of the last stitch of the right side.
Info :
Join the left side part and the canvas by its wrong sides to each other. Insert the hook in the place where the marker is at and pull out the loop. Crochet 18 SC in the each loop on the both parts. Then crochet 2 SC in 1 loop of the side part, but in the each loop of the canvas (to form a bend). Next, crochet 3 SC on both parts, and again, crochet 2 SC in 1 loop of the side part, but in the each loop of the canvas (to form a 2nd bend). Then 18 SC on both parts. Cut the thread. Make a fastening stitches at the beginning and end of crocheting. Shape the seam with hands.
Info :
Strengthen and hide all the ends on the wrong side. Steam the seams with an iron, form the bottom and the bend on the valve.
— Install the lower part of the lock :
Info :
Close the valve, and position the lower part of the lock to where it is supposed to be. Insert this part on the middle of the canvas. In my example, 9 rows below the edge. Put the holder on the back side on the antennae. Try to close the lock. Tighten the antennae, if everything is ok.
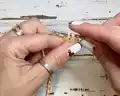
— Crochet the i-cord :
Step 1 :
Insert the hook through eyelet of the snap hook ring, pull out the loop. Twist clockwise. Crochet CH.
Step 2 :
Crochet 2 SC (crochet in the end), CH, turn; 2 SC, turn.
Step 3 :
Insert the hook under left leg of the SC previous row, pull out the loop, SC, turn;
Step 4 :
Insert the hook under 2 loops of the SC previous row, pull out the loop, SC, turn;
Step 5 :
Repeat to the required length. In my example, about 43 inches (110 cm).
Step 6 :
Take the 2nd snap hook ring. Crochet 2 SC trough the eyelet. Cut the end. Pull the end SC on the wrong side, strengthen and hide between loops.
— Embroidery :
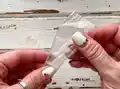
Step 1 :
Twist along a small piece of brown raffia yarn. Fold in half, thread the ends on the wrong side. Pull out one of the ends to the front side. Intercepting the middle of the peduncle and tighten it to the wrong side. You should get an inverted V.
Step 2 :
Make a few stitches with green raffia yarn at the base of the peduncle.
Step 3 :
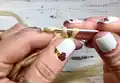
Twist a ball of red raffia yarn.
Step 4 :
Straighten a piece of red raffia yarn, put a ball. Stretch the ends to the wrong side and tie a knot. Forming the second cherry. Hide all the ends.
Step 5 :
Make the required number of a cherries.
— Sew in the lining :
Info :
The lining should repeat the shape of the bag. Put the lining inside. Straighten the lining inside with your hands. You can also pin with pins. Sew in the lining to the bag with the hidden stitches. Thread the needle over the edge of the lining. Make fastening stitches in the corners. Steam the seam with an iron through a damp cloth on the wrong side.
Info :
Fastening the belt to the bag.
Info :
Congratulations! Your cute clutch is ready.
This raffia clutch pattern is designed to help you create a polished, structured bag with a handmade touch. Follow the step-by-step photos and notes to work confidently with raffia yarn and get clean results. Add cherries or your own embroidery to make it uniquely yours. 🧶💖