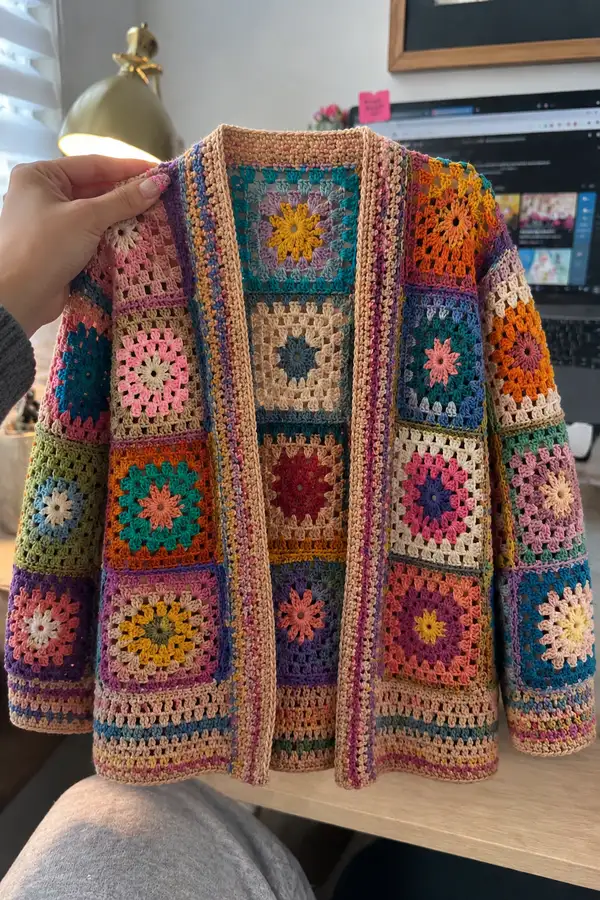
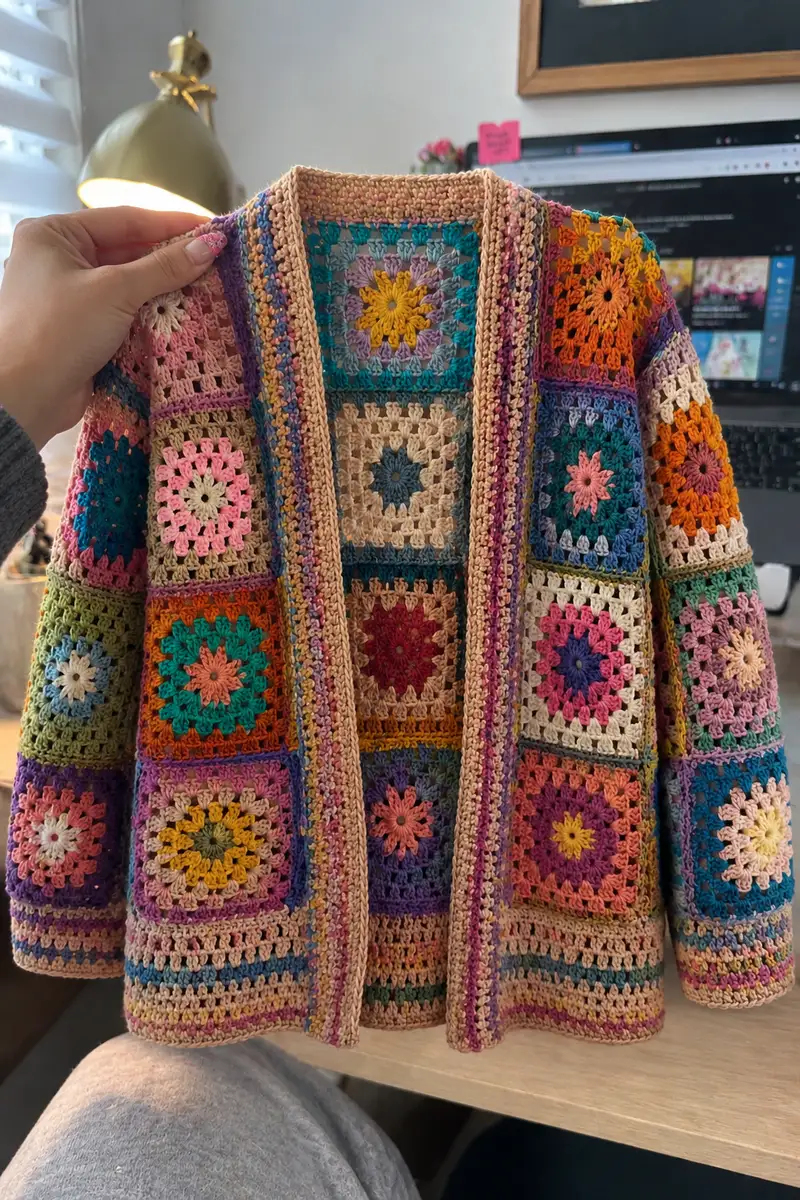
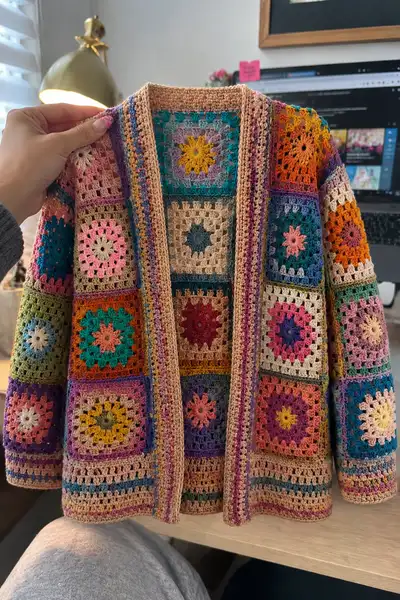
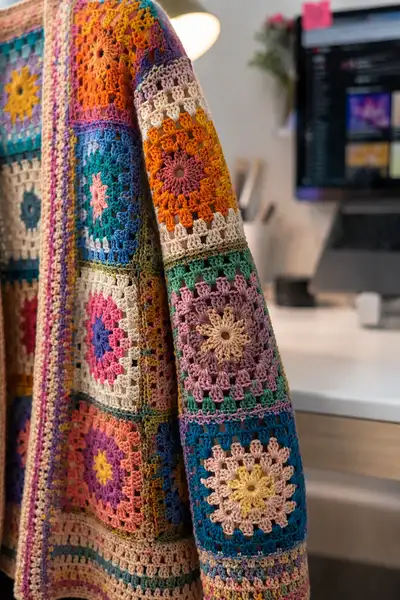
A vibrant, festival-ready granny square cardigan made from multicolored, floral-centered granny squares joined into a relaxed open-front jacket. This pattern recreates the sunburst centers, warm beige borders, and a textured ribbed band seen in the photo. Perfect for layering at Burning Man or an everyday boho statement piece.
Progress Tracker
0% Complete
— Overview and Gauge :
Info :
This cardigan is constructed from modular granny squares joined into 3 panels: Back panel (4 columns x 4 rows = 16 squares), Left Front (2 columns x 4 rows = 8 squares), Right Front (2 columns x 4 rows = 8 squares), and Sleeves (2 columns x 3 rows each = 6 squares per sleeve). Total squares: 38. Gauge: Each finished square measures approximately 12 cm (4.7 in) after blocking when worked with worsted weight yarn and 4.0mm hook. Final cardigan (after assembly) approximates a women's Small-Medium: chest 96-100 cm (38-39 in), length 60 cm (23.5 in) from shoulder to hem. Adjust square size by changing hook or yarn weight.
Info :
Before you start: plan your color layout on a table or design board. This pattern includes specific rounds for the floral center, classic granny-style expansion, and two rounds of neutral/beige framing before the joining round. Block squares flat before joining for neater edges and consistent sizing.
— Granny Square (Make 38 total; color your way) :
Round 1 :
With Color A (center color). Make a magic ring. Ch3 (counts as dc), 11 dc into ring. Join with sl st to top of ch3. (12 dc total)
Round 2 :
Change to Color B (petal color). Ch3 (counts as dc), 2 dc in same st, ch2, *3 dc in next st, ch2* repeat around 3 times. You will have 4 groups separated by ch2 corners. Join with sl st to top of ch3. (4 corner clusters of 3 dc = 12 dc, with 4 ch2 corners)
Info :
This creates a floral/cluster center with 4 corner chain-2 spaces that will form square corners. If you prefer an 8-petal center, you can substitute a starburst round: ch1, sc into each dc and chain spaces to make a petal round. The above retains a classic granny silhouette for straightforward joining.
Round 3 :
Join Color C. Sl st to nearest ch2 corner space. In corner space make (3 dc, ch2, 3 dc). *Along the next side between corners: ch1, 3 dc in same space (this forms side cluster), ch1, then in next corner space work (3 dc, ch2, 3 dc).* Repeat for all four sides. Join with sl st. After this round the square begins to take shape. (Corners: 4 x (3+3) = 24 dc; plus side clusters 4 x 3 = 12; total dc approx 36 depending on ch1 placements)
Round 4 :
Change to Color D. Sl st to next ch1 side space. Ch3, 2 dc in same space, ch1, 3 dc in next side space, ch1; in each corner space: (3 dc, ch2, 3 dc). Continue around placing 3-dc clusters in every ch1 side space and corner clusters in every ch2 corner. Join with sl st. This is a typical granny expansion round; square will widen evenly. (Expected stitch count increases by about 12 dc this round)
Info :
Rounds 3-5 follow the classic granny expansion principle: each round adds one 3-dc cluster into every side space between corners. Track the number of side clusters per side to keep squares symmetrical. Use stitch markers if needed to note the corner spaces on future rounds.
Round 5 :
Change to Color E. Repeat pattern: In every corner: (3 dc, ch2, 3 dc). In each side chain space between corners make 3 dc clusters separated by ch1. Join with sl st. Your square should now look square-ish with distinct corners and evenly spaced side clusters. (Approximate total dc: 36 + 12 = 48)
Round 6 :
Change to Color F (or same as D for continuity). Repeat as in Round 5: work corners and place 3-dc side clusters in all side spaces. Join with sl st. (Approx. 60 dc total)
Round 7 :
Change to neutral/beige color (this will begin the framing and make joining unified). Work one round of classic granny but place (3 dc, ch1, 3 dc) in corner spaces to result in a slightly taller corner ch1 for easier joining. Fill sides with 3 dc clusters in each side space. Join with sl st. (Approx. 72 dc)
Round 8 :
With neutral/beige. Work one more framing round: in each st along side work 1 dc to create a flat square face, but at corners work (dc, ch2, dc) to maintain turning points. This round evens out sides and creates a solid surface for joining. After this round, block square flat to target size (approx 12 cm).
Round 9 :
Final border round in beige: Ch1, sc evenly around placing 3 sc into each corner space (adjust to keep corners square). Fasten off leaving a long tail for weaving or joining. This sc-round makes a neat edge for join-as-you-go or whip stitch joins. (Edge will have even stitch count aligned with previous round)
Info :
Make total squares as follows: Back panel: 4 columns x 4 rows = 16 squares. Left front: 2 x 4 = 8 squares. Right front: 2 x 4 = 8 squares. Sleeves: 2 x 3 each = 6 squares per sleeve (12 total). Total squares = 44. You may choose to make fewer squares for a cropped version or more squares for longer length.
— Blocking and Square Preparation :
Info :
Block each square to the same size before joining. Wet-block or steam lightly and pin to a 12cm square template, stretching gently to true shape. Allow squares to dry fully. Blocking ensures even join lines and predictable garment dimensions.
Info :
Weave in loose ends temporarily but leave tails from the final beige round for joining. Label squares by position using small clips or pins to avoid assembly confusion.
— Joining Squares Into Rows (Join-as-you-go or single crochet join) :
Info :
We recommend join-as-you-go using slip stitches or single crochet into the sc border for a neat seam. Alternatively, use mattress stitch or whipstitch with the beige tail. The following uses a single crochet join (visible ridge) in beige for a defined grid like the photographed cardigan.
Round 1 (Join Rows) :
Lay out the first row of squares (4 squares for back row; 2 for front rows). With RS facing you and neutral yarn attached to lower right corner sc of first square, sc evenly through both sc borders of adjacent squares across the seam to join them horizontally. Work 1 sc in each sc stitch across joining edge. Fasten off at row end. Repeat for each horizontal row.
Info :
When you join squares horizontally, keep tension even so joined rows lie flat. Use blocking pins if seams pucker. Join rows into strips first: back rows (4 squares wide), front rows (2 squares wide), sleeve rows (2 squares wide).
Round 2 (Join Vertical Seams) :
After horizontal rows are joined into strips, stack rows on top of each other in correct order. With RS facing, sc through aligned sc borders vertically to join rows column by column. Work neat even sc in each sc stitch to create a strong seam. Fasten off. Repeat for all vertical seams until panels are complete.
Info :
Check seam placement frequently so squares remain aligned; small misalignments magnify across many squares. Slight adjustments can be made by unpicking a short section and re-seaming.
— Back Panel Assembly :
Round 1 :
Make four horizontal strips of 4 squares each (4 columns x 4 rows layout). Join horizontally as described, then join rows vertically to create a 4x4 square block (16 squares). The finished block forms the back panel. Press/block the assembled panel flat.
Round 2 :
If desired, add an extra round of even dc in beige around the outer edge of the entire back panel to create a uniform outer edge for joining the front panels and sleeves. Work 1 dc in each sc stitch along the perimeter, placing (2 dc, ch2, 2 dc) in corners to keep shape.
Info :
When you add the outer round, count your edge stitches to inform seam placements for the shoulders and armholes. The measured width (4 squares across) should equal the combined width of the front panels plus the body opening for the front band.
— Right and Left Front Panels :
Round 1 :
Make two front panels by joining 2 columns x 4 rows of squares (8 squares each). Join horizontally and vertically as described to create neat rectangular panels. Ensure right and left mirror each other in color placement and orientation.
Round 2 :
Add an outer dc frame in beige, working 1 dc in each sc along the perimeter, with (2 dc, ch2, 2 dc) at corners. For the front inner edge (the opening edge), do NOT add the same tall band here — the tall front band will be worked after assembly for consistency.
Info :
Place a stitch marker at the top corner positions marking shoulder seam lines (for example at the top 2 rows). This helps when aligning fronts to the back for shoulder joining.
— Sleeves (Make 2) :
Round 1 :
Make sleeve strips: 2 columns x 3 rows = 6 squares per sleeve. Join horizontally and vertically to make a narrow rectangular sleeve panel. The assembled sleeve should form a tube when its short edges are seamed together.
Round 2 :
After joining the 6 squares, fold the sleeve panel with RS together and seam the short sides using slip stitch or mattress stitch to form a cuff opening. Leave the seam neat and flat. Repeat for second sleeve.
Info :
Sleeves will be slightly boxy. If you prefer tapered sleeves, reduce the number of squares in upper rows or use shaping when seaming sleeve cap to armhole.
Round 3 :
With beige yarn, work a single round of dc around the wrist edge (cuff) of each sleeve: 1 dc in each sc along the seam and border. At seam position, place an extra dc to even the stitch count. Fasten off.
Round 4 :
Optional: Work two rounds of alternating 1 sc and 1 hdc in beige to create a neat cuff band. Use BLO on second round to create a ribbed cuff effect.
Info :
If you want the sleeves to match the body hem, add the shell hem rounds described later to the sleeve cuff as well so the look is cohesive.
— Shoulder Join and Body Assembly :
Round 1 :
Position the left and right front panels on top of the back panel aligning top edges. Mark shoulder width: leave approximately 3-4 squares (or the equivalent in width) centered across the back for shoulder placement so that the front panels overlap the back by one square width at each shoulder. With RS facing, seam shoulders using single crochet or mattress stitch through the topmost two rows only. This forms a neat, slightly dropped shoulder like the pictured jacket.
Info :
For a more fitted shoulder, reduce the number of joined rows at the shoulder (join only the top row). For a slouchy shoulder (like pictured), join top two rows to form longer drop shoulder.
Round 2 :
Sew sleeves into armholes: Slide the sleeve tube into armhole, aligning seam lines (center seam of sleeve to side seam of body). Pin sleeve evenly and sew around with whipstitch or sl st using beige yarn so seam sits flat and even. Repeat for second sleeve.
Info :
Tacking the sleeve in place with a few temporary large stitches before sewing will keep the sleeve from shifting and ensure the squares align across the seam. Use extra whipstitches at underarm for durability.
— Front Band and Collar (Tall Ribbed Band) :
Info :
The band is worked after panels are assembled. It creates the strong neutral frame seen in the photo. Work in beige with a slightly smaller hook if you want a firmer band (3.5mm recommended for tighter ribbing).
Round 1 :
Starting at lower right front hem, join beige yarn to the base corner sc. Work sc evenly along the entire front edge up to neck opening, working 1 sc in each edge sc stitch. When you reach the neck, continue around the back neck edge by placing 1 sc in each sc along the back neck, then continue down the other front edge to the lower hem. This completes one round of sc all along the front opening and neck. Count the total sts to maintain evenness for following rounds.
Round 2-4 :
Work 3 rounds of sc in the back loops only (BLO) to create a subtle horizontal ridge. Keep tension even; place 3 sc in corner spaces where needed to keep edges flat.
Info :
The photographed band is fairly tall — plan for 12-16 rounds of rib-style texture total. Work additional rounds in BLO if you want a taller, firmer band. Blocking after a few rounds will help the band sit straight.
Round 5-12 :
Work a rib pattern in BLO: *Row (round) odd: sc BLO across; Row even: hdc BLO across.* Repeat these two rounds to build height. Alternatively, for a deeper rib effect: Row odd: sc BLO; Row even: sc FLO. Continue until band reaches approximately 10-12 cm (4-5 in) tall or your desired height. Fasten off and weave ends. This creates the tall framed front band like in the photo.
Info :
If you prefer a folded collar, create the band a little longer (extra 2-3 rounds) and fold inward; tack down with hidden stitches to create a firmer fold. The pictured band is not folded but wide and tall for a cozy frame.
— Decorative Hem and Lower Edge Shell (Optional but pictured) :
Round 1 :
With beige, join at lower edge. Work 1 dc in each sc along hem edge to create a solid foundation round. Place (2 dc, ch2, 2 dc) in corner spaces and work 1 dc in each sc along the sides.
Round 2 :
Change to an accent variegated color. *Shell row: Skip 2 sts, (5 dc) in next st, skip 2 sts, sl st in next st* Repeat around to produce scallop shells. Work extra shells at corners to maintain length. Fasten off.
Round 3 :
Return to beige. Work 1 round of sc around shells, placing 1 sc into the center dc of each shell to anchor them, creating a textured lower border like the photographed hem band. Fasten off and weave in ends.
Info :
The photographed cardigan includes alternating rows of color across the hem (striped variegated rounds). To emulate that, add 2-3 rounds of alternating color stripes before the final shell round: each stripe row = 1 dc around using striping colors of your choice.
— Final Finishing Touches :
Info :
Weave in all remaining ends carefully into the beige border so they are invisible. Use a yarn needle and weave each end back and forth through 3-4 rows of stitches. Trim close. Steam block the entire garment on a flat surface to set shape, making sure front band and hem lay flat and neat.
Round 1 :
Check shoulder seams and underarm seams for strength. Add a line of backstitches (with yarn needle and matching yarn) across the inside shoulder seams for reinforcement. Add an optional small hook-and-eye or snap at the top inside neck if you want a subtle closure.
Info :
Optional: Add small decorative tassels or pom-poms to corners or lower hem. Secure using extra stitching and ensure decorations are festival-proof if wearing to Burning Man (heat, dust, movement).
— Sizing and Adjustments :
Info :
To increase size: add one extra square column to back (making 3 columns per front and 6 across back as an example) or add extra rows for length. To decrease size: remove one row or column of squares. Adjust front band height proportionally to cardigan length.
Info :
Swapping to a different yarn weight: if you use DK weight, the squares will be smaller — add more squares to reach desired width and length. If you use bulky yarn, reduce the number of squares. Always block and measure as you go.
— Troubleshooting and Decorative Options :
Info :
For neater joins try join-as-you-go slip stitch method: during the final beige round of each square, work into the adjacent square's sc edge rather than finishing the round separately. This yields flatter, less visible seams. If using this method, plan joining order carefully.
Info :
For extra structure in the front band you can insert a narrow strip of interfacing or lightweight fusible tape inside the folded band before tacking down — do not use if you prefer fully handmade, soft drape. The pictured band appears soft, made solely from stitches without interfacing.
Info :
For festival durability, pick strong cotton or cotton-blend yarn; cotton stands up well to grit and heat but can be heavier. Acrylic gives more drape and is lighter but can pill. Choose fiber according to the events where you'll wear this piece.
This joyful granny square cardigan is a celebration of color, texture, and slow handmade craft. Each square is a tiny sunburst of color that comes together to make a wearable statement piece you can be proud of. The tall neutral band and neat shell hem give the jacket structure and vintage charm while letting the colorwork shine. 🧶 Make it for Burning Man, a chilly festival night, or as your daily wearable art — every stitch tells a story. Happy crocheting and wear your colors loud and proud! ✨