๐Ÿงถ Beautiful โœจ Detailed ๐Ÿ’ Adorable

Creeper Amigurumi Pattern

Creeper Amigurumi Pattern
4.6โ˜… Rating
5-7 Hours Time Needed
1.5K Made This
โœ‚๏ธ

Intermediate Level

Ideal for those with basic crochet experience, featuring slightly more advanced stitches and techniques to expand your skills.

โฑ๏ธ

Weekend Treat

Takes 5-7 hours, making it an enjoyable project to finish over a couple of days.

๐Ÿงธ

Cute Companion

An adorable friend to cherish, handcrafted with love to bring comfort and joy for years to come.

About This Creeper Amigurumi Pattern

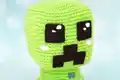
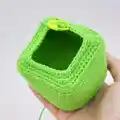
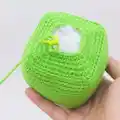
This pattern teaches you how to crochet a kawaii-style Creeper amigurumi, complete with head, body, feet and cute facial details. The instructions include every round and clear assembly notes so you can follow step by step. The finished toy measures approximately 15 cm tall using the recommended 2.5 mm cotton yarn and hook.

Creeper Amigurumi Pattern crochet pattern - detailed view of completed project

Youll find full round-by-round instructions, tips for embroidering the squares and cheeks, plus felt templates for the eyes and mouth. Enjoy personalizing colors and tiny details to make your Creeper unique.

Why You'll Love This Creeper Amigurumi Pattern

I absolutely love this pattern because it turns a blocky game character into a soft, kawaii companion you can hold. I enjoyed adapting classic Minecraft features into simple amigurumi shapes that stitch up quickly. I love how small details like felt eyes and embroidered squares bring so much personality to the toy. I also appreciate that the pattern is modularโ€”you can change yarn, size, or expression to create many adorable variations.

Creeper Amigurumi Pattern step 1 - construction progress Creeper Amigurumi Pattern step 2 - assembly progress Creeper Amigurumi Pattern step 3 - details and accessories Creeper Amigurumi Pattern step 4 - final assembly and finishing

Switch Things Up

I love experimenting with colorโ€”try soft pastels or neon shades instead of the classic green to create a playful version of the Creeper.

I often change yarn weight and hook size to make different sizes; using DK yarn with a 3.5 mm hook gives a slightly larger toy while thinner cotton makes a tiny keychain.

I sometimes replace felt eyes with safety eyes for a different finish, but be mindful of safety if the toy is for small children.

Embroider different facial expressions to change character: a smile, wink, or surprised mouth can completely alter the mood.

I add wire armatures inside legs for posability when I want the toy to stand or hold tiny propsโ€”just make sure to wrap wire ends safely.

Try adding a tiny scarf, hat or accessory to match seasons or holidays; I like making little seasonal outfits to gift multiple variants.

I recommend mixing yarn texturesโ€”try a slightly fuzzy yarn for accents or a variegated yarn for an interesting mottled look.

For a modern twist, stitch on small sequins or beads to the squares for sparkly details, securing them tightly for durability.

I sometimes make a family set of characters with different colors and sizesโ€”they make adorable displays or themed gifts.

Dont be afraid to modify stitch counts slightly to adapt proportions; I usually test by making one piece and adjusting before finishing the set.

Common Mistakes & How to Fix Them

โœ— Skipping stitch counts when working increases or decreases leads to shape errors; count stitches at the end of each round to ensure accuracy. โœ— Not stuffing gradually can create lumps or misshapen areas; stuff little by little while shaping to maintain a smooth surface. โœ— Leaving short tails when fastening off can make sewing parts unstable; leave long strands for sewing and weave them securely into seams. โœ— Forgetting to embroider or place facial pieces before final assembly can be awkward; attach felt eyes and mouth while the head is accessible to get correct placement. โœ— Working with inconsistent tension will change the final size and appearance; keep a steady, moderate tension and check gauge by comparing pieces as you go.

Creeper Amigurumi Pattern

Create a kawaii Minecraft Creeper amigurumi using simple crochet techniques and charming details. This pattern walks you through every round for the head, body and feet, plus assembly and facial features. Youll enjoy personalizing the squares, face and blush for a truly unique toy. Perfect for gifting or displaying, this little Creeper measures about 15 cm tall with the recommended yarn and hook.

Intermediate 5-7 Hours

Materials Needed for Creeper Amigurumi Pattern

โ€” Main Fabric

  • 01
    2.5 mm cotton yarn (Rainbow cotton 8/6) - Green lime (main color)
  • 02
    2.5 mm cotton yarn (Rainbow cotton 8/6) - Dark green (details)
  • 03
    2.5 mm cotton yarn (Rainbow cotton 8/6) - Pink (blush details)
  • 04
    2.5 mm cotton yarn (Rainbow cotton 8/6) - White (eye reflections)
  • 05
    Black felt - small pieces for eyes and mouth
  • 06
    Synthetic cotton filling - small amount for stuffing

โ€” Tools Required

  • 01
    Hot glue gun or needle and thread to sew the felt
  • 02
    2.5 mm crochet hook
  • 03
    Yarn needle
  • 04
    Scissors
  • 05
    Synthetic cotton filling

Progress Tracker

0% Complete

โ€” Head :

Info :

With 2.5 mm lime green cotton yarn.

Round 1 :

8 sc in a magic ring (8)

Round 2 :

8 inc (16)

Round 3 :

2 inc, 2 sc (24)

Round 4 :

1 sc, 2 inc, (4 sc, 2 inc) x3, 3 sc (32)

Round 5 :

2 sc, 2 inc, (6 sc, 2 inc) x3, 4 sc (40)

Round 6 :

3 sc, 2 inc, (8 sc, 2 inc) x3, 5 sc (48)

Round 7 :

4 sc, 2 inc, (10 sc, 2 inc) x3, 6 sc (56)

Round 8 :

5 sc, 2 inc, (12 sc, 2 inc) x3, 7 sc (64)

Round 9 :

1 sc BLO (64)

Round 10 - 26 :

1 sc (64)

Round 27 :

7 sc, 2 dec, (12 sc, 2 dec) x3, 5 sc BLO (56)

Round 28 :

6 sc, 2 dec, (10 sc, 2 dec) x3, 4 sc (48)

Round 29 :

5 sc, 2 dec, (8 sc, 2 dec) x3, 3 sc (40)

Round 30 :

4 sc, 2 dec, (6 sc, 2 dec) x3, 2 sc (32)

Round 31 :

3 sc, 2 dec, (4 sc, 2 dec) x3, 1 sc (24)

Info :

Stuffing

Round 32 :

2 sc, 2 dec (16)

Round 33 :

8 dec (8)

Round 34 :

4 dec (4)

Info :

Fasten off with sl st, cut and hide the strand.

โ€” Body :

Info :

With 2.5 mm lime green cotton yarn.

Round 1 :

8 sc in a magic ring (8)

Round 2 :

8 inc (16)

Round 3 :

2 inc, 2 sc (24)

Round 4 :

1 sc, 2 inc, (4 sc, 2 inc) x3, 3 sc (32)

Round 5 :

2 sc, 2 inc, (6 sc, 2 inc) x3, 4 sc (40)

Round 6 :

1 sc BLO (40)

Round 7 - 18 :

1 sc (40)

Round 19 :

2 sc, 2 dec, (6 sc, 2 dec) x3, 4 sc BLO (32)

Round 20 :

1 sc, 2 dec, (4 sc, 2 dec) x3, 3 sc (24)

Info :

Stuffing

Round 21 :

2 sc, 2 dec (16)

Round 22 :

8 dec (8)

Round 23 :

4 dec (4)

Info :

Fasten off with sl st and leave a long strand to sew to the head.

Info :

Sew with a yarn needle joining R.19 of the body to R.29 of the head.

โ€” Feet :

Info :

With 2.5 mm lime green cotton yarn.

Round 1 :

8 sc in a magic ring (8)

Round 2 :

8 inc (16)

Round 3 :

2 inc, 2 sc (24)

Round 4 :

1 sc BLO (24)

Round 5 - 10 :

1 sc (24)

Round 11 :

2 sc, 2 dec (16)

Info :

Stuffing

Round 12 :

8 dec (8)

Round 13 :

4 dec (4)

Info :

Fasten off with sl st and leave a long strand to sew to the body.

Info :

Join R.4 - R.6 of the feet to R.6 - R.8 of the body.

Info :

Sew two feet to the front and two feet to the back.

โ€” Details :

Infos :

With 2.5 mm dark green cotton yarn and a yarn needle embroidery three squares in front of each foot in R.9. With 2.5 mm dark green cotton yarn and a yarn needle embroidery two squares in the front part of the body, one square in R.14 and another in R.16.

โ€” Face :

Infos :

Cut out two 2.5 cm eyes with black felt and embroidery two reflections with white cotton yarn and a yarn needle to give it a kawaii touch. Glue the eyes between R.13 and R.17 of the head. With black felt, cut out a mouth 4.5 cm long and 3 cm high. Glue the mouth between R.19 and R.25 of the head. With pink cotton yarn and a yarn needle make two blushes in R.19 on the head.

Assembly Instructions

  • Sew with a yarn needle joining R.19 of the body to R.29 of the head so the head sits squarely on the body.
  • Join R.4 - R.6 of each foot to R.6 - R.8 of the body, sewing two feet to the front and two to the back for balanced placement.
  • Embroider three dark green squares in front of each foot (in R.9) and two squares on the front of the body (one in R.14 and one in R.16) using a yarn needle.
  • Glue the felt eyes (2.5 cm) between R.13 and R.17 of the head and glue the felt mouth (4.5 cm x 3 cm) between R.19 and R.25 of the head.
  • Embroider two small white reflections on each eye with white cotton yarn and add two pink blushes on R.19 with pink yarn for a kawaii effect.

Important Notes

  • ๐Ÿ’กUse a stitch marker to mark the start of each round to keep track of rounds and avoid losing your place.
  • ๐Ÿ’กStuff gradually and evenly, especially the head, to avoid lumps and to keep the creepers shape smooth and balanced.
  • ๐Ÿ’กLeave long tails when fastening off to make sewing pieces together easier and more secure.
  • ๐Ÿ’กPin or mark placement of feet and facial pieces before sewing or gluing to ensure correct symmetry and alignment.
  • ๐Ÿ’กWeave in ends securely and trim excess yarn to keep the finished amigurumi neat and durable.

Thanks for crocheting this kawaii Creeper with me โ€” your amigurumi adventure is complete! ๐Ÿงถ I hope you had fun shaping, stuffing, and adding the cute face details to bring your Creeper to life. ๐Ÿ˜Š Display it proudly or gift it to a fellow Minecraft fan โ€” handmade joy never goes out of style! โœจ

You ask,

we answer.

FAQs

What size will the finished piece be?

The finished amigurumi measures approximately 15 cm high when using the recommended 2.5 mm cotton yarn and 2.5 mm crochet hook.

Can I use different yarn weights for this pattern?

Yes, you can use different yarn weights, but this will affect the final size. Use an appropriate hook for the yarn weight and expect the Creeper to be larger or smaller.

Do I need prior crochet experience for this pattern?

This pattern is rated intermediate and assumes familiarity with basic crochet stitches like sc, increases and decreases, as well as sewing pieces together.

How long does this project typically take to complete?

Most crocheters complete this project in 5-7 hours, depending on experience and how much time you spend on detailing and assembly.

How should I attach the felt eyes and mouth?

Cut felt shapes to the specified sizes and glue them in place using a hot glue gun or sew them with needle and thread; embroider white reflections before final attachment for best results.