🧶 Beautiful ✨ Detailed 💝 Adorable

Crochet Bags Maker Trio Pattern

Crochet Bags Maker Trio Pattern
4.0★ Rating
5-7 Hours Time Needed
3.0K Made This
✂️

Beginner Friendly Level

Perfect for those just starting their crochet journey, with clear instructions and simple techniques

⏱️

Weekend Treat

Takes 5-7 hours, making it an enjoyable project to finish over a couple of days.

Stylish Touch

An elegant detail to elevate any look, combining traditional techniques with contemporary design sensibilities.

About This Crochet Bags Maker Trio Pattern

This pattern pack includes three complementary bag designs: a Shoulder Strap Bucket Bag, a Cross Body Pouch, and a Small Essentials Pouch. Each design is worked with Bernat Maker bulky yarn and uses simple stitches and construction for approachable results. The patterns include diagrams, strap and tab instructions, and clear finishing steps so you can assemble polished, durable bags.

Crochet Bags Maker Trio Pattern crochet pattern - detailed view of completed project

Designed for easy, satisfying crochet sessions, these bags are perfect for everyday wear or gifting. Use the included finishing tips to add hardware and leather details for a professional look.

Why You'll Love This Crochet Bags Maker Trio Pattern

I absolutely love this pattern trio because it transforms bulky yarn into sleek, modern bags that feel sturdy and stylish. I enjoy how fast each piece works up—perfect for an afternoon of crafting. The designs are versatile so I can mix colors or hardware to match any outfit. I also appreciate the clear diagrams and finishing instructions that make assembly straightforward and satisfying. Making a coordinated set always brings me joy when gifting or displaying at home.

Crochet Bags Maker Trio Pattern step 1 - construction progress Crochet Bags Maker Trio Pattern step 2 - assembly progress Crochet Bags Maker Trio Pattern step 3 - details and accessories Crochet Bags Maker Trio Pattern step 4 - final assembly and finishing

Switch Things Up

I love customizing these bags by changing yarn colors; try contrasting straps or a two-tone body for visual interest.

I often swap Bernat Maker for a lighter worsted weight to make a smaller, more delicate pouch—just adjust hook and expectations for size.

I sometimes add a lining using cotton fabric to give the pouches more structure and protect seams; sew the lining in before attaching hardware.

I experiment with different hardware finishes like antique brass or matte black to change the bag's personality without altering the crochet work.

I like to replace the leather cord with a braided yarn cord for a softer, fully yarn-made look that is machine washable.

I recommend trying decorative stitches on the flap or body edge, such as a crab stitch or picot, to add a subtle finishing touch.

I sometimes add an interior pocket by crocheting a small rectangle and sewing it inside the pouch for cards or keys.

I create sets by varying only the strap lengths—shorter straps for crossbody and longer for shoulder carry—and it makes coordinating gifts simple.

I advise testing different bead sizes on the drawstring to find the right balance and weight for the leather cord closure.

I also enjoy embroidering initials or small motifs on the pouch front to personalize gifts for friends and family.

Common Mistakes & How to Fix Them

✗ Skipping placement of the stitch marker for continuous rounds can cause misalignment of rows; place and move your marker at the end of each round to mark the beginning correctly. ✗ Joining rounds when the pattern specifies working in spirals will create a visible seam and break the stitch pattern; follow the note and work in spirals without joining to maintain the clean texture. ✗ Not loosening stitches when threading the leather cord can make threading impossible; loosen a few stitches in the top fold to create an opening large enough to pass the cord through. ✗ Forgetting to leave long ends when fastening off strap pieces prevents secure sewing; leave long tails so you can fold and sew strap ends into rings and tabs securely. ✗ Inconsistent tension when alternating long sc and regular sc will distort the bag sides; maintain even tension and practice the long single crochet to match row height.

Crochet Bags Maker Trio Pattern

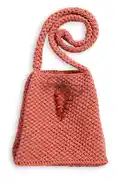
Create three stylish, easy-to-make crochet bags using Bernat Maker bulky yarn. This pattern trio includes a shoulder strap bucket bag, a cross-body pouch, and a small essentials pouch so you can make a set for everyday use. Clear instructions, diagrams, and finishing notes guide you through each step so you can stitch with confidence. Perfect for gifting or adding handmade style to your wardrobe.

Beginner Friendly 5-7 Hours

Materials Needed for Crochet Bags Maker Trio Pattern

— Main Fabric

  • 01
    Bernat Maker (8.8 oz/250 g; 317 yds/290 m)
  • 02
    Shoulder Strap Bucket Bag: Fawn (06013) - 2 balls or 495 yds/450 m
  • 03
    Cross Body Pouch: Lichen (06014) - 1 ball or 305 yds/280 m
  • 04
    Small Essentials Pouch: Lichen (06014) - 1 ball or 205 yds/186 m
  • 05
    Wooden beads and length of leather cord for Shoulder Strap Bucket Bag
  • 06
    Coats & Clark metal teeth zipper 7" [18 cm] for Cross Body Pouch and Small Essentials Pouch
  • 07
    Coats & Clark Dual Duty sewing thread (for attaching zippers and hardware)
  • 08
    1" [2.5 cm] Rectangular Brass Rings (Cross Body Pouch hardware)
  • 09
    1" [2.5 cm] Fashion Swivel Hook and 1" [2.5 cm] D-ring for Small Essentials Pouch

— Tools Required

  • 01
    Crochet hook size U.S. I/9 (5.5 mm) Susan Bates Silvalume or size needed to obtain gauge
  • 02
    Susan Bates stitch marker
  • 03
    Susan Bates yarn needle
  • 04
    Scissors
  • 05
    Coats & Clark metal teeth zipper 7" [18 cm] (for pouches)
  • 06
    Coats & Clark Dual Duty sewing thread
  • 07
    Rectangular rings 1" [2.5 cm] (for straps and buckles)
  • 08
    Fashion Swivel Hook 1" [2.5 cm]
  • 09
    D-ring 1" [2.5 cm]
  • 10
    Wooden beads and leather cord for drawstring
  • 11
    Pins for assembly

Progress Tracker

0% Complete

— Shoulder Strap Bucket Bag :

Info :

With A, ch 20. See diagrams on page 3.

Round 1 :

1 hdc in 3rd ch from hook and each ch to last ch. 3 hdc in last ch. Do not turn. Working across rem loops of foundation ch, 1 hdc in each ch to first ch. 2 hdc in same ch where first hdc was made. Join with sl st to first hdc. 38 hdc.

Round 2 :

Ch 2 (does not count as st). 1 hdc in same sp as sl st. 1 hdc in each of next 16 hdc. (1 hdc. Ch 3. 1 hdc) in next hdc. 1 hdc in next hdc. (1 hdc. Ch 3. 1 hdc) in next hdc. 1 hdc in each of next 16 hdc. (1 hdc. Ch 3. 1 hdc) in next hdc. 1 hdc in next hdc. 1 hdc in sp where first hdc was made. Ch 2. Join with sc to top of first hdc (counts as joining ch-3). 42 hdc and 4 ch-3 sps.

Round 3 :

Ch 2. 1 hdc around post of joining sc. *1 hdc in each hdc to next ch-3 sp. (1 hdc. Ch 3. 1 hdc) in next ch-3 sp. Rep from * around, ending with, 1 hdc in sp where first hdc was made. Ch 2. Join with sc to top of first hdc (counts as joining ch-3). 50 hdc and 4 ch-3 sps.

Info :

Rep last rnd until longer side measures 11" [28 cm].

Ridge rnd :

Ch 1. *1 hdcbp around each hdc to next ch-3 sp. Skip next ch-3 sp. Rep from * around. Do not join. Work in continuous rnds. PM on first st for beg of rnd.

Infos :

Notes: Work in spirals (do not join at end of rnd). Move marker at end of rnd as work progresses.

Round 1 and 2 :

Sides of Bag: 1st and 2nd rnds: 1 sc in each sc around. PM for beg of next rnd.

Round 3 :

3rd rnd: *1 sc in next sc. 1 long sc in next sc 2 rows below. Rep from * around.

Round 4 :

4th rnd: *1 long sc in next sc 2 rows below. 1 sc in next sc. Rep from * around.

Info :

Rep last 2 rnds, alternating sc and long sc until work from Ridge rnd measures 11" [28 cm]. Fasten off.

Section :

Shoulder Strap: With A, ch 7.

Row 1 :

1 sc in 2nd ch from hook. 1 sc in each ch to end of chain. Turn. 6 sc.

Row 2 :

Ch 1. 1 sc in each sc to end of row. Turn.

Row 3 :

Ch 1. 1 sc in first sc. (1 long sc in next sc 2 rows below. 1 sc in next sc) twice. 1 long sc in last sc. Turn.

Info :

Rep last row until Strap measures approx 38" [96.5 cm] or desired length. Fasten off, leaving long end.

Finishing :

Sew ends of Strap 2" [5 cm] below top edge at sides of Bag. Fold top of Bag (see diagram) and thread leather cord through all thicknesses, loosening stitches as needed for easier threading, having both ends of cord meet at center front. Secure ends of cord with beads. Tie in a bow.

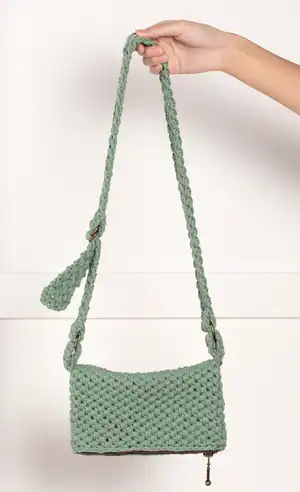
— Cross Body Pouch :

Info :

Ch 25. See Diagram for Sides on page 3. Work in continuous rnds. PM on first st for beg of rnd.

Round 1 :

1 sc in 2nd ch from hook and each ch to end of chain. Do not turn. Working across rem loops of foundation ch, 1 sc in each ch to end of rnd. 46 sc. Do not join. Work in continuous rnds. PM on first st for beg of rnd.

Round 2 :

1 sc in each sc around.

Round 3 :

*1 sc in next sc. 1 long sc in next sc 2 rows below. Rep from * around.

Round 4 :

*1 long sc in next sc 2 rows below. 1 sc in next sc. Rep from * around.

Info :

Rep last 2 rnds, alternating sc and long sc until work from beg measures 8" [20.5 cm]. Fasten off.

Section :

Waist & Cross-body Straps Long Strap: **Ch 5, leaving a long end.

Row 1 :

1 sc in 2nd ch from hook. 1 sc in each ch to end of chain. Turn. 4 sc.

Row 2 :

Ch 1. 1 sc in each sc across. Turn.

Row 3 :

Ch 1. 1 sc in first sc. 1 long sc in next sc 2 rows below. 1 sc in next sc. 1 long sc in last sc. Turn.

Info :

Rep last row until Long Strap measures approx 38" [96.5 cm] or desired length. Fasten off, leaving a long end.

Section :

Short Strap: Work from ** to ** as given for Long Strap. Rep last row until Short Strap measures approx 10" [25.5 cm]. Fasten off, leaving a long end.

Ring Tabs :

Ring Tabs (make 2) Work from ** to ** as given for Pouch Handle. Rep last 2 rows until Tab measures 2" [5 cm]. Fasten off, leaving a long end.

Finishing :

Sew in zipper using thread and sewing needle. Fold Pouch in half, having half of Pouch as flap. Insert one end of Long Strap into rectangular ring. Fold 1" [2.5 cm] to cover rectangular ring. Sew folded end to Strap. Insert opposite end of Long Strap into 2 rectangular rings held together. Fold 1" [2.5 cm] to cover both rectangular rings for buckles. Sew folded end to Strap. Insert one end of Short Strap into rectangular ring. Fold 1" [2.5 cm] to cover rectangular ring. Sew folded end to Strap. Insert Ring Tab into single rectangular ring at one end of Strap. Fold Ring Tab in half and sew both ends of Tab to one side of Pouch at top flap fold. Rep for other side. Fasten by inserting end of Long Strap through both rings of Short Strap, pulling to fit, then over and between the 2 rings. Insert Ring Tab into D-ring. Fold Tab in half and sew both ends of Tab to last rnd of Pouch at side edge. Latch Swivel Hook to D-Ring.

— Small Essentials Pouch :

Info :

Ch 11. See diagram on page 5. Work in continuous rnds. PM on first st for beg of rnd.

Round 1 :

3 sc in 2nd ch from hook. 1 sc in each ch to last ch. 5 sc in last ch. Do not turn. Working across rem loops of foundation ch, 1 sc in each ch to last ch. 2 sc in same ch where first 3 sc were made. Do not join. Work in continuous rnds. PM on first st for beg of rnd. 26 sc.

Round 2 :

2 sc in first sc. 1 sc in next sc. 2 sc in next sc. 1 sc in each of next 8 sc. (2 sc in next sc. 1 sc in next sc) twice. 2 sc in next sc. 1 sc in each of next 8 sc. 2 sc in next sc. 1 sc in last sc. 32 sc.

Round 3 :

2 sc in first sc. 1 sc in each of next 2 sc. 2 sc in next sc. 1 sc in each of next 9 sc. (2 sc in next sc. 1 sc in each of next 9 sc) twice. 2 sc in next sc. 1 sc in each of last 2 sc. 38 sc.

Round 4 :

2 sc in first sc. 1 sc in each of next 3 sc. 2 sc in next sc. 1 sc in each of next 10 sc. (2 sc in next sc. 1 sc in each of next 10 sc) twice. 2 sc in next sc. 1 sc in each of last 3 sc. 44 sc.

Round 5 :

1 sc in each sc around. PM #2 at end of rnd. See Diagram for sides on page 3.

Round 6 :

*1 sc in next sc. 1 long sc in next sc 2 rows below. Rep from * around.

Round 7 :

*1 long sc in next sc 2 rows below. 1 sc in next sc. Rep from * around.

Info :

Rep last 2 rnds, alternating sc and long sc until work from 5th rnd marker (#2) measures 4" [10 cm]. Fasten off.

Item Name (Pouch Handle) :

Pouch Handle **Ch 4, leaving a long end. 1st row: 1 sc in 2nd ch from hook. 1 sc in each ch to end of next 2 ch. Turn. 3 sc. 2nd row: Ch 1. 1 sc in each sc in across. Turn. 3 sc. 3rd row: Ch 1. 1 sc in first sc. 1 long sc in next ch-sp 1 row below. 1 sc in next sc. Turn. 4th row: Ch 1. 1 long sc in next sc 2 rows below. 1 sc in next sc. 1 long sc in last sc 2 rows below. Turn. 5th row: Ch 1. 1 sc in first sc. 1 long sc in next sc 2 rows below. 1 sc in last sc. Turn. Rep last 2 rows until Handle measures 10" [25.5 cm]. Fasten off, leaving a long end.

Item Name (Ring Tab) :

Ring Tab (make 1) Rep from ** to ** as given for Pouch Handle. Rep last 2 rows until Tab measures 1" [2.5 cm]. Fasten off, leaving a long end.

Finishing :

Sew in zipper using thread and sewing needle. Insert Handle through ring of Swivel Hook. Sew ends of Handle tog. Fold Handle flat against Swivel Hook and sew running stitches through both layers of Handle 2 rows from fold. Insert Ring Tab into D-ring. Fold Ring Tab in half and sew both ends of Tab to last rnd of Pouch at side edge. Latch Swivel Hook to D-Ring.

Assembly Instructions

  • Sew ends of Shoulder Strap 2" [5 cm] below top edge at sides of the Shoulder Strap Bucket Bag; fold top edge and thread leather cord through all thicknesses before securing with beads.
  • For Cross Body Pouch, sew zipper into top opening, fold pouch in half so half becomes flap, then attach rectangular rings and strap ends by folding 1" [2.5 cm] of strap over the ring and sewing securely.
  • Attach Ring Tabs by folding each tab in half and sewing both ends to the pouch at the top flap fold or side edge as indicated; secure swivel hooks and D-rings after tabs are sewn.
  • Insert one end of Long Strap through both rings of Short Strap to create adjustable fastening, pulling to fit and tucking ends as directed for a clean finish.
  • For Small Essentials Pouch, insert Handle through Swivel Hook ring, sew handle ends together, then fold and sew the layers 2 rows from the fold to secure hardware.

Important Notes

  • 💡Work in spirals for body rounds (do not join at end of rnd) and move your stitch marker as work progresses.
  • 💡Note: Ch 2 at beg of rnds does not count as a stitch unless otherwise stated.
  • 💡Pin and fold top edges to check placement of leather cord and beads before permanently sewing to ensure even placement.
  • 💡Fasten off leaving long tails for sewing strap ends, tabs, and hardware to allow secure folding and stitching.

Make a matching set of handmade bags with this cozy Bernat Maker trio—stylish, sturdy, and fast to stitch. Add leather accents and brass hardware to elevate each piece into a boutique-ready accessory. Perfect for gifting or treating yourself—happy stitching! 🧶✨

You ask,

we answer.

FAQs

What size will the finished pieces be?

Shoulder Strap Bucket Bag: Approx 14" [35.5 cm] wide x 11" [28 cm] high (excluding strap). Cross Body Pouch: Approx 8" [20.5 cm] square unfolded. Small Essentials Pouch: Approx 8" [20.5 cm] wide x 4½" [11.5 cm] high x 2½" [6 cm] deep (excluding handle).

Can I use a different yarn weight?

You can substitute yarn weights, but the final size and gauge will change; choose an appropriate hook to achieve the recommended gauge or adjust dimensions accordingly.

Do I need special tools for the hardware?

You will need rectangular rings, a swivel hook and a D-ring as specified; basic sewing thread and a sewing needle are used to attach zippers and hardware.

Is this pattern suitable for beginners?

Yes—this pattern is rated beginner friendly and uses straightforward stitches, but familiarity with long single crochet and working in spirals will help achieve the best results.