๐Ÿงถ Beautiful โœจ Detailed ๐Ÿ’ Adorable

Crochet Bumblebees Amigurumi Pattern

Crochet Bumblebees Amigurumi Pattern
4.2โ˜… Rating
2-3 Hours Time Needed
2.1K Made This
โœ‚๏ธ

Intermediate Level

Ideal for those with basic crochet experience, featuring slightly more advanced stitches and techniques to expand your skills.

โฑ๏ธ

Bite-Sized Project

Finishes in 2-4 hoursโ€”perfect for an afternoon of creative relaxation.

๐ŸŽ

Tiny Treasure

Small, sweet, and gift-worthy creations that fit perfectly in the palm of your hand with detailed charm.

About This Crochet Bumblebees Amigurumi Pattern

This pattern creates tiny stuffed bumblebees in several colour variations, complete with small wings and safety eyes. The instructions cover neat colour changes, back-loop-only rounds, and an invisible decrease for a tidy finish. You will make small, 3 in / 5 cm bees using worsted yarn with a fuzzy effect recommended for best results.

Crochet Bumblebees Amigurumi Pattern crochet pattern - detailed view of completed project

Includes full round-by-round instructions for white-tailed, red-tailed, tree and early bumblebees. Wings and assembly tips are provided so you can finish and customize your bees.

Why You'll Love This Crochet Bumblebees Amigurumi Pattern

I absolutely love this pattern because it turns tiny scraps of yarn into charming, tactile little creatures that bring instant joy. I enjoy the controlled color-change technique used here since it creates clean stripes without bulky joins. The pattern is compact and satisfying to make, so I can crochet several bees in a single afternoon for gifts or decorations. I also love that the wings are made with a thinner yarn for delicate detail, giving the bees a sweet, hand-finished look.

Crochet Bumblebees Amigurumi Pattern step 1 - construction progress Crochet Bumblebees Amigurumi Pattern step 2 - assembly progress Crochet Bumblebees Amigurumi Pattern step 3 - details and accessories Crochet Bumblebees Amigurumi Pattern step 4 - final assembly and finishing

Switch Things Up

I love experimenting with colour combinations; try pastel shades for a softer look or saturated brights for playful bees.

You can make the bee bigger or smaller by changing yarn weight and hook sizeโ€”bulky yarn gives a chunky bee, while finer yarn makes a mini keychain version.

I often swap the safety eyes for embroidered eyes to make a fully washable or baby-safe toy.

Add a tiny loop of yarn on the top to make a key ring or hangable ornament for garlands and mobiles.

Try different wing yarns and textures: fuzzy yarn, metallic thread, or even tiny crocheted flowers to make seasonal variants.

I sometimes embroider a tiny smile or antennae with contrasting yarn for added personality and character.

For a posable version, carefully insert craft wire into the wings or between body layers to shape them slightly upwards.

Mix and match tail colours and stripe patterns to create a multi-species collectionโ€”use orange, white, or grey tails as shown in the pattern.

I recommend adding subtle surface embroidery or beading for detail if you plan to display the bees as art pieces.

Don't hesitate to combine two scraps of different fiber types for the body to achieve fuzziness and color depthโ€”the bees look great with a slightly fuzzy finish.

Common Mistakes & How to Fix Them

โœ— Skipping stitch markers during rounds with increases leads to mis-counted stitches; place a marker at the beginning of each round to keep accurate counts. โœ— Changing colour in the wrong loop makes stripes look messy; always change colour in the last loop of the stitch so the next stitch is made in the new colour. โœ— Forgetting to work rounds closed with slip stitch will make colour changes misalign; follow the 'close round with sl st, ch 1' instruction exactly for neater colour joins. โœ— Not stuffing gradually causes a lumpy or misshapen body; add small amounts of stuffing as you go and shape the oval bottom before final closing.

Crochet Bumblebees Amigurumi Pattern

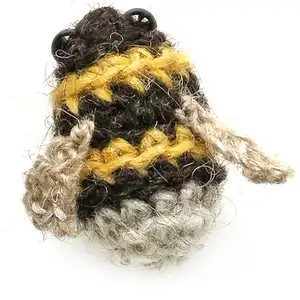
Make a collection of tiny, adorable crochet bumblebees using this clear, full-instruction pattern. You will learn neat colour changes, simple shaping, and how to attach tiny wings and eyes for delightful little bumbles. Perfect for gifting, keychains, or a charming nature-inspired mobile, each bee is quick to make and full of character.

Intermediate 2-3 Hours

Materials Needed for Crochet Bumblebees Amigurumi Pattern

โ€” Main Fabric

  • 01
    Worsted weight yarn (#4) - sheep or mixed black (0052 or 0005) - small leftovers (main body)
  • 02
    Worsted weight yarn (#4) - yellow (1703) - small leftover for stripes
  • 03
    Worsted weight yarn (#4) - orange (1704) - small leftover for red-tailed/early variants
  • 04
    Worsted weight yarn (#4) - light grey (0054) - small leftover for tail
  • 05
    Lace weight yarn (Lopi Einband) - beige heather (0886) - for wings (or split a lopi strand in half)
  • 06
    Istex Lett lopi (100% wool) recommended by designer for fuzzy look
  • 07
    Polyester stuffing / fibrefill - small amount

โ€” Tools Required

  • 01
    Crochet hook size E US / 3.5 mm
  • 02
    Thinner yarn for wings (Lopi Einband) or split lopi strand
  • 03
    7 mm animal safety eyes (2 pieces)
  • 04
    Scissors
  • 05
    Embroidery needle for sewing
  • 06
    Stitch markers or paper clips
  • 07
    Polyester stuffing
  • 08
    Pins for assembly (optional)

Progress Tracker

0% Complete

โ€” Body :

Info :

Start in black, change colour when indicated. To get neater colour changes, you aren't working in a spiral but closing each round with a sl st. At the end of each round, sl st in the first sc of the next round, then ch 1 and sc in that same stitch. This is the 1st stitch of the next round. At the end of each round you will skip over the sl st and ch and crochet a sl st, ch, sc in the following stitch. Don't cut the yarn between the colour changes but carry it along.

Round 1 :

magic ring of 4 = 4

Round 2 :

(sc in next, 2 sc in next) x 2 = 6

Info :

Mark the stitches of round 3 in which you'll make the 2nd and the 6th stitch with a coloured strand. (Insert the strand into the gap of the stitch you normally put your hook in.) When the strand is placed, just do the stitch like you always do. You've now marked where you later attach the eyes.

Round 3 :

(sc in next 2, 2 sc in next) x 2 = 8, change colour to yellow in last st, sl st in 1st

Round 4 :

ch 1, sc in same, [2 sc in next, (sc in next, 2 sc in next) x 3] in BLO = 12, change colour to black in last, sl st in 1st

Round 5 :

ch 1, sc in same, [sc in next 11] in BLO = 12, sl st in 1st

Info :

Attach the eyes permanently in the marked spots. It helps turning the piece inside-out when you attach the caps. After I attached the eyes, I inserted a little bit of stuffing between them, as shown in the images below.

Round 6 :

ch 1, sc in same, sc in next 11 = 12, change colour to yellow in last st, sl st in 1st

Round 7 :

ch 1, sc in same, [sc in next 11] in BLO = 12, change colour to black in last and cut yellow, sl st in 1st

Round 8 :

ch 1, sc in same, [sc in next 11] in BLO = 12, change colour to light grey in last and cut black, sl st in 1st

Round 9 :

ch 1, sc in same, [sc in next 11] in BLO = 12, sl st in 1st

Round 10 :

ch 1, sc in same, s2tog, (sc in next, s2tog) x 3 = 8, sl st in 1st

Info :

Stuff the bumblebee.

Round 11 :

ch 1, sc in same, sc in next, s2tog, sc in next 2, s2tog = 6, sl st in 1st

Info :

Add a little bit of stuffing if needed and then sew the hole closed by putting the needle from the inside out through all the outside loops of the 6 st, clockwise. If you do it correctly, you can now pull the end and it will close the gap. Make sure your bombus has a nice oval bottom.
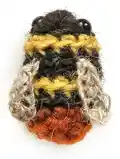
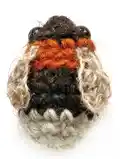
โ€” Red-tailed bumblebee :

Round 1-3 :

Follow the instructions for the white-tailed bee but skip the sl st and ch 1 and don't change colour to yellow in round 3.

Round 4 :

In BLO: (sc in next, 2 sc in next) x 4 = 12

Round 5 :

sc in each around = 12

Info :

Attach the eyes in the marked spots.

Round 6-7 :

sc in each around = 12

Round 8 :

sc in each around = 12, change colour to orange in last and cut black, sl st in 1st

Round 9 :

ch 1, sc in same, sc in next 11 = 12, sl st in 1st

Round 10-11 :

follow the instructions for the white-tailed bumblebee.

โ€” Tree bumblebee :

Round 1-3 :

Follow the instructions from the white-tailed bumblebee, change colour to orange instead of yellow.

Round 4 :

ch 1, sc in same, [2 sc in next, (sc in next, 2 sc in next) x 3] in BLO = 12, sl st in 1st

Round 5 :

ch 1, sc in same, sc in next 11 = 12, change colour to black in last st and cut orange, sl st in 1st

Info :

Attach the eyes in the marked spots.

Round 6 :

ch 1, sc in same, [sc in next 11] in BLO = 12, sl st in 1st

Round 7 :

ch 1, sc in same, sc in next 11 = 12, sl st in 1st

Round 8 :

ch 1, sc in same, sc in next 11 = 12, change colour to light grey in last and cut black, sl st in 1st

Round 9 :

ch 1, sc in same, [sc in next 11] = 12, sl st in 1st

Round 10-11 :

follow the instructions for the white-tailed bumblebee.

โ€” Early bumblebee :

Info :

To make this bee, follow the instructions for the white-tailed, but make the bottom in orange instead of light grey. That's all.

โ€” Wings :

Info :

Make two for each bumblebee, use the thinner yarn with the same hook. If you use Lopi yarn but don't have the Einband weight, split a lopi strand in half. Make the starting chain as long as the end, so you can use both ends together to attach the wings.

Round 1 :

ch of 6, in 3rd ch from hook dc, dc in same, hdc in next, sc in next, sl st in next and leave yarn ends for sewing.

Info :

Use both yarn ends to sew the wings to the body. Sew them on top of the third round behind the head, as shown in the images. The head ends at the first round you do in BLO.

Assembly Instructions

  • Attach the safety eyes permanently in the marked spots on round 3, inserting eye caps from the inside and adding a small bit of stuffing between the eyes before securing.
  • Stuff the body firmly but gradually through rounds 6-10, then close the hole by sewing through the outside loops of the final 6 stitches clockwise until the gap closes.
  • Make two wings using the thinner yarn, leave both yarn ends long, and sew each wing to the body on top of the third round behind the head using both yarn ends for a secure attachment.
  • Carry yarn between colour changes rather than cutting, and sew in any carried ends neatly on the inside before final finishing to hide yarn tails and keep stripes tidy.
  • Trim and secure any remaining yarn ends, and check symmetry of eyes and wings before final sewing to ensure a neat finished bee.

Important Notes

  • ๐Ÿ’กUse a stitch marker to mark the beginning of each round and move it up every round to keep your stitch counts accurate.
  • ๐Ÿ’กAlways change colour in the last loop of the stitch so the next stitch you make will be in the new colour for neat stripes.
  • ๐Ÿ’กCarry the yarn between colour changes instead of cutting to avoid many short ends, and cut only where the pattern instructs.
  • ๐Ÿ’กStuff gradually and test shape before closing the final hole so the bottom will be a nice oval and not lumpy.

These tiny bumblebees are a wonderful way to turn scraps into charming little treasures you can gift or collect. Make a whole family with different tails and stripe colours to create a sweet miniature garden of bees. Have fun stitching, customizing, and sharing your mini pollinators! ๐Ÿ๐Ÿงถ

You ask,

we answer.

FAQs

What size will the finished piece be?

The finished bumblebee measures approximately 3 inches / 5 cm long when using the recommended worsted yarn and a 3.5 mm (E) hook.

Can I use different yarn weights for this pattern?

Yes, you can change yarn weight but the size will change; use an appropriate hook for your yarn and expect the bee to be larger with bulky yarn or much smaller with finer yarn.

Do I need prior crochet experience for this pattern?

This pattern is rated intermediate because it includes colour changes, BLO rounds and invisible decreases, so basic crochet skills and experience reading rounds are recommended.

How long does this project typically take to complete?

Most crocheters complete a single bee in about 2-3 hours, though time may vary based on experience and how many bees you make in a session.