🧢 Beautiful ✨ Detailed πŸ’ Adorable

Crochet Bunny Pumpkin Amigurumi Pattern

Crochet Bunny Pumpkin Amigurumi Pattern
4.1β˜… Rating
5-7 Hours Time Needed
4.1K Made This
βœ‚οΈ

Intermediate Level

Iideal for those with basic crochet experience, featuring slightly more advanced stitches and techniques to expand your skills.

⏱️

Weekend Treat

Takes 5-7 hours, making it an enjoyable project to finish over a couple of days.

🧸

Cute Companion

An adorable friend to cherish, handcrafted with love to bring comfort and joy for years to come.

About This Crochet Bunny Pumpkin Amigurumi Pattern

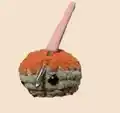
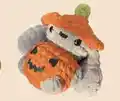
This pattern creates a charming bunny shaped like a pumpkin using chenille yarn and simple shaping techniques. Youll make a textured pumpkin body, floppy bunny ears, a cute hat and a tiny stem for the top. The pattern uses bobble stitch accents and color changes to give the pumpkin its character.

Crochet Bunny Pumpkin Amigurumi Pattern crochet pattern - detailed view of completed project

Complete round-by-round instructions are provided for each piece, plus clear assembly tips for sewing the parts together. Ideal for making seasonal gifts or a whimsical handmade decoration.

Why You'll Love This Crochet Bunny Pumpkin Amigurumi Pattern

I absolutely love this pattern because it combines playful design with cozy textures, making each bunny pumpkin irresistibly cuddly. I enjoy the creative twist of turning a classic amigurumi bunny into a pumpkin-shaped body that feels unique and festive. The chenille yarn gives it a soft, plush finish I cant stop touching, and the small details like the hat and stem make it feel handmade and special. I also love that the pattern is clear enough to allow small customizations so you can make each bunny your own.

Crochet Bunny Pumpkin Amigurumi Pattern step 1 - construction progress Crochet Bunny Pumpkin Amigurumi Pattern step 2 - assembly progress Crochet Bunny Pumpkin Amigurumi Pattern step 3 - details and accessories Crochet Bunny Pumpkin Amigurumi Pattern step 4 - final assembly and finishing

Switch Things Up

I love changing colors to give each Bunny Pumpkin its own personality; try pastel orange and mint green for a softer look or deep orange and chocolate brown for a classic autumn vibe.

To make this pattern larger, use a heavier chenille yarn and go up a hook size; the shape stays the same but becomes chunkier and cuddlier.

If you want a tiny keychain version, use lighter yarn and a smaller hook, then attach a keychain ring to the top of the hat or stem.

I often swap the bobble stitch for surface texture by crocheting added ridges after the body is finished to create a different pumpkin look.

Try embroidering different facial expressions on the pumpkin or use felt cutouts glued in place for quick customization.

Experiment with placement of the safety eyes to change the bunny's personality β€” closer together for a sleepy look, or wider for a surprised expression.

For posable ears or limbs, add a short wire inside before finishing, then wrap and secure ends so the wire won’t poke through the chenille yarn.

Add tiny crocheted accessories like a scarf or a tiny pumpkin bag to create a whole set of themed characters to display together.

I like to mix yarn textures β€” using a smooth cotton for small details like the nose or felt for facial features β€” to make the chenille really stand out.

Don’t be afraid to experiment with stitch tension and stuffing levels; a little extra squish makes these bunnies look delightfully plump and homemade.

Common Mistakes & How to Fix Them

βœ— Skipping the magic ring can leave a hole at the center of the piece; always start with a proper MR and tighten it securely when instructed. βœ— Forgetting to change colors exactly where noted can disrupt the pumpkin stripe details; swap yarns at the specified round and weave ends neatly. βœ— Not using the bobble stitch correctly will affect the textured look of the pumpkin; practice BO on a scrap and count stitches carefully when instructed. βœ— Overstuffing or understuffing causes poor shaping of the pumpkin and bunny; stuff gradually and adjust stuffing during shaping rounds to keep the form even. βœ— Ignoring front loop or back loop instructions will distort the hat and body edges; insert your hook in the specified loop (BLO/FLO) to get the intended shape.

Crochet Bunny Pumpkin Amigurumi Pattern

Make an adorable Bunny Pumpkin amigurumi using soft chenille yarn and a 5mm hook. This pattern guides you through every round and assembly step so you can create a cuddly seasonal friend. Youll enjoy the playful pumpkin body and the sweet hat and ears details. Perfect for gifts, decor, or a cozy handmade companion.

Intermediate 5-7 Hours

Materials Needed for Crochet Bunny Pumpkin Amigurumi Pattern

β€” Main Fabric

  • 01
    Chenille yarn Color A - Orange (used for main pumpkin body and hat)
  • 02
    Chenille yarn Color B - Brown (used for head/limbs accents)
  • 03
    Chenille yarn Color C - Green (used for the pumpkin stem)
  • 04
    Felt (optional) for pumpkin face details
  • 05
    Polyester stuffing for body and hat shaping

β€” Tools Required

  • 01
    Crochet hook size 5mm (as used by the designer)
  • 02
    Yarn needle
  • 03
    Scissors
  • 04
    Plastic safety eyes
  • 05
    Stuffing (polyester fiberfill)

Progress Tracker

0% Complete

β€” Head and Body :

Info :

*start with Color A

Round 1 :

4sc in MR (4)

Round 2 :

4inc (8)

Round 3 :

BLO (sc, inc)x4 (12)

Round 4 :

(2sc, inc) x4 (16)

Round 5 :

Do the BO in Color B: 4sc, BO, 4sc, BO, 6sc (16)

Round 6 :

(3sc, inc) x4 (20)

Round 7 :

sc around (20)

Round 8 :

Do the BO in Color B: 4sc, BO, 10 sc, BO, 4sc (20)

Info :

* Stretch your work to the sides make it rounder

Round 9 :

(2sc, dec) X5 (15)

Round 10 :

(sc, dec) x5 (10)

Info :

*Stretch, stuff change to Color B.

Round 11 :

BLO (sc, inc) x5 (15)

Round 12 :

(2sc, inc) x5 (20)

Round 13 :

sc around (2 rounds) (20)

Round 14 :

change to Color A: sc around (20) *safety eyes between R13-R14 4sc apart, stretch

Round 15 :

BLO (2sc, dec) x5 (15)

Info :

*Stretch your work, stuff

Round 16 :

(sc, dec) x5 (10)

Round 17 :

5dec (5)

Info :

FO, sew shut. *squish to make it chubbier *embroider the nose between eyes.

β€” HAT - sides :

Info :

*use Color A

Info :

*insert your hook in the front loops of R16

Round 1 :

(sc, ch, 2dc in 1 sc, ch) do this all around R16.

β€” EARS :

Info :

Make 2x

Round 1 :

6sc in MR (6)

Round 2 :

(2inc, sc) x2 (10)

Round 3 :

sc, 2inc, 3sc, 2inc, 2sc (14)

Round 4 :

sc, 2dec, 3sc, 2dec, 2sc (10)

Round 5 :

sc around (10)

Round 6 :

(dec, 3sc) x2 (8)

Info :

*4sc to close, chain 1, turn, 4sc, Fo leave a long tail and sew under the hat however you think looks best.

β€” Pumpkin stem :

Info :

*Insert the hook on the top of the head.

Round 1 :

Chain 3, start in the second chain from hook 2 hdc, slst in hat.

Info :

*You can make a cute/spooky face out of felt and glue it on the pumpkin or embroider it.

β€” Final :

Info :

And you're done!

Assembly Instructions

  • Sew the hat to the top front loops of the head (insert hook in the front loops of R16 when attaching) and secure with matching yarn so the hat sits evenly.
  • Place and attach the ears under the hat using the long tail left after finishing the ear, positioning them symmetrically on either side of the head.
  • Insert safety eyes between rounds R13-R14 spaced 4 single crochets apart before stuffing fully, then embroider the nose between the eyes.
  • Close the bottom opening by sewing shut after final decreases, squish the body slightly to make it chubbier, and weave in all ends neatly.
  • Attach the pumpkin stem to the top center of the hat/head by inserting hook where indicated, then secure and fasten off; add felt or embroidered face details to the pumpkin.

Important Notes

  • πŸ’‘Use a 5mm hook as recommended to achieve the correct gauge and plush chenille texture for this pattern.
  • πŸ’‘Place safety eyes before fully closing and stuffing the head to ensure correct placement between rounds R13 and R14.
  • πŸ’‘Follow BLO and FLO instructions exactly where indicated to get the correct hat edge and textured rows using bobble stitch.
  • πŸ’‘Leave long tails where instructed for sewing pieces in place, and pin parts before sewing to verify correct placement.

This sweet Bunny Pumpkin is a fun mix of cute and spooky, perfect for seasonal gifts and decor. πŸŽƒπŸ§Έ Crafted with plush chenille for a super cuddly finish that kids and adults will adore. 🧢✨ Make a pair and display them on a shelf or give as a handmade surprise this autumn!

You ask,

we answer.

FAQs

What size will the finished piece be?

The finished amigurumi will be a small plush approximately 10-15 cm tall depending on yarn tension and stuffing, using the recommended chenille yarn and 5mm hook.

Can I use different yarn weights for this pattern?

Yes, you can use different yarn weights but the size and texture will change; choose an appropriate hook for your yarn and expect a larger or smaller finished bunny.

Do I need prior crochet experience for this pattern?

This pattern is rated intermediate because it uses bobble stitches, color changes, BLO/FLO instructions, and shaping techniques; basic knowledge of amigurumi and these stitches is recommended.

How long does this project typically take to complete?

Most crocheters complete this project in 5-7 hours, though time may vary based on experience, customizations, and the number of pieces you make.