🧢 Beautiful ✨ Detailed πŸ’ Adorable

Crochet Coaster and Coaster Holder Pattern

Crochet Coaster and Coaster Holder Pattern
4.2β˜… Rating
2-3 Hours Time Needed
1.7K Made This
βœ‚οΈ

Beginner Friendly Level

Perfect for those just starting their crochet journey, with clear instructions and simple techniques

⏱️

Bite-Sized Project

Finishes in 2-4 hoursβ€”perfect for an afternoon of creative relaxation.

β˜•

Warm Welcome

A comforting piece for home or gifts that brings handmade warmth to everyday moments and special occasions.

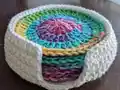
About This Crochet Coaster and Coaster Holder Pattern

This pattern creates a set of round crochet coasters plus a stackable coaster holder to keep them organized. It uses basic stitches like chain, double crochet, and single crochet back loop only to build sturdy, attractive pieces. The design is great for using scrap or variegated yarns so each coaster can be unique. You will end up with a useful kitchen accessory that also makes a lovely handmade gift.

Crochet Coaster and Coaster Holder Pattern crochet pattern - detailed view of completed project

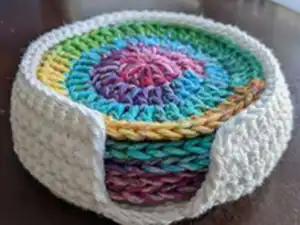
Simple, clear rows guide you through each coaster and the matching holder for a cohesive set. Perfect for practicing tension control and circular crochet increases.

Why You'll Love This Crochet Coaster and Coaster Holder Pattern

I absolutely love this pattern because it turns simple stitches into a useful, attractive set that brightens any table. I enjoy how quickly each coaster comes together, making it satisfying to finish several in one sitting. The holder design is clever and practical, keeping coasters neatly stacked and easy to grab. I also love that this pattern is forgiving and great for experimenting with colors, so every finished set feels personal.

Crochet Coaster and Coaster Holder Pattern step 1 - construction progress Crochet Coaster and Coaster Holder Pattern step 2 - assembly progress Crochet Coaster and Coaster Holder Pattern step 3 - details and accessories Crochet Coaster and Coaster Holder Pattern step 4 - final assembly and finishing

Switch Things Up

I love customizing these coasters by switching colors every round so each one looks unique and bright.

I often use variegated yarn for the center rounds to create a pop of color without extra sewing or color changes.

I sometimes make the coasters larger by adding an extra increase round or two if I need a mug or teapot-sized coaster.

I also try different yarn weights and hook sizes to create mini keychain coasters or oversized placemat versions.

I like to use textured stitches for the holder sidesβ€”try HDC or bobble stitches to create a cushioned feel and visual interest.

I sometimes add a fabric or cork base to the coaster for extra heat resistance and slip-prevention.

I recommend experimenting with contrasting rim colors to frame each coaster and make them pop when stacked in the holder.

I have made seasonal sets by choosing holiday colors or muted palettes for giftingβ€”this pattern adapts beautifully to themes.

I occasionally embroider initials or small motifs onto the coaster center for personalized gifts or home labeling.

I suggest trying recycled or t-shirt yarn for a chunky, sturdy holder and coasters with a rustic look and more durable surface.

I enjoy combining crochet with small felt accessories glued or sewn onto coasters for themed sets like floral or nautical motifs.

Common Mistakes & How to Fix Them

βœ— Skipping the initial slip stitch to join the chain can create a twisted start; always slst into the first chain after chaining 3 to form a neat center. βœ— Not counting stitches after each round will lead to uneven increase rounds and mismatched coaster shapes; count your stitches at the end of every round to confirm totals. βœ— Working with inconsistent tension makes stacked coasters look uneven and can make the holder floppy; maintain steady, moderate tension throughout and practice on a scrap if needed. βœ— Forgetting to leave the five open stitches on the holder leaves no opening for the coasters; follow Row 6 instructions closely and leave those stitches unworked. βœ— Not weaving in ends securely causes unraveling over time; cut yarn and weave in ends carefully after finishing each piece to ensure durability.

Crochet Coaster and Coaster Holder Pattern

Make a set of colorful coasters with a matching holder using easy, straightforward crochet techniques. This pattern is perfect for using up scrap yarn and creating functional home decor. You will enjoy the quick progress and the tidy, stackable holder that keeps coasters neat. Great for gifting or brightening your kitchen with handmade charm.

Beginner Friendly 2-3 Hours

Materials Needed for Crochet Coaster and Coaster Holder Pattern

β€” Main Fabric

  • 01
    Yarn - I use 4 medium cotton yarn. You can use any yarn you want, in any color!

β€” Tools Required

  • 01
    Crochet hook size H (I hook)
  • 02
    Tapestry Needle

Progress Tracker

0% Complete

β€” What You Need :

Info :

Yarn - I use 4 medium cotton yarn. You can use any yarn you want, in any color! Hook - I use an H hook. Tapestry Needle

β€” What You Need To Know :

Infos :

Chain - ch. Single Crochet - sc. Double Crochet - dc. Single Crochet Back Loop Only - scblo. Slip Stitch - slst.

β€” Pattern for Coasters :

Info :

Make 6! (Or however many you want, it's your world!) All Chain stitches count as first stitch!

Info :

Chain 3, slst into first ch

Round 1 :

ch 2, 11 dc into center of chain, slst to join to top of ch 2 space (12)

Round 2 :

ch 2, 2dc in each st around, dc in same st as ch 2, slst to join to top of ch 2 space (24)

Round 3 :

ch 2, 2dc in next st, *dc, 2dc* *Repeat around*, slst to join to top of ch 2 space (36)

Round 4 :

ch 2, dc in next st, 2dc, *dc, dc, 2dc* *Repeat around*, slst to join to top of ch 2 space (48)

Info :

Cut yarn and weave in ends.

β€” Pattern for Holder :

Info :

Chain 3, slst into first ch

Round 1 :

ch 2, 11 dc into center of chain, slst to join to top of ch 2 space (12)

Round 2 :

ch 2, 2dc in each st around, dc in same st as ch 2, slst to join to top of ch 2 space (24)

Round 3 :

ch 2, 2dc in next st, *dc, 2dc* *Repeat around*, slst to join to top of ch 2 space (36)

Round 4 :

ch 2, dc in next st, 2dc, *dc, dc, 2dc* *Repeat around*, slst to join to top of ch 2 space (48)

Round 5 :

ch 1, sc, sc, 2sc, *sc, sc, sc, 2sc* *Repeat around*, slst to join to top of ch 1 space (60)

Round 6 :

ch 1, scblo in the next 54 stitches. You will leave 5 stitches open.

Round 7 :

ch 1, turn, sc in each st around

Round 8-13 :

*Repeat round 7*

Round 14 :

slst in each st around the perimeter of the holder, including the 5 stitches at the bottom of the opening. This makes the holder a bit more sturdy and less likely to fold in or out, but if your holder is already sturdy after round 13, then it may not be necessary for you.

Info :

Cut yarn and weave in ends. Insert coasters into holder, and enjoy!

Assembly Instructions

  • Cut yarn and weave in ends for each coaster and the holder to secure your stitches and give a tidy finish.
  • Leave 5 stitches open at Round 6 of the holder to create the opening; do not work those stitches so the coasters can slide in easily.
  • After completing Round 14, check the perimeter of the holder and ensure the opening aligns with the 5 unworked stitches; adjust by gently stretching if needed before inserting coasters.
  • Stack finished coasters neatly and insert them into the holder with the holder opening facing outward for easy removal and use.
  • Pin or align coasters inside the holder to test fit before final weaving in of ends to confirm nothing will snag or block the opening.

Important Notes

  • πŸ’‘All chain stitches count as the first stitch for each round, so do not add an extra stitch when counting increases.
  • πŸ’‘Maintain consistent tension throughout your rounds to ensure coasters lay flat and the holder remains structured.
  • πŸ’‘Leave the 5 stitches open in Round 6 of the holder to form the opening; this is essential for the holder to function correctly.

Create a coordinated set of coasters and a matching holder that adds handmade charm to any table. These quick projects are great for using scrap yarn and making thoughtful, practical gifts. Enjoy the bright colors and satisfying progress as each coaster grows into a neat stackable set. β˜•πŸ§Ά

You ask,

we answer.

FAQs

What size will the finished coasters and holder be?

Finished coasters measure approximately the size typical for a medium mug when using medium weight (4) cotton yarn and an H hook; the holder fits the stacked coasters made with the same yarn and hook.

Can I use a different yarn weight for this pattern?

Yes, you can use different yarn weights, but this will change the finished size; adjust your hook size accordingly and make a sample coaster to check fit before making multiple pieces.

Do I need prior crochet experience for this pattern?

This pattern is beginner friendly and requires basic crochet skills like chain, double crochet, single crochet, and slip stitch, so it's suitable for new crocheters ready to practice circular increases.

How long will it take to make a full set?

Most crocheters complete a full set of six coasters plus the holder in about 2-3 hours, though time may vary with experience and chosen yarn.