🧢 Beautiful ✨ Detailed πŸ’ Adorable

Crochet Emotional Support Pickle Amigurumi Pattern

Crochet Emotional Support Pickle Amigurumi Pattern
4.1β˜… Rating
2-3 Hours Time Needed
3.9K Made This
βœ‚οΈ

Beginner Friendly Level

Perfect for those just starting their crochet journey, with clear instructions and simple techniques

⏱️

Bite-Sized Project

Finishes in 2-4 hoursβ€”perfect for an afternoon of creative relaxation.

🧸

Cute Companion

An adorable friend to cherish, handcrafted with love to bring comfort and joy for years to come.

About This Crochet Emotional Support Pickle Amigurumi Pattern

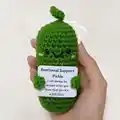
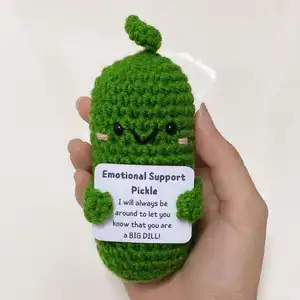
This pattern creates a small, hand-sized Emotional Support Pickle amigurumi with a curly stem, embroidered smile, tiny cheeks and safety eyes. It uses continuous rounds from a magic ring and basic increases and decreases for shaping. The finished piece makes a sweet gift or a comforting pocket buddy.

Crochet Emotional Support Pickle Amigurumi Pattern crochet pattern - detailed view of completed project

Clear step-by-step rounds and illustrated tips guide you through each stage. Simple finishing instructions show how to place eyes, sew the mouth and add cheeks for the perfect expression.

Why You'll Love This Crochet Emotional Support Pickle Amigurumi Pattern

I absolutely love this pattern because it turns simple stitches into a joyful little companion that brings a smile. I enjoy the quick, satisfying shaping of the stem that curls naturally without complicated steps. I love how the tiny face details β€” the safety eyes, embroidered mouth and blush β€” give so much personality with minimal effort. I also appreciate that it is finished quickly, making it perfect for last-minute gifts or craft breaks.

Crochet Emotional Support Pickle Amigurumi Pattern step 1 - construction progress Crochet Emotional Support Pickle Amigurumi Pattern step 2 - assembly progress Crochet Emotional Support Pickle Amigurumi Pattern step 3 - details and accessories Crochet Emotional Support Pickle Amigurumi Pattern step 4 - final assembly and finishing

Switch Things Up

I love how easily you can customize this pattern by changing the yarn color to create different personalities for your pickles.

I often use sport weight yarn with a smaller hook to make a tiny keychain version that is perfect for backpacks.

Try bulky yarn with a larger hook to make a squishy, cuddle-sized pickle that is great as a pillow buddy.

I sometimes embroider different mouth shapes or add felt accessories to change the expression from cheerful to sleepy or surprised.

For a seasonal twist I add tiny hats or scarves in contrasting colors to make holiday-themed pickles.

I also swap the safety eyes for embroidered eyes for a fully soft, baby-safe version.

Consider adding a small loop of yarn at the stem so you can hang the pickle as an ornament or attach it to a bag.

If you want a poseable version, I add thin wire inside the body before stuffing to make it slightly posable.

I like to vary cheek colors and intensity β€” soft pink for a shy look or bright coral for extra cuteness.

Finally, create matching sets with different sizes and colors and give them as a cheerful bundle β€” they make great gifts and party favors.

Common Mistakes & How to Fix Them

βœ— Skipping the magic ring and starting with chains can leave a hole at the top; always begin with a magic ring and tighten it to close the center.
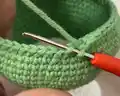
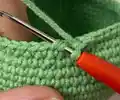
 βœ— Joining rounds with a slip stitch breaks the spiral look and creates a visible seam; crochet continuously in the round and use a stitch marker to track your beginning. βœ— Forgetting to stuff as you go results in lumps or difficulty closing the opening later; stuff gradually and evenly, adding small amounts while shaping. βœ— Placing safety eyes too early or unevenly can distort the face placement; mark positions between rounds 8-9 and ensure there are three stitches between eyes before securing.
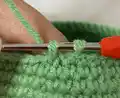
 βœ— Pulling slip stitches too loose when finishing the stem makes the stem flop; after making the sl st in the magic ring, pull the two strings on the hook tight so the sl st is small and neat.

Crochet Emotional Support Pickle Amigurumi Pattern

Make your very own adorable Emotional Support Pickle with this friendly crochet pattern. You will work from a magic ring to shape a cute curled stem and a tidy body, then add safety eyes, a sweet smile, and tiny cheeks. The design is quick to make and perfect for gifting or keeping on your desk as a comforting companion.

Beginner Friendly 2-3 Hours

Materials Needed for Crochet Emotional Support Pickle Amigurumi Pattern

β€” Main Fabric

  • 01
    5 Ply Cotton Yarn (Green) - main color (amount as needed for a small amigurumi)
  • 02
    Pink yarn - small amount for cheeks
  • 03
    Black yarn (2-ply recommended) - small amount for sewing mouth
  • 04
    6mm diameter safety eyes (2 pieces) for the face

β€” Tools Required

  • 01
    Crochet hook size 3.5 mm
  • 02
    6mm diameter safety eyes (2 pieces)
  • 03
    Stuffing (polyester fiberfill)
  • 04
    Hot melt glue
  • 05
    Yarn needle for sewing and weaving ends
  • 06
    Stitch marker
  • 07
    Scissors
  • 08
    Printer to print the sign and card (You need to know how to print!)

Progress Tracker

0% Complete

β€” Stem and Body :

Info :

Start with a magic circle. Ch7 in MR. Grab the top loop of the 2nd chain to make a sc. Continue making 5 sc for the stem. Do not press the stem; make it curl naturally. Make a sl st in MR and pull the two strings on the hook tight so that the sl st will be smaller. Ch1 as turning chain. The sl st and turning ch do not count as stitches.

Round 1 :

MR of 6 sc (6)

Round 2 :

6 inc (12)

Round 3 :

(sc, inc) * 6 (18)

Round 4 :

(sc, inc, sc) * 6 (24)

Round 5-11 :

24 sc (24)

Info :

Place eyes and sew mouth & cheeks after completing rounds 5-11 (instructions for placement and sewing are on the following pages).

β€” Place eyes, sew mouth and cheek :

Info :

Eyes are placed between R8-R9. There are 3 holes (stitches) between the eyes when positioned correctly.

Info :

Use 2-ply black yarn to sew the mouth for a neat, thin line.

Infos :

Needle out from the first hole between the eyes. Then needle in from the third hole between the eyes. Needle out from the middle hole of one row below. Needle under the black yarn and pull the yarn down to form a "V" shape. Needle in from the same middle hole of one row below. Use yarn tails to tie double knots inside to secure the mouth. Use pink yarn to sew cheeks on both sides.

β€” Body :

Round 12-21 :

24 sc (24)

Info :

Stuff the body lightly as you go, especially before reducing. Add more stuffing to shape the pickle before closing.

Round 22 :

(sc, dec, sc) * 6 (18)

Round 23 :

(sc, dec) * 6 (12)

Round 24 :

3 dec (9)

Info :

Make a sl st. Stuffing a little more. Leave about 15 cm (5.9 inches) of yarn and cut. Pass the needle through the front loops of all 9 stitches and pull tight to close the hole, then weave in the tail end.

β€” Hand*2 :

Hand (P1) :

Ch 8, go into the 3rd stitch from the hook and do 6 dc, ch1, leave a long tail and cut yarn. Sew them on the body at desired positions (small 'hands' holding the card).

Info :

Print sign on card and glue it on the body. The designer printed the sign file on 5" * 7" card and cut each sign to size.

Assembly Instructions

  • Attach the head/top stem area to the body by ensuring the stem sits centered on top and securing any loose stitches from the stem to the top round with a few hidden stitches.
  • Place the 6 mm safety eyes between rounds 8 and 9 with three stitches between them, then secure washers on the inside before continuing.
  • Sew the mouth using 2-ply black yarn: follow the needle in/out steps described to form a neat V-shaped smile and tie double knots inside to secure.
  • Sew the pink cheeks on both sides of the face using small stitches with pink yarn, securing and weaving in ends on the inside.
  • Sew the two small hand pieces onto the front of the body where they can hold the printed card, then glue the printed sign to the hands/body with hot melt glue for a secure finish.

Important Notes

  • πŸ’‘When working in the round, start with a magic circle and crochet continuously without joining with a slip stitch, using a stitch marker to mark the beginning of each round.
  • πŸ’‘Make sure the right side is out; the right side will show neat V stitches and the magic ring tail should be inside the work.
  • πŸ’‘Stuff gradually and evenly as you shape the body; overstuffing can distort the shape while under stuffing will not give enough structure.

This little Emotional Support Pickle is a tiny handmade hug you can keep anywhere β€” perfect for desks, pockets, or gift boxes. Make one for a friend or keep it for yourself; it always reminds you that you are a BIG DILL! 🧢😊

You ask,

we answer.

FAQs

What size will the finished piece be?

The finished amigurumi measures approximately 12 cm (4.7 inches) tall with a diameter of about 5 cm (1.96 inches) using the recommended 5-ply cotton and a 3.5 mm hook.

Can I use different yarn weights for this pattern?

Yes, you can use different yarn weights but this will change the finished size and may require an adjusted hook size; make a gauge test and adjust stuffing accordingly.

Do I need prior crochet experience for this pattern?

This pattern is beginner friendly, but familiarity with magic ring, single crochet, increases, decreases and sewing on safety eyes will help you follow the instructions more easily.

How long does this project typically take to complete?

Most crocheters complete this project in 2-3 hours, though your time may vary depending on experience and how detailed you make the finishing touches.