🧢 Beautiful ✨ Detailed πŸ’ Adorable

Crochet Flower Blanket Pattern

Crochet Flower Blanket Pattern
3.9β˜… Rating
12-15 Hours Time Needed
1.7K Made This
βœ‚οΈ

Beginner Friendly Level

Perfect for those just starting their crochet journey, with clear instructions and simple techniques

⏱️

Multi-Day Project

A rewarding 12+ hour journeyβ€”perfect for dedicated crafters who love detailed work.

πŸ€—

Soft Hug

Gentle, plush, and full of warmth, creating a sense of comfort and coziness wherever they find a home.

About This Crochet Flower Blanket Pattern

This pattern teaches you how to crochet small daisy-style flowers and join them into a colorful blanket. The flowers are made with simple chains, single crochet and slip stitches, making this accessible for newer crocheters. You can use many colors to create a vibrant patchwork effect. The pattern includes assembly notes and a joining diagram for guidance.

Crochet Flower Blanket Pattern crochet pattern - detailed view of completed project

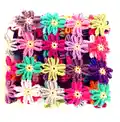
Flowers are worked in rounds and joined by attaching petals to neighboring flowers as you go. The author used Drops Paris yarn and a 4mm hook, but you can adapt yarn and hook to change size.

Why You'll Love This Crochet Flower Blanket Pattern

I absolutely love this pattern because it makes cheerful, colorful blankets that are surprisingly quick to assemble once you get into a rhythm. I love how each little flower becomes a tiny piece of art, and mixing colors is relaxing and playful. The joining method creates a lovely open texture that still feels warm and snuggly. Making rows of flowers feels meditative, and the finished blanket brings a big smile every time I see it.

Crochet Flower Blanket Pattern step 1 - construction progress Crochet Flower Blanket Pattern step 2 - assembly progress Crochet Flower Blanket Pattern step 3 - details and accessories Crochet Flower Blanket Pattern step 4 - final assembly and finishing

Switch Things Up

I love customizing this pattern by changing the color placement for each flower to create stripes or gradients across the blanket.

I often make the flower centers one consistent color and vary the petals for a more cohesive look.

If you want a softer palette, I switch to pastel shades or mix neutrals with one bright accent color.

To make a smaller lap blanket, reduce the number of flowers in each row and the number of rows.

For a larger throw, use thicker yarn and a bigger hook or increase the number of flowers per row and rows overall.

I sometimes add a simple single crochet border around the joined flowers to tidy the edges and add stability.

Try embroidering a small detail in the center of each flower for a personal touch and texture variation.

You can also make the centers in a bulky yarn for a raised, textured look that contrasts with fine petal yarn.

If you like a denser blanket, join the flowers more tightly by using smaller connecting stitches when attaching petals.

I sometimes alternate two different petal colors in each flower to create a striped petal effect that reads beautifully from a distance.

Common Mistakes & How to Fix Them

βœ— Skipping the slip stitch to close the initial chain ring leads to a loose center; always attach the first chain to the last with a slip stitch to form a neat ring. βœ— Not changing color correctly when instructed can leave an ugly tail; change colour with the last slip stitch as shown and weave in ends securely. βœ— Making fewer or more petals than required will cause mismatched joins; count and make exactly eight 8-chain bows before proceeding to the petal row. βœ— Forgetting to attach petals of new flowers to existing petals will result in unjoined gaps; follow the drawing and attach the fifth single crochet into the correct petal of the neighboring flower. βœ— Fastening off too close to the joining point leaves little yarn to weave in; leave a workable tail when fastening off so you can neatly sew or weave the end.

Crochet Flower Blanket Pattern

Create a bright and cheerful flower blanket using simple crochet techniques and colorful yarn. This pattern walks you through making individual daisy-like flowers and joining them into a cozy blanket. You can mix and match colors to create a playful patchwork effect perfect for gifts or home decor. Follow the clear step-by-step instructions and the joining diagram to finish a stunning blanket.

Beginner Friendly 12-15 Hours

Materials Needed for Crochet Flower Blanket Pattern

β€” Main Fabric

  • 01
    Drops Paris by Garnstudio (used by the designer) in assorted colors (use multiple colors for petals and centers as desired)
  • 02
    Cotton/ cotton-blend yarn suitable for 4mm hook (use assorted colors; exact amounts depend on blanket size)

β€” Tools Required

  • 01
    Crochet hook size 4mm
  • 02
    Scissors
  • 03
    Yarn needle for sewing in ends
  • 04
    Pins for positioning pieces (optional)

Progress Tracker

0% Complete

β€” The pattern :

Flower A :

1. Chain 4, attach the first chain to the last with a slip stitch. 2. Do 8 single crochet in the ring you made in the first row. 3. Do a slip stitch in the first single crochet. Change colour while doing so. If you don't know how to change colour, go here: http://annemarieshaakblog.blogspot.nl/2012/04/how-to-change-colour.html 4. *Chain 8, make a slip stitch in the next single crochet.* Repeat what's in between * seven more times. You now have 8 bows. 5. *Do 9 single crochet in the first 8-chain-bow. Make a slip stitch in the single crochet below. That's the same single crochet where you did a slip stitch in in the previous row.* Repeat what's in between * seven morgen times. Fasten off after the last slip stitch.

Info :

You've now finished your first flower. On the drawing on the last page, that's flower A. You'll now start working on flower B.

Flower B :

1. Repeat rows 1-4 of flower A. Start with row 5 but only make the first 6 leaves of row 5. 2. Make leaf 7 as follows: do 4 single crochet in the 8-chain-bow. Now make the fifth single crochet in the fifth single crochet of one of the leaves of flower A. See the drawing on the last page for a clear instruction. Do the same with leaf 8 and finish the flower as you did with flower A.

Flower C :

Make flower C in the same way as flower B. Ofcourse you can add as many flower to this row as you like. I made a row of 12 flowers in total.

Flower D :

Flower D is the first flower of the second row of flowers. Make flower D in the same way as flower B.

Flower E :

1. Repeat rows 1-4 of flower A. Start with row 5 but only make the first 4 leaves of row 5. 2. Now attach the leaves 5, 6, 7 and 8 the same way you attached them with flower B. See the drawing on the last page for a clear instruction.

Info :

Now all other flowers are made like flower E. I made 8 rows of flowers, so in total my blanket has 96 flowers. You can use as many colours as you like.

β€” Last but not least :

Info :

Designing crochet patterns is a time-consuming and difficult job. I'd love to see you make as many flower blankets as you like for yourself or to give as a gifts. But please do not make copies of this pattern, don't distribute this pattern, don't share it and don't sell it as if it is your design. If you post your own flower blanket somewhere on the WorldWideWeb, I'd love it if you refer to my shop.

Assembly Instructions

  • Refer to the joining diagram on the last page to attach petals of new flowers to petals of existing flowers so seams form between neighboring flowers.
  • When making Flower B and subsequent joined flowers, attach the fifth single crochet of the joining petal into the corresponding single crochet of the neighbor (see drawing).
  • Work rows of flowers across (for example a row of 12 flowers) and then start the next row attaching to the petals of the row below as shown in the diagram.
  • Fasten off each flower after completing the last slip stitch but leave a tail if you need to sew in or tidy up the join; weave in ends neatly with a yarn needle.
  • Pin flowers in place before final sewing if you want to check alignment; use the diagram as a guide for spacing so the blanket remains even.

Important Notes

  • πŸ’‘Use a crochet hook size 4mm as recommended by the designer for similar gauge and finished size.
  • πŸ’‘Change colours on the last slip stitch as instructed to keep transitions neat and reduce ends to weave in.
  • πŸ’‘Follow the joining diagram carefully when attaching petals to prevent mismatched joins and gaps in the blanket.
  • πŸ’‘You can adapt yarn and hook sizes but be aware this will change the finished blanket size and the number of flowers needed.

This flower blanket pattern brings playful color and handmade charm into your home. Make rows of daisy-style flowers and join them to create a cozy, cheerful throw that brightens any room. Use as many colors as you like and enjoy the meditative rhythm of small, repeated motifs. 🧢🌸

You ask,

we answer.

FAQs

What size will the finished piece be?

The finished blanket size depends on the number of flowers and yarn/hook used; the designer made 8 rows of 12 flowers for a total of 96 flowers.

Can I use different yarn weights for this pattern?

Yes, you can use different yarn weights but this will affect the final size; adjust your hook to suit the yarn and note that you will need fewer or more flowers for the desired dimensions.

Do I need prior crochet experience for this pattern?

This pattern is beginner friendly and uses basic stitches like chain, single crochet and slip stitch, so basic crochet knowledge is recommended.

How long does this project typically take to complete?

This project can take 12-15 hours depending on your speed and the number of flowers you make; joining and finishing will add to the total time.

How do I join the flowers together?

Follow the drawing on the last page: petals are attached by making the fifth single crochet of the new petal into the corresponding single crochet of a neighboring petal, joining as you go.