🧢 Beautiful ✨ Detailed πŸ’ Adorable

Crochet Landscape Rings Amigurumi Pattern

Crochet Landscape Rings Amigurumi Pattern
4.5β˜… Rating
1-2 Hours Time Needed
2.6K Made This
βœ‚οΈ

Beginner Friendly Level

Perfect for those just starting their crochet journey, with clear instructions and simple techniques

⏱️

Quick Make

Complete in under 2 hoursβ€”lightning fast fun for instant gratification and quick gifts.

✨

Stylish Touch

An elegant detail to elevate any look, combining traditional techniques with contemporary design sensibilities.

About This Crochet Landscape Rings Amigurumi Pattern

This pattern creates small crochet landscape rings approximately 20mm in diameter that you can wear or gift. You will work in rounds on a simple chain base and build three color bands to form a mini scene. The design is finished with tiny embroidered details for birds, trees, or buildings to bring each ring to life.

Crochet Landscape Rings Amigurumi Pattern crochet pattern - detailed view of completed project

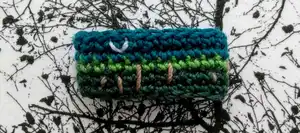
The instructions are straightforward and use basic stitches making it ideal for new crocheters. Color suggestions for beach, city and woodland themes are included to inspire your own combinations.

Why You'll Love This Crochet Landscape Rings Amigurumi Pattern

I absolutely love this pattern because it turns a few simple stitches into a tiny wearable landscape full of personality. I enjoy how quickly each ring comes together, making it perfect for a last-minute handmade gift. The colorways are playful and versatile, letting me mix and match moods like beachy, urban, or woodland scenes. Embroidering the small details is my favorite part because it adds charm and makes every ring unique.

Crochet Landscape Rings Amigurumi Pattern step 1 - construction progress Crochet Landscape Rings Amigurumi Pattern step 2 - assembly progress Crochet Landscape Rings Amigurumi Pattern step 3 - details and accessories Crochet Landscape Rings Amigurumi Pattern step 4 - final assembly and finishing

Switch Things Up

I love how easy it is to customize these rings with different color palettes; try pastel tones for a soft, vintage look or bright brights for a bold statement.

I often change the foundation chain length to make larger or smaller rings; increasing by a few chains will give you a looser, larger band while decreasing tightens it up.

I sometimes switch yarns to a slightly thicker weight and a larger hook to create chunky statement rings that are quicker to make and very tactile.

I like to experiment with embroidered motifs beyond birds and trees 6tiny suns, waves or geometric city skylines add a lot of personality.

I sometimes add a small bead or metallic thread into the embroidery to give a shimmer or focal point for the top band.

I enjoy mixing texture by using a boucle or slub yarn for one of the bands so the landscape has more visual interest and depth.

I recommend trying a set of three rings in coordinating colorways to wear stacked; they look great layered and make a lovely gift set.

I occasionally attach a small jump ring inside the crochet band to convert the piece into a pendant or keychain charm for versatility.

I encourage you to vary stitch tension deliberately 6slightly looser stitches soften the ring while tighter stitches give a neater, more rigid band.

I also like to practice surface crochet over the top band for accent lines instead of embroidery for a more textured graphic finish.

Common Mistakes & How to Fix Them

βœ— Making a twisted chain when joining will distort the ring shape; ensure the chain is laid flat and untwisted before joining with a slip stitch. βœ— Skipping the note about chain length can make the ring too large or too small; use 20 ch as a guide and increase or decrease the chain to achieve the required diameter. βœ— Forgetting to change colours at the indicated rows will blur the scene bands; change yarn exactly at the end of the specified round to keep clean color separations. βœ— Not weaving in ends before embroidering will cause loose threads during stitching; weave and secure all tails first, then do the embroidered details carefully.

Crochet Landscape Rings Amigurumi Pattern

Make tiny, wearable landscape rings that capture beach, city or woodland scenes using simple crochet stitches and playful embroidery. This easy pattern guides you step-by-step to create a 20mm diameter ring you can customize with colorways and stitched details. Perfect as a quick gift or a creative jewelry project you can finish in an afternoon.

Beginner Friendly 1-2 Hours

Materials Needed for Crochet Landscape Rings Amigurumi Pattern

β€” Main Fabric

  • 01
    Scheepjes Sugar Rush - beach colorway: saffron, dark teal, snow white
  • 02
    Scheepjes Sugar Rush - city colorway: charcoal, mercury, snow white
  • 03
    Scheepjes Sugar Rush - woodland colorway: spruce, sage green, teal
  • 04
    Small amounts of charcoal, snow white & moon rock for embroidery details

β€” Tools Required

  • 01
    Crochet hook size 1.5 mm
  • 02
    Yarn needle

Progress Tracker

0% Complete

β€” Ring :

Infos :

Approx. size 620mm in diameter. Starting from the bottom.

Row 1 :

Make a slip knot in first colour. Ch 20 (20ch makes a ring about 20mm in diameter 6increase or decrease as required) & join with a slip stitch

Info :

*Make sure the chain isn't twisted

Row 2 :

ch 1 (does not count as a stitch), 1 dc in each st & join with a sl st

Row 3 :

ch 1 (does not count as a stitch), 1 dc in each st & join with a sl st

Info :

*Change to middle colour

Row 4 :

ch 1 (does not count as a stitch), 1 dc in each st & join with a sl st

Info :

*Change to top colour

Row 5 :

ch 1 (does not count as a stitch), 1 dc in each st & join with a sl st

Row 6 :

ch 1 (does not count as a stitch), 1 dc in each st, join with a sl st & fasten off

Info :

Weave in your ends

Info :

Embroider small v shapes for birds in charcoal or snow white and lines for tree trunks or buildings in moon rock and charcoal.

Assembly Instructions

  • Weave in all yarn tails securely using a yarn needle after fastening off to neaten the inside of the ring.
  • Change colours exactly at the end of the indicated rounds (after Row 3 for middle colour and after Row 4 for top colour) to create clear landscape bands.
  • Embroider small V shapes in charcoal or snow white to represent birds, spacing them across the top band for a natural look.
  • Stitch vertical or horizontal lines for tree trunks or buildings using moon rock and charcoal yarn, keeping stitches small and deliberate for detail.

Important Notes

  • πŸ’‘Make sure the chain isn't twisted before joining with a slip stitch to form the initial ring.
  • πŸ’‘20 chain stitches makes a ring about 20mm in diameter; increase or decrease the chain length to alter final size.
  • πŸ’‘Change to the middle and top colours at the indicated times to keep crisp color bands for the landscape effect.
  • πŸ’‘Weave in ends before embroidering details to prevent loose threads and to keep your embroidered motifs tidy.

These tiny Crochet Landscape Rings are a delightful quick-make project that turns yarn into wearable scenes. 🧢 Customize colors for beach, city or woodland themes and add tiny embroidered details to make each ring unique. ✨ Perfect as a thoughtful handmade gift or a special addition to your accessory collection. 🌿

You ask,

we answer.

FAQs

What size will the finished piece be?

The finished ring measures approximately 20 mm in diameter when using the recommended 20 chain foundation and the specified hook size.

Can I use different yarn weights for this pattern?

You can, but changing yarn weight will affect the final size; adjust the number of foundation chains and hook size to achieve the desired diameter.

Do I need prior crochet experience for this pattern?

This pattern is rated beginner friendly and uses basic stitches like chain and double crochet, so basic crochet knowledge is helpful.

How long does this project typically take to complete?

Most crocheters can complete a single ring in under 2 hours, though time will vary depending on embroidery detail and familiarity with the stitches.