🧢 Beautiful ✨ Detailed πŸ’ Adorable

Crochet Owl Amigurumi Pattern

Crochet Owl Amigurumi Pattern
4.1β˜… Rating
1-2 Hours Time Needed
2.7K Made This
βœ‚οΈ

Beginner Friendly Level

Perfect for those just starting their crochet journey, with clear instructions and simple techniques

⏱️

Quick Make

Complete in under 2 hoursβ€”lightning fast fun for instant gratification and quick gifts.

🧸

Cute Companion

An adorable friend to cherish, handcrafted with love to bring comfort and joy for years to come.

About This Crochet Owl Amigurumi Pattern

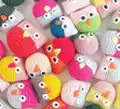
This pattern creates a small, colorful crochet owl using basic US crochet terms and simple shaping. It is perfect for using up yarn scraps and making quick, giftable amigurumi. The design includes clear instructions for the body and simple eye pieces to finish the owl.

Crochet Owl Amigurumi Pattern crochet pattern - detailed view of completed project

No advanced techniques are required, just basic stitches and a magic ring to start. Perfect for beginners looking for a fast, satisfying project.

Why You'll Love This Crochet Owl Amigurumi Pattern

I absolutely love this pattern because it is simple, versatile, and quick to make, so you can create lots of owls in different color combinations. I enjoy how each tiny change in color or beak style gives the owl a whole new personality. I also love that the pattern uses minimal materials and is great for using leftover yarn scraps. Making these owls is a relaxing, rewarding project that finishes fast and looks adorable on display or as gifts.

Crochet Owl Amigurumi Pattern step 1 - construction progress Crochet Owl Amigurumi Pattern step 2 - assembly progress Crochet Owl Amigurumi Pattern step 3 - details and accessories Crochet Owl Amigurumi Pattern step 4 - final assembly and finishing

Switch Things Up

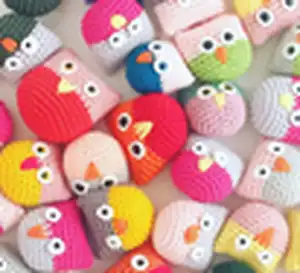
I love customizing this little owl pattern by mixing bright and neutral colors to create unique personalities for each owl.

You can make the owl larger or smaller by switching yarn weight and adjusting your hook size; thicker yarn makes a chunkier, cuddly owl while thinner yarn makes a tiny keychain version.

I often change the eye colors or use safety eyes of different sizes to make expressive faces; try larger eyes for a cuter look.

Experiment with beak styles: embroider a small triangle, crochet a tiny cone, or use felt for a flat beak variation.

If you want posable ears, add a small piece of wire inside the ear folds before stitching them closed.

I sometimes add tiny embroidered eyebrows or blush with a little yarn or fabric paint for extra character.

Try adding small accessories like a crocheted bow, hat, or scarf to make themed owls for holidays or special gifts.

If you're making multiples, consider alternating two-tone bodies or striped bellies to create a coordinated collection.

I also like to attach a keyring or loop to the top for easy use as a bag charm or keychain; simply crochet a short chain and secure it inside the top seam.

Lastly, don't be afraid to mix techniques like felt appliques or surface embroidery to highlight the wings or chest for a more decorative finish.

Common Mistakes & How to Fix Them

βœ— Skipping the magic ring tightening leads to a loose center hole; pull the ring tight and close the center before continuing. βœ— Forgetting to change colour at the indicated row creates awkward transitions; change colour exactly where instructed to keep the design tidy. βœ— Not inserting safety eyes through the closure can cause misplacement; push the safety eyes through the middle and through the closure on the inside as instructed. βœ— Overstuffing the body can distort the owl shape and make the top hard to close; stuff gradually and evenly to maintain the rounded shape.

Crochet Owl Amigurumi Pattern

Make a charming crochet owl using simple stitches and minimal assembly. This quick, colorful amigurumi is perfect for scrap-busting and makes a sweet gift or keychain. You will love how fast the little owl comes together and how many variations you can create by switching colors. Follow the clear US-term instructions and finish an adorable owl in under two hours.

Beginner Friendly 1-2 Hours

Materials Needed for Crochet Owl Amigurumi Pattern

β€” Main Fabric

  • 01
    Paintbox Yarns (assorted colors) - small amounts per owl (use scraps or approx 5-10g per color depending on size)
  • 02
    White yarn (small scrap) for eye rounds
  • 03
    Contrasting yarn for beak (small scrap)
  • 04
    Polyester stuffing (fyberfill) to fill the body

β€” Tools Required

  • 01
    Crochet hook - use the size recommended for your chosen yarn
  • 02
    Safety eyes (recommended small sizes for mini owls, adjust to preference)
  • 03
    Scissors
  • 04
    Yarn needle for sewing and weaving ends
  • 05
    Stitch markers (optional)
  • 06
    Pins for assembly (optional)

Progress Tracker

0% Complete

β€” Body :

Round 1 :

6SC in a magic ring.

Round 2 :

Increase around. (12)

Round 3 :

* 1SC, increase. * Repeat around. (18)

Round 4 :

* 2SC, increasee. * Repeat around. (24)

Round 5-8 :

1SC in each stitch around. (24)

Info :

Change colour.

Round 9-14 :

1SC in each stitch around. (24) Fasten off.

β€” Eyes :

Info :

Eyes (with white)

Round 1 :

Make a magic ring, chain 3.

Round 2 :

Do 10DC in the magic ring. Close the ring.

Round 3 :

1 slip stitch in the first DC.

Info :

Now push the safety eyes through the middle and push them through the closure that's on the inside of the body. Fill the body with fyberfill and close the top. Fold the sides of the top to shape the ears. Sew a beak on the body.

β€” Notes :

Infos :

Designing crochet patterns is a time-consuming and difficult job. I'd love to see you make as many owls as you like. But please do not make copies of this pattern, don't distribute this pattern, don't share it and don't sell it as if it is your design. If you post your own owl somewhere on the WorldWideWeb, I'd love it if you refer to my blog or shop. Enjoy!

Assembly Instructions

  • Push the safety eyes through the middle of each white eye piece and ensure they go through the closure on the inside of the body before securing the back.
  • Fill the body with polyester stuffing (fyberfill) gradually until it reaches a nice firm but soft shape, then close the top opening by sewing the last stitches together.
  • Fold the sides of the top to form ear shapes and stitch them in place to keep the ears defined and symmetrical.
  • Sew a small triangular beak onto the front center of the owl, positioning it between and slightly below the eyes for a natural look.

Important Notes

  • πŸ’‘Use stitch markers to mark the beginning of each round for accurate counting and consistent shaping.
  • πŸ’‘Stuff the body gradually and evenly; overstuffing will distort the overall shape and make closing difficult.
  • πŸ’‘Secure safety eyes firmly and check the inside closure before finishing to ensure eyes will not move or fall out.

This delightful Crochet Owl pattern is perfect for making cheerful little friends from your yarn scraps. Create a flock in bright colors or soft pastels to match any decor. Share them as gifts or use them as ornaments and keychains for a handmade touch. πŸ§ΆπŸ¦‰

You ask,

we answer.

FAQs

What size will the finished piece be?

The finished amigurumi owl size depends on the yarn and hook you use; with standard sport/worsted weight yarn and the recommended hook you can expect a small owl roughly the size of a small egg or palm-sized toy.

Can I use different yarn weights for this pattern?

Yes, you can use different yarn weights, but this will affect the final size; choose an appropriate hook for your yarn and note the finished dimensions will change accordingly.

Do I need prior crochet experience for this pattern?

This pattern is rated beginner friendly, so basic knowledge of magic ring, single crochet, and double crochet is recommended but no advanced techniques are required.

How long does this project typically take to complete?

Most crocheters can complete this small owl in under two hours, depending on experience and finishing details like sewing the eyes and beak.