🧢 Beautiful ✨ Detailed πŸ’ Adorable

Crochet Snowman Ornaments Amigurumi Pattern

Crochet Snowman Ornaments Amigurumi Pattern
4.6β˜… Rating
2-3 Hours Time Needed
1.3K Made This
βœ‚οΈ

Intermediate Level

Ideal for those with basic crochet experience, featuring slightly more advanced stitches and techniques to expand your skills.

⏱️

Bite-Sized Project

Finishes in 2-4 hoursβ€”perfect for an afternoon of creative relaxation.

🧸

Cute Companion

An adorable friend to cherish, handcrafted with love to bring comfort and joy for years to come.

About This Crochet Snowman Ornaments Amigurumi Pattern

This pattern creates small snowman head ornaments with removable tiny hats and a crocheted carrot nose. You will work in continuous spiral rounds using single crochet stitches for a neat finish. The design is compact and perfect for making multiple color variations for holiday decorations.

Crochet Snowman Ornaments Amigurumi Pattern crochet pattern - detailed view of completed project

Includes detailed round-by-round instructions for the nose, head, and hat plus assembly tips. Ideal for gifting or adding handmade charm to your tree or home.

Why You'll Love This Crochet Snowman Ornaments Amigurumi Pattern

I absolutely love this pattern because it turns simple stitches into a delightful holiday character that’s quick to make. I enjoy how each tiny hat and nose can be customized with different yarn colors to give each snowman its own personality. The pattern is compact, so you can produce several ornaments in an afternoon to decorate or gift. It’s satisfying to see the head take shape as you stuff and close it, and finishing the little embroidered smile always makes me smile too.

Crochet Snowman Ornaments Amigurumi Pattern step 1 - construction progress Crochet Snowman Ornaments Amigurumi Pattern step 2 - assembly progress Crochet Snowman Ornaments Amigurumi Pattern step 3 - details and accessories Crochet Snowman Ornaments Amigurumi Pattern step 4 - final assembly and finishing

Switch Things Up

I love how easy it is to customize these ornaments by changing hat colors and nose yarn to create distinct personalities for each snowman.

I often use pastel yarns for a soft, vintage look, or bright primary colors for playful, modern decorations.

I sometimes make mini versions by using thinner yarn and a smaller hook to create tiny keychain-friendly snowmen.

I like to embroider different smiles or add tiny felt accessories like scarves or mini bow ties for variety.

I recommend trying variegated yarn for the hat to get a fun, multicolored brim without changing yarns mid-work.

I occasionally place one safety eye slightly higher or lower to give a more whimsical facial expression β€” test placement before securing.

I also experiment with textured stitches for the hat brim, such as slip stitch ridges or front loop ribs, for a different finish.

I sometimes add a small loop of yarn or ribbon to the top of the hat for easier hanging on the tree.

I prefer adding a touch of blush with very diluted fabric paint or pastel chalk for a soft cheek effect that photographs beautifully.

I encourage you to mix yarn types like cotton for a crisp look or acrylic for extra durability depending on the intended use.

Common Mistakes & How to Fix Them

βœ— Skipping the stitch marker when working in a continuous spiral causes you to lose track of the first stitch; always place a marker and move it up each round to maintain correct stitch placement. βœ— Overstuffing the head creates lumps and can make sewing the hat uneven; stuff gradually in small chunks and shape as you go to get a smooth finish. βœ— Forgetting to place safety eyes between the correct rounds will misplace the face features; insert safety eyes between rounds 10 and 11 with two stitches space between them as instructed. βœ— Pulling the magic ring too tight on the nose will close the hole and ruin the shape; for the nose leave the ring slightly open to create a small circle and form the shape gradually. βœ— Not counting stitches after increase/decrease rounds leads to uneven shaping; count your stitches after every shaping round (especially rounds with InvDec) to ensure correct stitch totals.

Crochet Snowman Ornaments Amigurumi Pattern

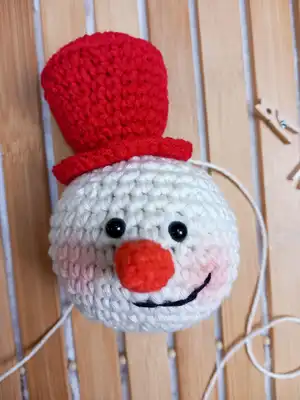
Make charming crochet snowman ornaments with this easy-to-follow pattern. You will create a sweet, stuffed snowman head with a tiny hat and carrot nose β€” perfect for gifts or holiday decor. The pattern includes full round-by-round instructions, materials list, and helpful finishing tips to guide you every step of the way.

Intermediate 2-3 Hours

Materials Needed for Crochet Snowman Ornaments Amigurumi Pattern

β€” Main Fabric

  • 01
    Drops Paris (for head) color No. 17 - 50gr/1.8oz, 75m/82yds (amount as needed for multiple ornaments)
  • 02
    YarnArt Jeans Bamboo (for hats and noses) - 50gr/1.8oz, 150m/164yds (colors No. 107, 119, 121, 137, 138, 141, 144 suggested)
  • 03
    Yarn in colors of choice for hats and noses - small amounts (approx 10-30g per hat/nose)
  • 04
    Black embroidery thread - small amount for smile detail
  • 05
    Polyester stuffing - small amount per ornament (use small chunks)

β€” Tools Required

  • 01
    Crochet hook size 2 mm
  • 02
    Crochet hook size 3 mm
  • 03
    Crochet hook size 3.5 mm
  • 04
    6mm safety eyes (2 pieces per ornament)
  • 05
    Tapestry needle
  • 06
    Scissors
  • 07
    Stitch marker
  • 08
    Blush for the cheeks (optional)
  • 09
    Black embroidery thread for the smile

Progress Tracker

0% Complete

β€” Tools and Materials :

Info :

1. Crochet hooks 2 mm, 3 mm and 3.5 mm. 2. Yarn in colors of choice. 3. Stuffing. 4. 6mm safety eyes. 5. Tapestry needle. 6. Scissors. 7. Stitch marker. 8. Blush for the cheeks (optional). 9. Black embroidery thread.

β€” Abbreviations (US) :

Infos :

MR : Magic Ring. Sc: Single crochet. Ch: Chain. *..* : repeat instructions inside *. (...) : number of stitches in this round. Inc: Increase. Dec: Decrease. InvDec: Invisible Decrease. St/Sts: Stitch/Stitches. Slst: Slip stitch. R: Round. FO: Fasten off. BLO: Back Loop Only.

β€” Notes and Tips :

Infos :

This pattern is using the single crochet stitch. The yarn I used is Drops Paris color No. 17 [50gr/1.8oz, 75m/82yds] for the head. The yarn for the hats and noses is YarnArt Jeans Bamboo [50gr/1.8oz, 150m/164yds] color No. 107, 119, 121, 137, 138, 141 and 144. Crochet in continuous spiral rounds (do not join at the end of each round). Use a stitch marker to keep track of the first stitch in each round. When filling with polyester stuffing, take small chunks and push them through the hole. Do not overstuff it, we don't want any filling to bleed through the stitches, just make sure to stuff the snowman head evenly. The snowman ornaments measure around 3.2in (8cm) wide and 4.5in (11cm) tall including the hat. In case you use another yarn, sizing may differ.
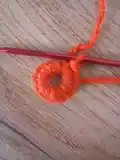
β€” Nose :

Info :

For the nose we will start from the bottom up. With hook No. 2 make a MR

Round 1 :

10 sc in MR ( do not pull to close the hole fully, just create a circle) (10)

Round 2 :

3 sc, InvDec, 3sc, InvDec (8)

Round 3 :

2 sc, InvDec, 2 sc, InvDec (6)

Round 4 :

3 sc, InvDec, 1 sc (5)

Round 5 :

InvDec, 1 sc, leave the last 2 stitches unworked, ch1 and FO leaving a long tail for sewing (40 cm/16 in)

Info :

Pull the yarn from the tip of the nose to the base, so we can sew it later.

β€” Head :

Info :

With hook No. 3.5 make a magic ring (MR)

Round 1 :

6 sc into MR, pull yarn to tighten the circle (6)

Round 2 :

Inc in each st around (12)

Round 3 :

*1 sc, Inc* repeat from * 5 more times (18)

Round 4 :

1 sc, Inc, *2 sc, Inc* repeat from * 4 more times, 1 sc (24)

Round 5 :

*3 sc, Inc* repeat from * 5 more times (30)

Round 6 :

Sc around (30)

Round 7 :

*4 sc, Inc* repeat from * 5 more times (36)

Round 8-12 :

Sc around (36)

Round 13 :

*4 sc, InvDec* repeat from * 5 more times (30)

Round 14 :

Sc around (30)

Round 15 :

*3 sc, InvDec* repeat from * 5 more times (24)

Info :

Put the safety eyes between rounds 10 and 11, with two stitches space in between. Sew the nose between rounds 7 and 10. ~Start filling the head here~

Round 16 :

1 sc, InvDec, *2 sc, InvDec* repeat from * 4 more times, 1 sc in last st (18)

Round 17 :

*1 sc, InvDec* repeat from * 5 more times (12)

Info :

~Stuff the head some more~

Round 18 :

12 InvDec (6)

Info :

FO leaving a long tail (20 cm/8 in), thread your tapestry needle and pull the tail through every one of your 6 sts. Pull tight to close the hole and hide the rest of the yarn inside the head.
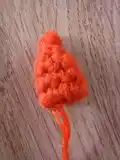
β€” Hat :

Info :

With hook No. 3 make a magic ring (MR)

Round 1 :

8 sc into MR, pull yarn to tighten the circle (8)

Round 2 :

Inc in each st around (16)

Round 3 :

*1 sc, Inc* repeat from * 7 more times (24)

Round 4 :

1 sc, Inc, *2 sc, Inc* repeat from * 6 more times, 1 sc (32)

Round 5 :

*3 sc, Inc* repeat from * 7 more times (40)

Info :

For the next round ONLY we will be working in BLO, even the Decreases.

Round 6 :

*3 sc, Dec* repeat from * 7 more times (32)

Info :

(back to normal)

Round 7 :

1 sc, InvDec, *2 sc, InvDec,* repeat from * 6 more times, 1 sc (24)

Round 8-11 :

Sc around (24)

Round 12 :

*2 sc, InvDec* repeat from * 5 more times (18)

Round 13 :

Sc around (18)

Round 14 :

*2 sc, Inc* repeat from * 5 more times (24)

Round 15 :

1 sc, Inc, *3 sc, Inc* repeat from * 4 more times, 2 sc (30)

Round 16 :

*2 sc, Inc* repeat from * 9 more times (40)

Info :

Slst on the next stitch and FO leaving a long tail (20 cm/8 in)

Info :

Stuff the hat a little bit, to keep the shape and sew it on top of the head. Add some blush to the cheeks and with your black embroidery thread, make a smile.

Info :

Feel free to contact me, in case you have any trouble with the instructions! e-mail: cotton.and.wool@outlook.com

Assembly Instructions

  • Insert the 6mm safety eyes between rounds 10 and 11, spacing them two stitches apart, and secure them firmly before stuffing.
  • Sew the nose between rounds 7 and 10 on the head using the long tail left from the nose, ensuring it sits centered on the face.
  • Start stuffing the head after round 15, add more stuffing after round 17, then close the hole after round 18 by pulling the tail through the 6 sts and hiding the yarn inside.
  • Stuff the hat lightly to keep the shape, align it on top of the head and sew it securely in place with the long tail left from the hat.
  • Add blush to the cheeks if desired and embroider a smile with black embroidery thread using the photos as placement reference.

Important Notes

  • πŸ’‘Work in continuous spiral rounds; do not join at the end of each round and use a stitch marker to mark the first stitch in each round.
  • πŸ’‘When stuffing, use small chunks of polyester fiberfill and push them in gradually to avoid lumps and to keep a smooth shape.
  • πŸ’‘Use the recommended hook sizes for each part: 3.5 mm for the head, 3 mm for the hat, and 2 mm for the nose to achieve the shown gauge and proportions.
  • πŸ’‘Place safety eyes before heavy stuffing to ensure correct positioning and to secure them firmly to avoid movement.
  • πŸ’‘Leave long tails when fastening off the head and hat to use for sewing and closing openings.

Create a collection of tiny snowman ornaments to brighten your home this season and give as heartwarming handmade gifts. Each little snowman is full of personality thanks to colorful hats and a sweet embroidered smile. Happy crocheting and may your holidays be cozy and creative! πŸŽ„πŸ§Ά

You ask,

we answer.

FAQs

What size will the finished piece be?

The snowman ornament measures approximately 3.2 inches (8 cm) wide and 4.5 inches (11 cm) tall including the hat when using the recommended yarn and hook sizes.

Can I use different yarn weights for this pattern?

Yes, you can use different yarn weights, but the final size and stitch tension will change; choose an appropriate hook for the yarn and adjust placement of eyes and nose accordingly.

Do I need prior crochet experience for this pattern?

This pattern is rated intermediate and uses continuous rounds, invisible decreases, and shaping; basic knowledge of single crochet, increases, and decreases is recommended.

How long does this project typically take to complete?

Most crocheters complete one ornament in about 2-3 hours, though time may vary depending on experience level and whether you add extra details or colorwork.

How do I attach the hat so it stays in place?

Stuff the hat lightly to keep its shape, place it on top of the head, and sew it around the base with the long tail left from the hat to secure it firmly.