🧶 Beautiful ✨ Detailed 💝 Adorable

Crochet Wine Tote Bag Pattern

Crochet Wine Tote Bag Pattern
4.1★ Rating
2-3 Hours Time Needed
4.0K Made This
✂️

Intermediate Level

Ideal for those with basic crochet experience, featuring slightly more advanced stitches and techniques to expand your skills.

⏱️

Bite-Sized Project

Finishes in 2-4 hours—perfect for an afternoon of creative relaxation.

Stylish Touch

An elegant detail to elevate any look, combining traditional techniques with contemporary design sensibilities.

About This Crochet Wine Tote Bag Pattern

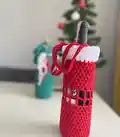
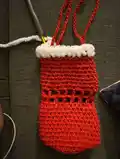
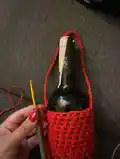
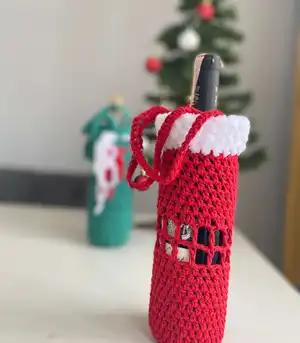
This pattern creates a fitted crochet wine tote designed to hold a standard wine bottle with a decorative perforated band and optional velvet trim. The project uses half double crochet rounds to form the body, a lacy square band to add visual interest, and a crocheted strap to finish. Clear step-by-step rounds and photos guide you through each stage so you can achieve a professional-looking gift bag.

Crochet Wine Tote Bag Pattern crochet pattern - detailed view of completed project

Perfect as a holiday or hostess gift, the tote is customizable in length and trim so you can tailor it to any bottle or color palette. The pattern includes complete round-by-round instructions, materials, and helpful tips.

Why You'll Love This Crochet Wine Tote Bag Pattern

I absolutely love this pattern because it turns a simple bottle into a thoughtful handmade gift that feels special and personal. I enjoyed designing the perforated band because it adds a lovely decorative window without complicating the construction. I also love how easily you can change colors and trims to suit holidays or occasions. Completing a full tote in an afternoon is so satisfying, and it makes a charming present for friends and family.

Crochet Wine Tote Bag Pattern step 1 - construction progress Crochet Wine Tote Bag Pattern step 2 - assembly progress Crochet Wine Tote Bag Pattern step 3 - details and accessories Crochet Wine Tote Bag Pattern step 4 - final assembly and finishing

Switch Things Up

I love changing colors to match seasons; try deep greens and golds for a festive holiday tote or soft pastels for spring gifts.

If you want a larger tote, use a bulkier macrame yarn and a larger hook to create a chunkier, more substantial bag.

For a mini keychain version, use lighter yarn and a smaller hook to make a pretty bottle-shaped charm that doubles as decoration.

I often add embroidered initials on the perforated band area to personalize each gift for friends and family.

Try adding a fabric lining inside the tote for extra strength and a cleaner finish—cut a fabric tube and sew it into the inside before finishing the top edge.

I sometimes add a snap or button closure at the top for extra security when carrying the bottle.

Swap the velvet trim for a crocheted scallop edge in a contrasting color to create a delicate decorative finish.

Make a matching set by crocheting multiple totes in different sizes—small ones for olive oil or specialty vinegar bottles, larger ones for magnum bottles.

Use metallic or variegated yarn for a more festive appearance that sparkles in holiday lighting for an eye-catching gift.

I recommend trying different strap styles—flat crocheted straps, braided straps, or even leather handles—for varied looks and durability.

Common Mistakes & How to Fix Them

✗ Failing to count stitches after increases will lead to a distorted base; count hdc after each increase round to ensure the correct stitch total. 
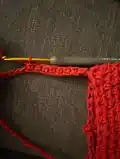
✗ Working perforated rows with tight tension can shrink the hole size and distort the pattern; relax your tension in those rows and crochet more loosely to keep the squares open. ✗ Skipping the stitch that joins rounds or using the wrong joining point will change row alignment; always slip stitch into the top of the first indicated stitch and mark the start of each round with a stitch marker. ✗ Not securing the strap ends tightly can cause them to slip under load; knot securely, weave in ends, and sew the strap ends down for extra reinforcement.

Crochet Wine Tote Bag Pattern

Make a delightful crochet wine tote that fits a standard wine bottle and makes a beautiful handmade gift. This pattern walks you through forming the base, creating the perforated decorative band, adding a strap and finishing with a plush velvet trim. You will enjoy working textured half double crochets and simple lace squares to create a stylish and sturdy tote.

Intermediate 2-3 Hours

Materials Needed for Crochet Wine Tote Bag Pattern

— Main Fabric

  • 01
    100 g macrame yarn (main color) - approximately 1 skein
  • 02
    20 g white velvet yarn (for trim) - approximately 1 small skein

— Tools Required

  • 01
    Crochet hook 4.5 mm (US 7)

Progress Tracker

0% Complete

— Body :

Infos :

Hello, let's make a crochet wine tote together. we are starting... I am briefly explaining the terms we use this pattern. MATERIALS: 4,5 MM HOOK. 100 G MACRAME YARN, 20G WHITE VELVET YARN. CROCHET TERMS: Chain (ch) yarn over, pull yarn through stitch on hook. Slip Stitch (Slip St) insert hook into stitch or space indicated, yarn over, pull yarn through both loops on hook. Single crochet (SC) insert hook into stitch or space indicated, yarn over, pull up a loop (2 loops in hook), yarn over, pull yarn through loops on hook. Half double crochet (hdc) yarn over, insert hook into stitch or space indicated, pull up a loop (3 loops in hook), yarn over, pull yarn through loops on hook. Double crochet (dc) yarn over, insert hook into stitch or space indicated, pull up a loop (3 loops in hook) * yarn over, pull yarn through 2 loops on hook; repeat from* once more. Treble crochet (tr) yarn over twice, insert hook into stitch or space indicated, pull up a loop (4 loops in hook) * yarn over, pull yarn through 2 loops on hook; repeat from* 2 times.

Round 1 :

Make 6 ch, and connect to the first ch to form a ring. Make 10 hdc into the ring. Close the row by sinking into the top of the first hdc. With 2 ch go to the top row (we have reached the 2nd row). here we will make 2 hdc into each stitch. at the end of the row we will have a total of 20 hdc. it is important to proceed by counting. When we come to the end, connect to the top of the first hdc.

Round 2 :

Make 3 ch to go up to the 3rd row. make 1 more hdc into the same ch. (In the 2nd row we made 2 hdc into each ch. In the 3rd row we will advance the row by making 1 double 1 single.) 1 hdc on the next ch, 2 hdc on the next ch...When we come to the end, connect to the top of the first hdc.

Round 3 :

Let's move on to row 4 with 2 ch. in this row our work on all chains will be as follows; 1 hdc on 1ch, 1 hdc on the next 1 ch, 2 hdc single on the next 1 ch, ie 2 hdc single, 1 hdc double so when we complete the row, connect to the first hdc and close row 4. To move to row 5. make 2 ch. we will no longer increase, make 1 hdc on each ch. the trick here is to make the hdc ch sin only on the edge line. we do this for a complete curl. (picture a-b) When we complete the row, connect to the first hdc and close the 5th row. In rows 4 and 5, it will start to curl inwards and take the bottle form.

Round 4 :

In all the next 10 rows, when we close the row, we go to the top row with 1 ch. and we make 1 hdc on each ch.

Round 5 :

in this order, we go to the top row with 4 ch. (The reason why it is 4 is that we have moved to the perforated row) Skip 1 ch and make 1 dc on the 2nd ch. Make 1 ch, make 2 ch, skip 1 ch and make 1 dc on the next ch. complete the whole row like this. When closing the row, connect to the 3rd of the first 4 ch groups and close. When the row is completed, go up to the top row with 4 ch. make 1 dc on top of the dc in the next row. make 2 ch, make 1 dc on top of the next dc. so we will form squares. When closing the row, connect to the 3rd of the first group of 4 ch and close.

Round 6 :

in this order, we switch from perforated rows to straight rows again. in this order, we switch from perforated rows to straight rows again. In the bottom row, we made 2 ch between the squares. in this row, we will only work on 2 chs. we will complete the whole row by making 2 hdc in every 2 ch spaces. do not knit tightly in this row, knit more freely so that it does not tighten. When you reach the end of the row, connect to the first ch. Go to the top row with 1 ch. In this and the next 7 rows, we will make 1 ch on each ch. (total 8 row)

Round 7 :

we're moving on to making stalks. Let's make 40 ch. (you can extend the length here as much as you want. you can also do it by measuring here. Skip 8 ch and connect on the 9th ch. Here we must make it tight while connecting. we will call it a belt. we will complete the belt by making 1 hdc on each ch kin on the belt. connect to the beginning and cut the rope. knot tightly. Count 4 ch from the end of the arch and tie into ch 5. Make 40 ch. (this will be the 2nd arch.) skip 8 ch and tie tightly to the 9th ch. go back and make 1 hdc in all ch. tie at the beginning and cut the rope. knot tightly.

Round 8 :

and in this order we switch to velvet thread. the trick here. after knitting the straps, I continue with velvet because I want the straps to stay inside. follow this way for a more beautiful look. Since the velvet rope is fluffy, it may be difficult for you to see the chains. try to understand with your hand. we will continue in this way for a total of 2 rows by making 1 ch on each ch.

Info :

General view: for the perforated areas here; if you want, you can decorate it with velvet threads. If you want, you can write a cute note on the note paper and tie it. Or you can keep it simple.

Assembly Instructions

  • Create the strap (belt) by making 40 ch to desired length, skip 8 ch and attach to the 9th ch creating a loop; tighten connection and knot the tail securely.
  • After tying the strap loops, go back and work 1 hdc across each chain of the strap to reinforce it, then cut and knot the yarn tightly.
  • When switching to velvet yarn, attach the velvet thread and work 1 hdc (or 1 ch as indicated) for two rows to create a plush trim so the straps stay inside the trim.
  • Secure and weave in all ends firmly; knot strap ends and weave the tails into the body or sew them down for extra reinforcement.

Important Notes

  • 💡It is important to proceed by counting stitches during increases to maintain a round, even base.
  • 💡Do not crochet tightly in the perforated rows; work with a looser tension so the square holes form cleanly and do not tighten.
  • 💡When joining rounds, slip stitch into the top of the first hdc as indicated to keep row alignment and consistent stitch counts.

This crochet wine tote makes a beautiful, handmade gift that transforms a simple bottle into something special and festive. Customize colors and trims to match any occasion or holiday, and add a handwritten note tucked inside for a personal touch. Perfect for quick gifts and hostess surprises—make one today! 🧶 🎁

You ask,

we answer.

FAQs

What size will the finished piece be?

The finished tote is designed to fit a standard wine bottle; dimensions will vary slightly depending on yarn tension but should comfortably hold most 750 ml bottles.

Can I use different yarn weights for this pattern?

Yes, you can substitute yarn weights, but this will change the finished size; use an appropriate hook size for your chosen yarn and adjust stitch counts if necessary.

Do I need prior crochet experience for this pattern?

This pattern is rated intermediate and assumes you know basic stitches like hdc, dc and how to join rounds; experience with counting and tension control is helpful.

How long does this project typically take to complete?

Most crocheters complete this project in 2-3 hours, depending on experience and any customizations you choose to add.