🧢 Beautiful ✨ Detailed πŸ’ Adorable

Cute cat Amigurumi Pattern

Cute cat Amigurumi Pattern
4.6β˜… Rating
5-7 Hours Time Needed
1.5K Made This
βœ‚οΈ

Beginner Friendly Level

Perfect for those just starting their crochet journey, with clear instructions and simple techniques

⏱️

Weekend Treat

Takes 5-7 hours, making it an enjoyable project to finish over a couple of days.

🧸

Cute Companion

An adorable friend to cherish, handcrafted with love to bring comfort and joy for years to come.

About This Cute cat Amigurumi Pattern

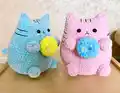
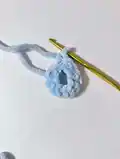
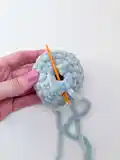
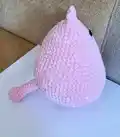
This pattern creates a soft, plush cat amigurumi holding a small donut. It uses plush yarn for a squishy texture and simple crochet rounds to build the shape. You will crochet the body, ears, arms, legs, tail and a separate donut, then assemble and add embroidered details.

Cute cat Amigurumi Pattern crochet pattern - detailed view of completed project

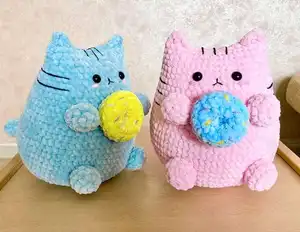
Clear round-by-round instructions make this piece approachable for newer crocheters. Photos and finishing tips are included to help with placement and assembly.

Why You'll Love This Cute cat Amigurumi Pattern

I absolutely love this pattern because it turns simple rounds into a charming, squishy companion that’s delightful to make. I enjoy how quickly the body grows with basic increases and how little details like the donut and embroidered lines bring personality. I always find the plush yarn so satisfying to work with, and the finished toy is cuddly and gift-ready. Making this cat is a joyful, soothing project I reach for whenever I want a quick, happy make.

Cute cat Amigurumi Pattern step 1 - construction progress Cute cat Amigurumi Pattern step 2 - assembly progress Cute cat Amigurumi Pattern step 3 - details and accessories Cute cat Amigurumi Pattern step 4 - final assembly and finishing

Switch Things Up

I love how easy it is to customize this cat by changing the yarn color; try pastel shades for a soft look.

I often switch yarn weight and hook size to make mini or jumbo versions β€” heavier yarn gives a cuddlier toy.

I like adding embroidered brows or different mouth shapes to change the cat's expression subtly.

For a playful twist, make the donut a different color and embroider contrasting sprinkles using short stitches.

I sometimes swap safety eyes for embroidered eyes for a fully child-safe toy suitable for babies.

Try sewing tiny clothes or a scarf on the cat for seasonal or holiday variations.

I suggest experimenting with textured yarn for the donut to give it a realistic frosted look.

To create a mobile set, make several mini cats and hang them with ribbon for nursery decor.

I like to use metallic thread for very small highlight stitches to make accents pop against plush yarn.

If you want a poseable toy, consider adding a short piece of floral wire inside each arm before stuffing.

Try mixing two yarns held together for an interesting marled texture on the body or donut.

I recommend practicing embroidery on a scrap piece before adding facial details to ensure confident, even stitches.

Common Mistakes & How to Fix Them

βœ— Skipping stitch counting during increases causes uneven shaping; count stitches every round and mark the start with a stitch marker. βœ— Understuffing or overstuffing the body makes the toy misshapen; stuff gradually, checking the silhouette and adding small amounts until smooth. βœ— Placing safety eyes too close or too far apart changes the expression; follow the pattern and glue eyes between rounds 5 and 6 with five stitches between. βœ— Not leaving long ends for sewing will make assembly difficult; always leave a generous tail when finishing parts to securely sew them in place.

Cute cat Amigurumi Pattern

Make a cuddly plush cat holding a tiny donut with this friendly crochet pattern. You will enjoy simple rounds, gentle shaping, and cute finishing touches. The design is sweet, compact, and perfect for gifting or keeping on your shelf. Follow step-by-step instructions and photos to guide you through every piece.

Beginner Friendly 5-7 Hours

Materials Needed for Cute cat Amigurumi Pattern

β€” Main Fabric

  • 01
    Himalaya Dolphin Baby plush yarn - for cat (1-1.5 of a skein)
  • 02
    Small amounts of the same plush yarn in two other colors for the donut
  • 03
    YarnArt Jeans or similar (for embroidered lines on the donut and body), small amount
  • 04
    Black yarn (YarnArt Jeans used for body lines) - small amount for stripes
  • 05
    Embroidery thread for nose
  • 06
    Stuffing material - polyester fiberfill

β€” Tools Required

  • 01
    Crochet hook size 4 mm
  • 02
    Black eyes - 10 mm (2 pieces)
  • 03
    Glue for eyes (glue gun recommended)
  • 04
    Scissors
  • 05
    Yarn needle for sewing and embroidery
  • 06
    Stitch markers (optional but recommended)
  • 07
    Polyester stuffing
  • 08
    Pins for assembly (optional)

Progress Tracker

0% Complete

β€” Body :

Round 1 :

make ch2, in the second ch from the hook: 6 sc (6)

Round 2 :

6inc (12)

Round 3 :

(1sc, inc)*6 (18)

Round 4 :

(2sc, inc)*6 (24)

Round 5 :

(3 sc, inc)*6 (30)

Round 6 :

(4sc, inc)*6 (36)

Round 7 :

(5sc, inc)*6 (42)

Round 8 :

(6sc, inc)*6 (48)

Round 9 :

(3sc, inc)*12 (60)

Round 10 :

(4sc, inc)*12 (72)

Round 11-16 :

(6 rounds) without changes (72)

Round 17 :

(4sc, dec)*12(60)

Round 18-21 :

(4 rounds): without changes (60)

Round 22 :

(8sc, dec)*6 (54)

Round 23-24 :

(2 rounds): without changes (54)

Round 25 :

(7sc, dec)*6 (48)

Round 26-27 :

(2 rounds): without changes (48)

Round 28 :

(6sc, dec)*6 (42)

Round 29-33 :

(5 rounds): without changes (42)

β€” Crochet ears :

Info :

Fold the bode in half and work, joining 2 sides

Round 34 :

3 dc, 14 sl st, 3 dc

Info :

Cut off the yarn and hide the end.

β€” Arms and Legs :

Info :

Arms and legs are crocheted in the same way (make 4)

Round 1 :

Make ch2, in the second ch from the hook: 6sc (6)

Round 2 :

6inc (12)

Round 34 (legs/arms) :

(2 rounds): without changes (12)

Info :

Leave a long end for sewing

β€” Glue eyes :

Info :

Count 5 round from the top. Glue eyes between rounds 5 and 6 The distance between eyes is 5 stitches.

β€” Embroidery mouth :

Info :

Embroidery a mouth (as it is shown on the pictures)

β€” Embroider cheeks :

Info :

Make several stitches (you may use embroidery thread/ cotton thread or plush yarn, as you like more).

β€” Tail :

Round 1 :

Make ch2, in the second ch from the hook: 6sc (6)

Round 2 :

6inc (12)

Round 3-4 :

(2 rounds): without changes (12)

Round 5 :

(1sc, dec)*4 (8)

Round 6-13 :

(8 rounds): without changes (8)

Info :

Leave a long end for sewing

Info :

Sew the tail at level of rounds 10-11

β€” Sew arms :

Info :

Count from the ears 8 rounds and sew arms. Lightly stuff the arms. The distance between arms is 8 stitches

β€” Sew legs :

Info :

Sew legs at level of rounds 11-12 of the body The distance between legs is 8 stitches. Lightly stuff the legs.

β€” Donut :

Round 1 :

Make ch12, close in a ring, 12sc in a ring

Round 2 :

(1sc, inc)*6 (18)

Round 3 :

18sc

Round 4 :

BLO: 18sc

Round 5 :

1sc, dec (12)

Round 6 :

without changes (12)

Info :

Leave the end for sewing. Sew the first and the last rounds. Stuff as you go.

β€” Donut finish :

Info :

Embroider colored spots on the donut as desired.

Info :

Sew the donut to the arms joining to the side stitches of the arms.

β€” Embroidery lines :

Info :

Embroider lines of 2 cm on the head.

Info :

Embroider lines on the body: count 2 rounds down from the eyes, the width of the lines is 5-6 stitches.

β€” Finished :

Info :

Your cat is ready!

Assembly Instructions

  • Glue the safety eyes between rounds 5 and 6 with a distance of 5 stitches between them, securing with glue for extra hold.
  • Fold and attach ears to the top of the head, hiding ends and sewing securely along the base so they stand upright.
  • Sew arms 8 rounds down from the ears, spacing arms 8 stitches apart and lightly stuffing before closing.
  • Sew legs at the level of rounds 11-12 of the body, spacing 8 stitches apart and lightly stuffing for stability.
  • Sew the tail at the level of rounds 10-11, using the long tail left for sewing and securing firmly inside the body.
  • Position the donut between the arms and sew it to the side stitches of the arms so it sits centered and secure.

Important Notes

  • πŸ’‘Use stitch markers to mark the beginning of each round to keep count and avoid accidental stitch shifts.
  • πŸ’‘Stuff parts gradually as you work to maintain smooth shaping and avoid lumps in the finished toy.
  • πŸ’‘Leave long yarn ends on limbs and tail to make sewing and securing parts much easier and stronger.
  • πŸ’‘Glue safety eyes securely and consider additional backings or washers for durability if the doll will be handled frequently.

This cute plush cat was made to bring a smile and a little squishy comfort to your day. Hold it, gift it, or leave it on a shelf β€” it will brighten any space. Make one in your favorite color and add a tiny donut for a playful touch. 🧢🧁

You ask,

we answer.

FAQs

What size will the finished piece be?

The size of the finished toy is approximately 21-23 cm when using the recommended Himalaya Dolphin Baby yarn and 4 mm hook.

Can I use different yarn weights for this pattern?

Yes, you can use different yarn weights but the finished size will change; choose an appropriate hook for your yarn and expect different stitch counts and spacing.

Do I need prior crochet experience for this pattern?

This pattern is rated beginner friendly and uses basic stitches like sc, inc and dec, so basic crochet experience is recommended for best results.

How long does this project typically take to complete?

Most crocheters finish this project in about 5-7 hours, depending on experience, assembly time, and embroidery details.