🧶 Beautiful ✨ Detailed 💝 Adorable

Cute Dinosaur Amigurumi Pattern

Cute Dinosaur Amigurumi Pattern
4.4★ Rating
5-7 Hours Time Needed
1.2K Made This
✂️

Intermediate Level

Ideal for those with basic crochet experience, featuring slightly more advanced stitches and techniques to expand your skills.

⏱️

Weekend Treat

Takes 5-7 hours, making it an enjoyable project to finish over a couple of days.

🧸

Cute Companion

An adorable friend to cherish, handcrafted with love to bring comfort and joy for years to come.

About This Cute Dinosaur Amigurumi Pattern

This pattern creates a small, cuddly amigurumi dinosaur with contrasting spikes and features for a playful look. Each piece is worked in continuous rounds with clear stitch counts included at the end of rounds. Youll assemble head, body, tail, arms, legs, back spikes and an egg, then sew everything together for a polished result. The pattern is photo-supported and includes placement notes for safety eyes.

Cute Dinosaur Amigurumi Pattern crochet pattern - detailed view of completed project

Worked in 2.5 mm hook and sport/fingering-weight yarn (use a hook that matches your yarn). The finished toy is compact and perfect as a gift or shelf buddy.

Why You'll Love This Cute Dinosaur Amigurumi Pattern

I absolutely love this pattern because it turns simple stitches into a characterful little dinosaur with lots of charm. I enjoy how the contrasting spikes and paws bring the design to life and allow for playful color choices. The shaping is satisfying to crochet — you can see the piece grow and take form quickly. I also appreciate that the pattern uses straightforward techniques with precise stitch counts, making it easy to follow and customize as you go.

Cute Dinosaur Amigurumi Pattern step 1 - construction progress Cute Dinosaur Amigurumi Pattern step 2 - assembly progress Cute Dinosaur Amigurumi Pattern step 3 - details and accessories Cute Dinosaur Amigurumi Pattern step 4 - final assembly and finishing

Switch Things Up

I love customizing this dinosaur by changing the spike and paw colors for a fresh look.

You can make a mini keychain version by using thinner yarn and a smaller hook for a tiny portable pal.

I also like using bulky yarn with a larger hook to create a squishier, oversized cuddly version of this design.

Try embroidering different expressions on the face to change the character — a smile, a smirk, or a sleepy face each give a different personality.

I often add small felt accessories like a tiny hat or scarf to make seasonal or themed dinosaurs.

For a posable version, I sometimes insert thin wire into the limbs before stuffing to allow gentle posing for display.

To make a set, I vary yarn colors across several toys for a family of dinosaurs in complementary shades.

I like to add safety stitched details like tiny claws or nostrils using contrasting yarn for subtle texture.

If youre gifting, I embroider the recipients initial on the base of the foot for a personalized touch.

Play with different eye types: embroidered eyes for safety with babies or glossy safety eyes for a more expressive look for older kids.

Dont be afraid to adjust stuffing levels — firmer stuffing gives structure, while softer stuffing makes a cuddlier toy.

I recommend practicing any changes on a small swatch first to ensure your gauge and proportions stay pleasing to the eye.

Common Mistakes & How to Fix Them

✗ Skipping safety eye placement instructions can lead to uneven facial features; insert the safety eyes between rounds 18-19 with 18 sc between them to keep symmetry. ✗ Not stuffing as you go causes lumps and poor shaping; stuff the body and tail tightly and add filling gradually while shaping to maintain a smooth silhouette. ✗ Ignoring stitch count changes during increases and decreases causes misshapen parts; count your stitches at the end of each round, especially at increase/decrease rounds. ✗ Forgetting to leave long sewing tails results in difficulty assembling; leave a long thread when fastening off pieces so you can sew them securely without adding new yarn. ✗ Flattening without ensuring alignment makes seams visible when sewing layers; when flattening the arm or leg ends, line layers up carefully and stitch through both layers evenly to hide the seam.

Cute Dinosaur Amigurumi Pattern

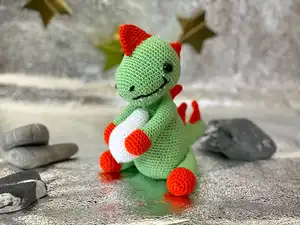
Make an adorable hand-crocheted dinosaur that is perfect for gifts, nursery decor, or a charming keepsake. This pattern walks you through each piece — head, body, tail, legs, arms, back spikes and a little egg — with clear rounds and helpful assembly notes. Youll learn shaping techniques and how to join parts neatly to create a professional finish. Ideal for crocheters looking to make a lovable little companion.

Intermediate 5-7 Hours

Materials Needed for Cute Dinosaur Amigurumi Pattern

— Main Fabric

  • 01
    Yarn - Main Color: Green (A)
  • 02
    Yarn - Accent Color: Orange (B)
  • 03
    Yarn - Accent Color: White (C)
  • 04
    Note: The pattern lists yarn as required but does not specify exact weights or quantities; choose amounts to comfortably fill a 10 cm toy using recommended hook size.

— Tools Required

  • 01
    Crochet hook size 2.5 mm (or a size that fits your yarn)
  • 02
    Scissors
  • 03
    Polyester stuffing
  • 04
    Tapestry needle for sewing and weaving ends
  • 05
    Stitch marker
  • 06
    Pins for assembly
  • 07
    Safety eyes (insert between rounds 18-19)

Progress Tracker

0% Complete

— Head :

Round 1-8 :

sc in a mr

Round 2-8 :

sc inc(12 sc)

Round 3-1 :

sc into sc next inc(24 sc)

Round 4-2 :

sc into sc next inc(32 sc)

Round 5-3 :

sc into sc next inc(40 sc)

Round 6-14 :

(9 ring)sc into sc(40 sc)

Round 15-1 :

sc into sc next inc(60 sc)

Round 16-22 :

(7 ring)sc into sc(60 sc)

Round 23-(6 times) :

8 sc into sc next dec(54)

Round 24-(6 times) :

7 sc into sc next dec(48)

Round 25-(6 times) :

6 sc into sc next dec(42)

Round 26-(6 times) :

5 sc into sc next dec(36)

Round 27-(6 times) :

4 sc into sc next dec(30)

Round 28-(6 times) :

3 sc into sc next dec(24)

Round 29-(6 times) :

2 sc into sc next dec(18)

Round 30-(6 times) :

1 sc into sc next dec(12)

Round 31 :

6 sc dec fo.

Info :

Insert the safety eyes between rnd 18 19. There will be 18 sc between them.

— Body :

Round 1-6 :

sc in a mr

Round 2-6 :

sc inc(12 sc)

Round 3-1 :

sc into sc next inc(18 sc)

Round 4-2 :

sc into sc next inc(24 sc)

Round 5-3 :

sc into sc next inc(30 sc)

Round 6-4 :

sc into sc next inc(36 sc)

Round 7-5 :

sc into sc next inc(42 sc)

Round 8-6 :

sc into sc next inc(48 sc)

Round 9-7 :

sc into sc next inc(54 sc)

Round 10-14 :

(5 ring)sc into sc(54 sc)

Round 15-(6 times) :

7 sc into sc next dec(48)

Round 16-20 :

(5 ring)sc into sc(48 sc)

Round 21-(6 times) :

6 sc into sc next dec(42)

Round 22-26 :

(5 ring)sc into sc(42)

Round 27-(6 times) :

5 sc into sc next dec(36)

Round 28-30 :

(3 ring)sc into sc(36)

Round 31-(6 times) :

4 sc into sc next dec((30)

Round 32 :

sc into sc(30)

Round 33-(6 times) :

3 sc into sc next dec(24)

Info :

Stuff the body tightly. keep filling as you go

Round 34-36 :

(3 ring)sc into sc(24)

Round 37-(6 times) :

2 sc into sc next dec(18)

Round 38-41 :

(4 ring)sc into sc(18)fo.Leave a long thread to sew on.

— Tail :

Round 1-6 :

sc in a mr

Round 2 :

(4 times)sc inc(10 sc)

Round 3 :

(2 times)sc inc(12 sc)

Round 4 :

sc into sc(12 sc)

Round 5 :

(6 times)1 sc into sc next inc(18)

Round 6-8 :

(3 ring)sc into sc(18)

Round 9 :

(6 times)2 sc into sc next inc(24)

Round 10-14 :

(5 ring)sc into sc(24)

Round 15 :

(6 times)3 sc into sc next inc(30)

Round 16-20 :

(5 ring)sc into sc(30)

Round 21 :

(6 times)4 sc into sc next inc(36)

Round 22-23 :

(2 ring)sc into sc(36)

Round 24 :

(6 times)5 sc into sc next inc(42)

Round 25 :

sc into sc(42 sc)fo.Leave a long thread to sew on.

Info :

Stuff the tail tightly.

— Arms :

Item A Color :

Rnd 1-6 sc in a mr

Round 2 :

6 sc inc(12 sc)

Round 3 :

(4 times)2 sc into sc next inc((16)

Round 4-6 :

(3 ring)sc into sc(16 sc)

Round 7 :

(4 times)2 sc into sc next dec(12)

Item Main Color :

Rnd 8-25-(18 ring)sc into sc(12)

Round 26 :

Flatten the awl into both layers (6 sc) Leave a long thread to sew on.

Info :

Fill the sleeves a little.

— Legs :

Round 1-6 :

sc in a mr

Round 2-6 :

sc inc(12 sc)

Round 3 :

(6 times)1 sc into sc next inc(18 sc)

Round 4-6 :

(3 ring)sc into sc(18)

Info :

MAIN COLOR -fill the legs

Round 7-22 :

(16 ring)sc into sc(18 sc)

Round 23 :

Flatten the awl into both layers (9 sc)fo.

Info :

Leave a long thread to sew.

— Dinosaur Back :

A COLOR - MAKE 5 :

Make 5 pieces.

Round 1-6 :

sc in a mr

Round 2 :

sc into sc(6)

Round 3 :

2 sc inc(8)

Round 4 :

sc into sc (8)

Round 5 :

2 sc inc(10)

Round 6 :

2 sc inc(12)

Round 7 :

2 sc inc (14)

Round 8 :

2 sc inc(16)

Round 9 :

2 sc inc(18)fo.Leave a long thread to sew on.

— Egg :

Round 1-6 :

sc in a mr

Round 2-6 :

sc inc(12)

Round 3-4 :

(2 ring)sc into sc(12 sc)

Round 5 :

(2 times)5 sc into sc next inc(14)

Round 6 :

2 sc inc(16)

Round 7 :

2 sc inc(18)

Round 8 :

(6 times)3 sc into sc next inc(24 sc)

Round 9-10 :

(2 ring)sc into sc(24)

Round 11 :

(6 times)4 sc into sc next inc(30)

Round 12 :

sc into sc(30)

Round 13 :

(6 times)5 sc into sc next inc(36)

Round 14-16 :

((3 ring)sc into sc (36)

Round 17 :

(6 times)5 sc into sc next dec(30)

Round 18 :

sc into sc(30)

Round 19 :

(6 times)4 sc into sc next dec(24)

Round 20 :

sc into sc(24)

Round 21 :

(6 times)3 sc into sc next dec(18)

Round 22 :

sc into sc(18)

Round 23 :

(6 times)2 sc into sc next dec(12)

Round 24 :

6 sc dec(6)fo.

— Joining Parts :

Info :

Sew the head to the neck.

Info :

Sew the sleeves to rnd 34 on both sides.

Info :

Sew the legs together rnd-5-11-to both sides.

Info :

Sew the tail to the back of the body between the legs.

Assembly Instructions

  • Sew the head to the neck securely, aligning the neck opening to the top of the body and stitching through matching rounds for a smooth join.
  • Sew the sleeves (arms) to round 34 on both sides of the body, positioning them symmetrically and sewing through several rounds to secure.
  • Sew the legs together and attach them to both sides at the positions indicated (rnd-5-11) so the dinosaur can sit steadily.
  • Sew the tail to the back of the body between the legs, centering it and stitching firmly to prevent pulling.
  • Attach the dinosaur back spikes (make 5) along the top of the body and tail, spacing evenly and sewing each spike with a long tail so edges are secure.

Important Notes

  • 💡Insert safety eyes between Rnd 18 and Rnd 19 with 18 single crochets between them for correct placement.
  • 💡Stuff the body and tail tightly and add filling gradually while shaping to avoid lumps and maintain smooth curves.
  • 💡Leave a long thread when fastening off pieces so you can sew parts together without joining new yarn or thread.
  • 💡Use pins to position parts before sewing to ensure correct placement and symmetry across both sides.

This cute dinosaur amigurumi is perfect for gifting or displaying on a shelf — a handmade friend full of personality. 🧶 Its contrasting spikes and tiny egg give it playful charm and make it a lovely project to personalize. ✨ Enjoy making and customizing each piece; every stitch helps bring this little dino to life. 💚

You ask,

we answer.

FAQs

What size will the finished piece be?

The finished amigurumi measures around 20 cm in circumference and about 10 cm in length using the recommended hook and yarn.

Can I use different yarn weights for this pattern?

Yes, you can use different yarn weights, but this will change the final size; adjust your hook size accordingly and remember stuffing amounts will vary.

Do I need prior crochet experience for this pattern?

This pattern is rated intermediate, so you should be comfortable with single crochet, increases, decreases, and working in continuous rounds for best results.

How long does this project typically take to complete?

Most crocheters finish this project in about 5-7 hours, though time may vary based on experience level, assembly speed, and customization.