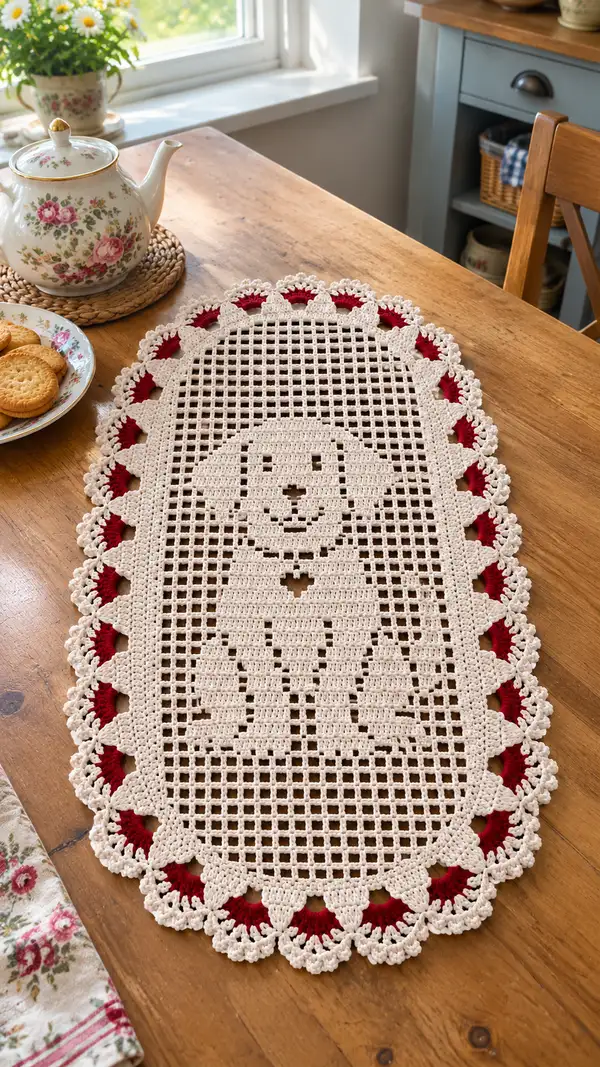
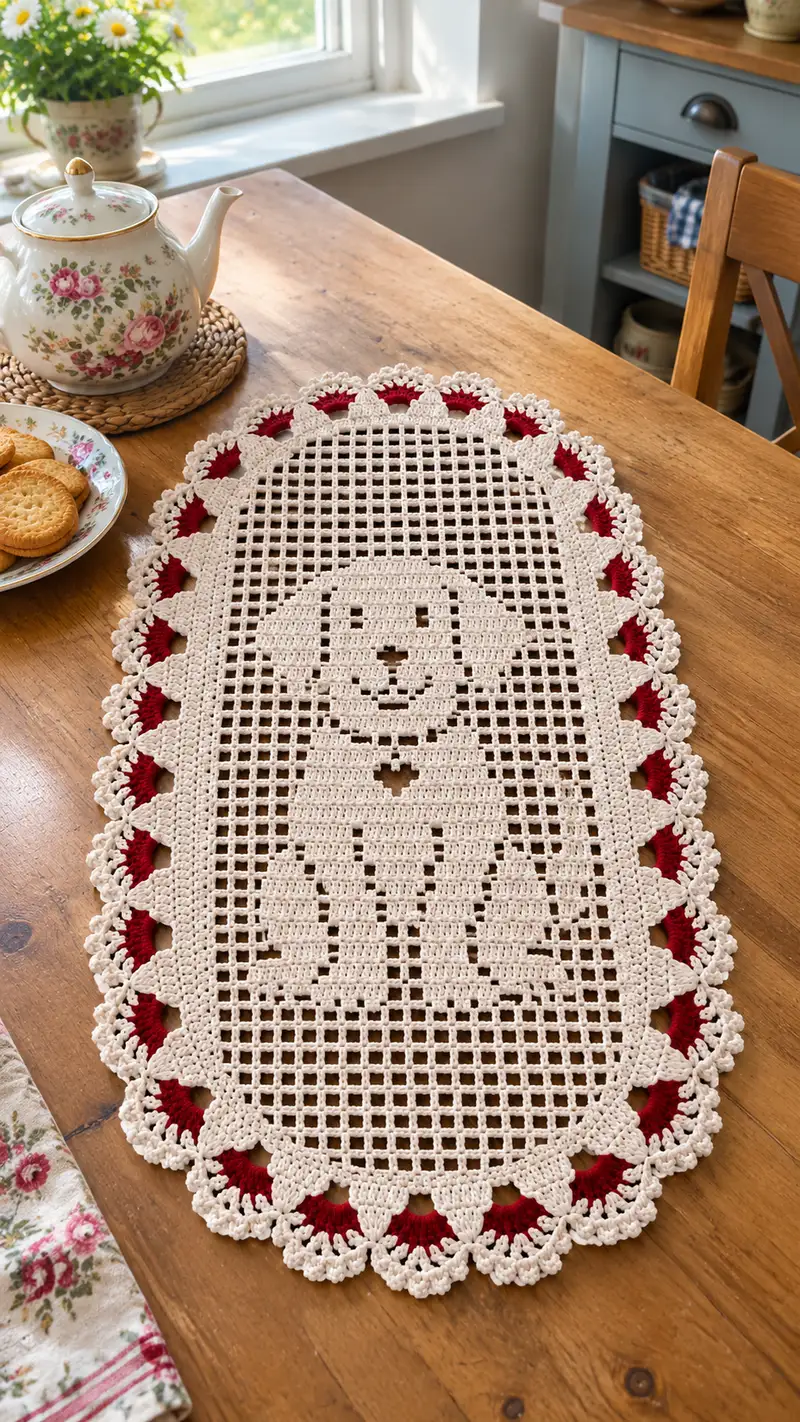
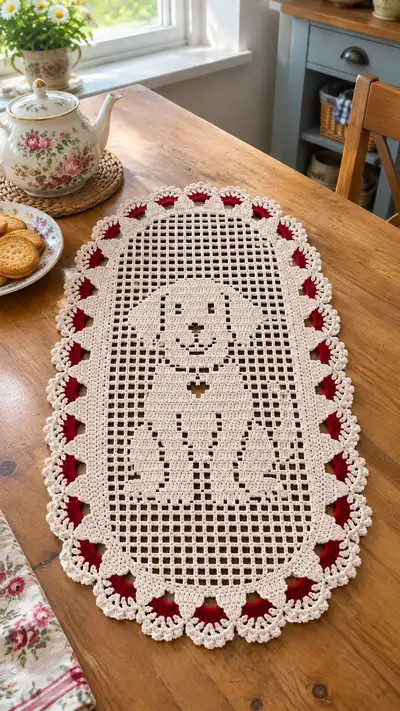
A vintage-inspired oval filet table runner featuring a sweet sitting dog motif inside a tidy mesh ground and a scalloped lace border with contrasting red arches. Worked in cotton yarn for a crisp, classic look, this runner brings cozy farmhouse charm to a dining table or sideboard. The pattern uses filet crochet techniques for the central motif and a combination of shell and picot stitches for the scalloped edging.
Progress Tracker
0% Complete
— Notes & Gauge :
Info :
This pattern is worked in a mesh/filet style. One mesh unit = 1 double crochet + ch2 (open mesh) OR 3 dc worked across the mesh for a filled mesh (see filled-mesh instructions below). Gauge is not critical for lace, but for a similar finished size use worsted cotton and 3.5mm hook to obtain approximately 3 meshes = 1 inch horizontally. The finished runner with the stated counts measures roughly 14" wide by 36" long before blocking.
Info :
All rows in the central panel are worked flat, turning at the end of each row. The pattern uses a consistent mesh count across the entire panel so stitch arithmetic stays consistent. Keep a row counter and use stitch markers at both long edges and the panel midpoint to help align the dog motif.
— Abbreviations & Techniques :
Info :
Open mesh: dc, ch2, skip 2 stitches space. Filled mesh: 3 dc worked across the space that would otherwise be open (this gives a solid square). Beginning ch3 counts as dc. When changing color, fasten off and weave tails in or carry inside the ch2 spaces if neatness allows.
— Foundation Chain & Starting Edge :
Row 0 :
Ch153. (This creates 75 mesh units across: formula = (meshes x 2) + 3 where meshes = 75)
Info :
Make a loose but even foundation chain. Mark the last chain as the right-edge marker. The starting chain count of 153 yields a panel 75 meshes wide, which is an even, workable number for centering the dog motif and creating balanced scallops on each long side.
— Main Mesh Panel (Rows 1-120) :
Row 1 :
Turn. Ch3 (counts as dc), skip first ch, *ch2, sk next ch, dc in next ch* repeat across until last chain, end with dc in top of turning ch. (75 meshes)
Row 2 :
Ch3, *for an open mesh: dc in the dc below, ch2; for a filled mesh: 3 dc across the ch2 opening below* across to end, finish with dc in top of turning ch. (75 meshes)
Info :
Rows 1-12 establish the mesh background. Work all as open meshes (no filled squares) for a clean start so the dog motif can be placed beginning at Row 20. Keep tension even and ensure each row starts with ch3 counted as dc.
Rows 3-12 :
Repeat Row 2, working all meshes as open mesh (75 meshes each row). (Rows 3-12)
Info :
Place stitch markers at both edges at Rows 1 and 12 to mark the 'header' section. This will help center the motif vertically. Check width: panel should measure approximately 14" before blocking.
Row 13-19 :
Continue mesh pattern as in Row 2. These rows are the background above the motif and should remain open mesh. (75 meshes each row)
Info :
Locate the approximate center of the panel horizontally: mesh number 38 (counting from either edge) is the center mesh. The dog motif is centered on this mesh column and spans vertically between Row 20 and Row 90 in this pattern. Keep a marker at mesh 38 throughout to ensure perfect alignment.
Row 20 :
Start dog motif placement. Ch3. For meshes 1-17: open mesh. Meshes 18-20: filled mesh (3 dc each) to begin lower part of dog's head/shoulder shaping. Meshes 21-57: open mesh until reaching center cluster. Meshes 58-60: filled mesh to balance symmetrical shaping. Meshes 61-75: open mesh. (75 meshes)
Row 21 :
Ch3. For meshes 1-16 open; 17-21 filled (3 dc each); 22-56 open; 57-61 filled; 62-75 open. (75 meshes)
Row 22 :
Ch3. For meshes 1-15 open; 16-22 filled; 23-55 open; 56-62 filled; 63-75 open. (75 meshes)
Info :
Filled mesh groupings above create the top of the dog's head and beginning shoulders. When working a filled mesh, work 3 dc into the ch2 space below (or across the two chains/space). Maintain upright stitches and keep the panel flat by avoiding over-tightening filled meshes.
Row 23 :
Ch3. Meshes 1-14 open; meshes 15-23 filled; meshes 24-54 open; meshes 55-63 filled; meshes 64-75 open. (75 meshes)
Row 24 :
Ch3. Meshes 1-13 open; 14-24 filled; 25-53 open; 54-64 filled; 65-75 open. (75 meshes)
Row 25 :
Ch3. Meshes 1-12 open; 13-25 filled; 26-52 open; 53-65 filled; 66-75 open. (75 meshes)
Info :
At this stage you are establishing the rounded top of the dog’s head and the shoulders. Use a combination of filled mesh groups that widen then narrow symmetrically to create the head outline. Check symmetry by folding the panel along the center marker to ensure both sides match.
Rows 26-34 :
Continue building the dog silhouette with a gradual widen-then-narrow sequence of filled meshes to form ears, neck, and chest. Example pattern for these rows: Row 26 filled meshes 12-26 and 27-63, Row 27 filled meshes 11-27 and 28-62, Row 28 filled meshes 10-28 and 29-61, gradually shaping. Keep each row at 75 meshes. (Rows 26-34)
Info :
Refer often to the photo to match negative space and filled squares. If working from a printed motif grid you can translate each 'pixel' into a mesh unit. The dog in the pictured runner occupies roughly 70% of the panel's vertical height and sits centered horizontally.
Rows 35-44 :
Sculpt the facial opening and eyes using small-filled-square clusters. On about Row 38 place two isolated filled meshes separated by 6 open meshes for the eyes (example: filled meshes at 33 and 41). Place a small filled cluster for the nose around Row 42 centered on mesh 38 (single filled mesh). Keep mesh count 75 each row. (Rows 35-44)
Info :
For small features like eyes and nose, use single filled meshes surrounded by open meshes to create contrast. Keep the eyes about 5-7 mesh columns apart for a gentle expression. If you prefer a more expressive face, you can embroider eyes later on top of filled meshes.
Rows 45-60 :
Work the torso and front legs. Use vertical columns of mostly filled meshes with occasional open mesh breaks to indicate separation of legs and the gap under the belly. Example: Rows 45-48 filled meshes centered from 28-48 to form the chest; Rows 49-56 form two vertical filled legs starting at meshes 28-33 and 43-48 with open meshes between to shape separation. (75 meshes each row)
Info :
Rows 45-60 define the dog's body and legs; take your time shaping these with symmetric filled blocks. Use stitch markers at mesh boundaries for each leg column so vertical edges remain straight across many rows.
Rows 61-75 :
Continue the lower body and begin the ground line under the dog. Keep the central area mostly filled to form a seated silhouette with a small open heart-shaped gap near the chest if desired (as seen in the photo). Keep each row at 75 meshes. (Rows 61-75)
Info :
If you want the heart-shaped negative space visible under the neck (as in the photo), plan two adjacent open meshes in the center area among filled meshes to create that small motif. Place it around Rows 62-66 directly centered on mesh 38 for consistent appearance.
Rows 76-90 :
Finish the lower body and ground plane. Narrow the silhouette slightly to create the illusion of paws sitting on the table; leave 3-4 rows of open mesh ground beneath the dog before the final even mesh rows that lead into the border area. (Rows 76-90)
Info :
By Row 90 the dog motif should be complete and centered. If you need to correct any placement, this is the best time to frog back a few rows and adjust filled mesh positions while the panel is still flexible.
Rows 91-102 :
Work open mesh background again to create space between motif and border. Maintain 75 meshes per row. (Rows 91-102)
Info :
At Row 102 mark the long-edge start point for the border shaping. The border will be worked in rounds around the entire panel after the central mesh panel is complete. Add a last even mesh row to make a neat, flat edge for joining the border.
Row 103 :
Ch3, work open mesh across (75 meshes). Fasten off and weave in tails if preferred, or carry yarn to one edge for border joining. (75 meshes)
Info :
Block the panel flat now. Pin the mesh to a smooth rectangle/oval shape on a blocking board, stretching evenly. Allow to dry completely before proceeding to the edging. Blocking opens the mesh and ensures the scallops will sit evenly around the oval.
— Border Foundation (worked around the oval panel) :
Round 1 :
Join main color to any long-side edge corner with a sl st. Ch1, work 1 sc evenly around the edge into the short spaces along the mesh edge, placing approximately 3 sc in each side 'mesh' edge and 6-8 sc along the curved ends to maintain shape. Join with sl st to first sc. (Approximate count: 420 sc around; adjust to panel tension.)
Info :
Distribute sc evenly; exact count not critical but keep symmetry. Place a stitch marker at the midpoints of the long sides and at both ends so later scallop repeats align opposite each other. The approximate 420 sc allows for repeating scallop units every 12-14 sc depending on tension; we will use established markers to space scallops evenly.
Round 2 :
Ch3 (counts as dc), 1 dc in same st, *sk 3 sc, 7 dc in next sc (this forms the red-arch pocket), sk 3 sc, 1 dc in each of next 3 sc* repeat around to form repeating groups. Join with sl st to top of ch3. (Same approximate total stitches; scallop repeat count approx 28 on long sides combined)
Info :
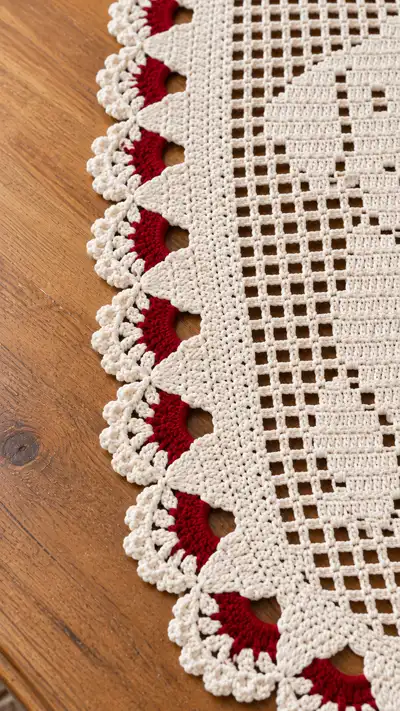
Round 2 creates the pocket spaces where the red backing will be worked. The 7-dc fan forms a crescent opening; the following 3 dc create a bridge between fans. This establishes both the decorative scallop and the arch pocket for color backing.
— Red Arch Inserts (color change rounds) :
Round 3 (Accent color - Red) :
Join red yarn at the base of the first 7-dc fan of Round 2. Ch1, sc in same st, *ch2, 11 dc across the space formed by the 7-dc fan (work into the fan so the red fills the crescent), ch2, sl st into the base between fans* repeat for each fan around the oval. Fasten off red and weave ends. (Approx 28 red arches)
Info :
Work each red arch to sit flush behind the cream fan so that the fan’s points rest on top of the red. Use a hook one size smaller (3.0mm) if the red arches need to be tighter to sit snugly. Keep the arch tall enough to peek through the fan openings as shown in the photo.
Round 4 (Main color) :
Rejoin main color at the bridge space after a red arch. Ch1, sc around into the ch2 spaces used in Round 3 anchoring each red insert. Work evenly to stabilise the insert. (Join and secure at each arch base.)
Info :
After adding red arches, reinforcing them with sc around the bases ensures they will not tug loose during later lace work. Weave in red ends on the underside for a clean face side.
— Scalloped Shell Border (Rounds 5-16) :
Round 5 :
Ch3 (counts as dc). Work 2 dc in same st, *sk 2 sc, 5 dc in next sc (shell), sk 2 sc, 1 dc in each of next 3 sc* repeat to end, join. (Shells spaced evenly; total shells approx 28)
Round 6 :
Ch1. In each shell: work (sc, ch3, sc) into the center of the 5-dc shell. Between shells work 3 sc across the bridging dc sts. Join. (Creates picot-ready foundation)
Info :
Round 6 builds little open loops at the tip of each shell which will receive the decorative picot clusters. Keep stitch numbers even between shells to maintain a smooth scallop curve around the oval.
Round 7 :
Ch3, in each shell top work: *7 dc cluster into the (sc, ch3, sc) loop to create a scallop fullness, sl st into base between shells* repeat around. Join. (Round 7)
Round 8 :
Ch1. Work 1 sc into each dc around; at each scallop peak work (sc, picot, sc) into top stitch to give a delicate pointed edge. Join. (Round 8)
Info :
Picots: ch3, sl st into third ch. Adjust picot size based on yarn thickness; for cotton worsted a 3-chain picot gives a neat tight point. If picots are too large, reduce to ch2.
Round 9-12 :
Repeat a decorative shell-row cycle to build a double-layer scallop: Round 9 work 3 dc clusters into spaces to broaden scallop; Round 10 sc around; Round 11 small crab stitch round for reverse edging; Round 12 sc evenly to tidy edge. Join each round. (Rounds 9-12)
Info :
These extra rounds add depth to the scalloped edge giving the layered look shown in the photo. If your scallops feel too stiff, skip one of the layer rounds to keep lacy movement.
Round 13 :
Final decorative round: work small clusters of (sc, ch3, sc) at scallop crests and do a picot cluster (sc, picot, sc) at each tip for extra frill. Fasten off and weave ends securely. (Round 13)
Info :
Finish by trimming stray fibers and lightly steaming-blocking the entire runner to set scallops. If desired, apply a light starch spray to help the scallops hold their shape on a dining table.
— Finishing Touches :
Info :
Weave in all tails on the WS using a yarn needle. Neaten red insert tails by stitching them to the underside of the red arches so they are invisible from the top. Re-block the entire piece after weaving ends to ensure the mesh and border lay flat.
Info :
Optional: embroider tiny nostrils or eyes on the filled meshes with a darker thread for added definition. This is optional because the filled mesh squares create a clear silhouette without embroidery.
Info :
Care: Hand wash or machine gentle in a laundry bag on cool; reshape while damp. Press gently from the WS if needed using low iron and a pressing cloth.
This lovely filet runner combines geometric mesh with a sweet dog motif and a lacy scalloped border for a vintage-inspired centerpiece. The contrast red arches behind the scallops add a beautiful pop of color and depth, making every scallop stand out. It’s a relaxing, focused crochet project that rewards you with a charming heirloom piece. 🧶 Give it as a thoughtful gift or keep it to brighten your own table—either way you'll enjoy every delicate stitch. 🌸