About This Cutie Utility Basket Pattern
This pattern creates a durable, 24" circumference x 8" high utility basket worked in spirals for a seamless look. Youll work with three strands of worsted yarn held together to achieve a firm, structured fabric that holds shape beautifully. Two suggested colorway options are given (Coordinating and Contrasting) with full round-by-round instructions for consistent results. The pattern includes clear tips for changing strands and finishing for a professional look.

The basket is made using a 6mm hook and medium worsted weight yarn; gauge is 4" = 12 SCS and 12 rows. Finished size is approximately 24" circumference x 8" high and can be adjusted by changing yarn weight or hook size.
Why You'll Love This Cutie Utility Basket Pattern
I absolutely love this pattern because it turns simple single crochet into a strong and beautiful basket with minimal tools. I enjoy how holding three strands together creates instant structure without complicated stitches. The color change method during the last stitch of the previous round makes clean transitions that look intentional and polished. Working in spirals keeps a smooth, seamless surface and makes assembly effortless. This pattern is a satisfying weekend project that yields a useful handmade item I truly enjoy gifting and using around my home.
Switch Things Up
I love customizing this basket by swapping color placements to match seasonal decor or give each basket its own personality.
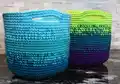
I often hold two neutral strands with one bright accent strand for a subtle pop that still reads cohesive from a distance.
I sometimes use a bulky yarn in two strands and a worsted yarn in the third strand to create interesting texture and slightly larger size.
I have created minis by using finer yarn and smaller hooks, which make great keychain or shelf baskets for tiny storage.
I experiment with ombre by gradually changing one strand color across several rounds for a smooth gradient effect.
I occasionally add a braided cotton handle after the top rounds for extra durability when carrying heavier items.
I will embroider initials or small motifs on the finished basket for personalization before weaving in ends.
I recommend testing a small swatch when changing yarn brands to make sure gauge and stiffness meet your expectations.
I sometimes finish the rim with a contrasting round of surface slip stitches to create a neat, decorative edge.
I also try holding tape yarn or ribbon as one of the strands for a sturdier, decorative finish that stands up to heavy use.
Common Mistakes & How to Fix Them
✗ Not winding skeins into two center-pull balls before starting causes tangles and slowdowns; wind each skein into two center-pull balls as instructed to keep yarn feeding smoothly.
✗ Skipping the stitch marker when working in spirals leads to lost round counts; place and move a stitch marker at the start of each round to stay on track.
✗ Using a larger-than-specified hook to reduce effort will create a floppy basket with less structure; if you must increase hook size, expect a larger, softer basket and adjust expectations accordingly.
✗ Changing colors incorrectly during the last stitch can leave loose floats or color gaps; follow the method of pulling up a loop, dropping and swapping strands, then completing the stitch to ensure clean color transitions.
✗ Maintaining inconsistent tension when holding three strands together results in uneven fabric and wavy edges; practice keeping an even, moderate tension across all three strands for best results.