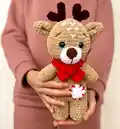
Create a charming plush deer with this friendly crochet pattern. You will work with plush yarn and follow clear, photographed steps to assemble a sweet 12 in / 28 cm amigurumi. The pattern includes full instructions for legs, body, head, arms, ears, antlers, muzzle, nose, tail, patches and a scarf. Perfect for gifting or seasonal decor, this deer is cuddly, detailed, and fun to make.
Progress Tracker
0% Complete
— Materials And Tools :
Info :
Original yarn: Plush yarn Dolce YarnArt 120m(131 yds)/100g in light brown - 1ball 100g. Plush yarn Dolce YarnArt 120m(131 yds)/100g - a little: in dark brown for antlers and in white for muzzle, patch and tail. You can substitute these yarn with another not plush bulky yarn with hook 4mm. Cotton yarn Yarnart Jeans 159m(174yads)/50g or another cotton or acrylic medium yarn in dark brown for nose and eyebrows. Substitute plush yarn: Himalaya Dolphin Baby 120m (131 yds)/100g, Baby Bee Adore a ball 100g/84m, Velvet by Bernat 288m (315yds)/300g, IceCream Deluxe by Lion Brand 142m (155 yds)/142g. Hook US size G/6 (4 mm), and C/2 (3 mm). Glitter safe eyes 16 mm (you can substitute safety eyes with buttons or simply crochet the eyes with black yarn). Fiber fill stuffing. Brown thread for assembling. Tapestry needle.
— Crochet Abbreviations :
Info :
dc - double crochet. dec - decrease. inc - increase. rnd(s) - round(s). sc - single crochet. sl st - slip stitch. st(s) - stitch(s). () - rep the content of the parenthesis as many times as the number after parenthesis says. The number after = is the total number of stitches in the rnd.
— Beginning :
Info :
Notes: start working from the body. All pieces are worked in a spiral continuously. This means that you do not end the rnd with a slip stitch and do not start a rnd with a chain. I start working every piece from a magic ring but you can ch2 and work the necessary number of sc in the second st from the hook. You should crochet tight enough to prevent stuffing from sticking out.
— Legs & Body :
Round 1 :
6 sc in magic ring =6 sts
Round 2 (INC) :
sc 2 in each st around=12 sts
Round 3 (INC) :
(sc in next st, 2 sc in next st)*6 times =18 sts
Round 4-10 :
sc in each st around =18 sts
Info :
Fasten off, leave the tail about 10 cm and cut the yarn. One leg is done. Rep rnds 1-10 for the second leg. Do not cut yarn when the second leg is finished.
Round 11 :
18 sc around the 1st leg' sts, then make 18 sc around the 2nd leg's sts (this is how legs are attached to each other) = 36 sts
Info :
Then with the tail of the first leg yarn you should do 1 sl st inside the legs to prevent hole between the legs.
Round 12-18 :
sc in each st around = 36 sts
Info :
Now you need to stuff the legs. Otherwise it will be uncomfortably later.
Round 19 (DEC) :
(sc in next 4 sts, sc dec)*6 times = 30 sts
Round 20 :
sc in each st around = 30 sts
Round 21 (DEC) :
(sc in next 3 sts, sc dec)*6 times = 24 sts
Round 22 :
sc in each st around = 24 sts
Round 23 (DEC) :
(sc in next 2 sts, sc dec)*6 times = 18 sts
Info :
Now stuff the body and continue:
Round 24 (DEC) :
(sc in next st, sc dec)*6 times = 12 sts
Round 25 :
sc in each st around = 12 sts
— Head :
Round 1 :
6 sc in magic ring = 6 sts
Round 2 (INC) :
2 sc in each st around = 12 sts
Round 3 (INC) :
(sc in next st, 2 sc in next st)*6 times =18 sts
Round 4 (INC) :
(sc in next 2 sts, 2 sc in next st)*6 times = 24 sts
Round 5 (INC) :
(sc in next 3 sts, 2 sc in next st)*6 times = 30 sts
Round 6 (INC) :
(sc in next 4 sts, 2 sc in next st)*6 times = 36 sts
Round 7 (INC) :
(sc in next 5 sts, 2 sc in next st)*6 times = 42 sts
Round 8 (INC) :
(sc in next 6 sts, 2 sc in next st)*6 times = 48 sts
Round 9-15 :
sc in each st around = 48 sts
Info :
Important!!!! If you use safe eyes (16 mm) insert them now between rounds 11 and 12 with 7 sts in between.
Round 16 (DEC) :
(sc in next 6 sts, sc dec)*6 times = 42 sts
Round 17 (DEC) :
(sc in next 5 sts, sc dec)*6 times = 36 sts
Round 18 (DEC) :
(sc in next 4 sts, sc dec)*6 times = 30 sts
Round 19 (DEC) :
(sc in next 3 sts, sc dec)*6 times = 24 sts
Round 20 (DEC) :
(sc in next 2 sts, sc dec)*6 times = 18 sts
Round 21 (DEC) :
(sc in next st, sc dec)*6 times = 12 sts
Round 22 (DEC) :
sc dec*6 times =6 sts
— Arm (Make 2) :
Round 1 :
6 sc in magic ring = 6 sts
Round 2 (INC) :
2 sc in each st around = 12 sts
Round 3-8 :
sc in each st around = 12 sts
Round 9 (DEC) :
(sc in next 4 sts, sc dec)*2 times = 10 sts
Info :
Stuff the arm, do not stuff it too tight.
Round 10 (DEC) :
(sc in next 3 sts, sc dec)*2 times = 8 sts
Round 11 (DEC) :
(sc in next 2 sts, sc dec)*2 times = 6 sts
Info :
Close the piece using sc, work 2 sc along the edge of the piece. Fasten off, cut yarn and weave in ends. One arm is done. Rep rnds 1-11 for the second arm.
— Muzzle :
Round 1 :
6 sc in magic ring =6 sts
Round 2 (INC) :
sc 2 in each st around=12 sts
Round 3 (INC) :
(sc in next st, 2 sc in next st)*6 times =18 sts
Round 4 :
sc in each st around =18 sts
— Nose :
Round 1 :
6 sc in magic ring =6 sts
Round 2 (INC) :
sc 2 in each st around=12 sts
Round 3 (INC) :
(sc in next st, 2 sc in next st)*6 times =18 sts
Info :
Fasten off. Leave the long tail for sewing.
— Ears (Make 2) :
Round 1 :
6 sc in magic ring = 6 sts
Round 2 :
sc in each st around = 6 sts
Round 3 (INC) :
2 sc in each st around = 12 sts
Round 4 :
sc in each st around = 12 sts
Round 5 (INC) :
(sc in next st, 2 sc in next st)*6 times =18 sts
Round 6 :
sc in each st around = 18 sts
Round 7 (DEC) :
(sc in next st, sc dec)*6 times = 12 sts
Info :
Fasten off, cut yarn and weave in ends. One ear is done. Rep rnds 1-7 for the second ear.
— Antlers (make 2) :
First antler part :
With dark brown plush yarn and hook 4mm make a magic ring. Round 1: 6 sc in magic ring = 6 sts. Round 2: sc in each st around = 6 sts. Fasten off and cut yarn.
The second antler part :
With dark brown plush yarn and hook 4mm make a magic ring. Round 1: 6 sc in magic ring = 6 sts. Rounds 2-3: sc in each st around = 6 sts. Do not cut yarn!!!
Round 4 (DEC) :
With the working yarn of 2nd antler part crochet around first antler part. Make 1 sc, sc dec, 1 sc, sc dec until reaching 2nd antler part. Continue on 2nd part with 1 sc, sc dec, 1 sc, sc dec = 8 sts
Round 5 (DEC) :
1 st, sc dec, 2 st, sc dec, 1 st = 6 sts
Info :
Fasten off, cut yarn and weave in ends. One antler is done. Rep rnds 1-5 for the second antler.
— Tail :
Round 1 :
6 sc in magic ring = 6 sts
Round 2 (INC) :
(sc in next st, 2 sc in next st)*3 times =9 sts
Round 3 :
sc in each st around =9 sts
Info :
Fasten off, cut yarn and weave in ends.
— Square Or Heart Patches For The Belly :
Square Patch :
Work the patch back and forth in rows. This means that you need to make a turning chain at the end of each row. With white plush yarn and hook 4mm make ch 5. Row 1: sc in 2nd chain from hook and in next 3 sts, ch1 = 4 sts, turn. Row 2: sc in next 4 sts, ch 1= 4 sts, turn. Row 3: sc in next 4 sts, ch 1= 4 sts, turn. Row 4: sc in next 4 sts = 4 sts. Fasten off.
Heart Patch (instead square patch) :
Work with plush pink or red yarn make magic ring. Round 1 sc in next st, 3 dc in next st, 2 sc in next st, 1 hdc in next st, 2 sc in next st, 3 dc in next st, sl st = 12 sts. Fasten off.
Scarf :
Work the scarf back and forth in rows. This means that you need to make a turning chain at the end of each row. With red plush yarn and hook 4mm make ch 5. Row 1: sc in 2nd chain from hook and in next 3 sts, ch1= 4 sts, turn. Row 2-39: sc in next 4 sts, ch 1= 4 sts, turn. Row 40: sc in next 4 sts = 4 sts. Fasten off, cut yarn and weave in ends.
— Assembly :
Step 1 :
If you use safe eyes, you must insert them when you crocheted the head. Or sew the eyes to the head between 11 and 12 round with 7 sts in between.
Step 2 :
Sew the head to the body (attach linking sts from the round 20 of the head to sts from round 25 of the body).
Step 3 :
Sew arms to the body between 24 and 25 rounds. Try to stick the needle in the same place that will help to keep arms flexible.
Step 4 :
With the same thread using needle sculpting, shape the head. Use photo as a guide.
Step 5 :
Stuff the muzzle a little bit and sew it to the head between rnd 13 and rnd 18.
Step 6 :
Sew the nose to the top of the muzzle (between 1 and 4 rounds) and with the same brown thread make 2 large stitches to the down of muzzle.
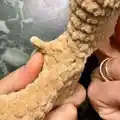
Step 7 :
With the same brown thread sew antlers to the top of the head (between round 2 and 5) and embroider eyebrows (between 7 and 10 rounds) as shown at the photo.
Step 8 :
Than fold the ears in half lengthwise and sew the ears between 7 and 8 rounds of the head.
Step 9 :
With white yarn embroider a few small stitches on the deer's forehead.
Step 10 :
Then with white thread sew the tail on the back and the patch on the belly, sew several stitches on the patch with contrast yarn.
Info :
That's all. Your toy is ready!
This adorable Deer amigurumi is designed to become a cherished handmade friend for gifting or display. It combines plush textures with sweet facial details for a lovable finish. Make one for the holidays or as a warm, cozy companion for a loved one. 🧶🐾