🧢 Beautiful ✨ Detailed πŸ’ Adorable

Delilah Boho Bag Pattern

Delilah Boho Bag Pattern
4.7β˜… Rating
8-10 Hours Time Needed
3.6K Made This
βœ‚οΈ

Intermediate Level

Ideal for those with basic crochet experience, featuring slightly more advanced stitches and techniques to expand your skills.

⏱️

All-Day Adventure

Requires 8-10 hours, ideal for a full day of immersive crocheting.

✨

Stylish Touch

An elegant detail to elevate any look, combining traditional techniques with contemporary design sensibilities.

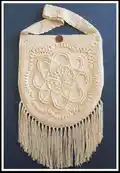
About This Delilah Boho Bag Pattern

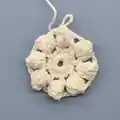
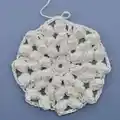
This pattern creates the Delilah Boho Bag β€” a textured, decorative shoulder bag with a layered mandala-style front panel, sturdy top edge and long strap. The design blends cluster stitches, arches and framed motifs to build a distinctive boho texture. The pattern includes photo references for each round to help you match shaping and stitch placement while you work.

Delilah Boho Bag Pattern crochet pattern - detailed view of completed project

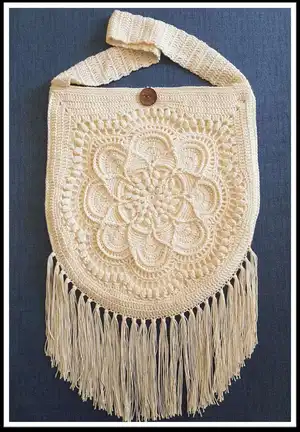
You will make the circular motif then work joining rows and top edging before crocheting the long strap and attaching fringe. The finished bag is decorative yet functional, perfect for everyday use or gifting.

Why You'll Love This Delilah Boho Bag Pattern

I absolutely love this pattern because it combines decorative stitches with practical construction to make a bag you will actually use. The layered petals and arches create so much beautiful texture that I find endlessly satisfying to crochet. I enjoy how the design lets me play with negative space and surface detail without being overly complicated. Every time I make one I find small ways to personalize the look through color and fringe length, which keeps this project fresh and fun.

Delilah Boho Bag Pattern step 1 - construction progress Delilah Boho Bag Pattern step 2 - assembly progress Delilah Boho Bag Pattern step 3 - details and accessories Delilah Boho Bag Pattern step 4 - final assembly and finishing

Switch Things Up

I love changing the color palette on this design to give each bag a new personality; try deep rusts and teal for autumnal vibes or soft pastels for a spring look.

You can make the bag bigger or smaller by switching yarn weight and hook size; thicker yarn and a larger hook will make a chunkier, larger bag.

Try adding a lining with a coordinating fabric for extra durability and to keep small items from slipping through the decorative stitches.

Change the fringe length or style β€” knotted fringe, trimmed tassels, or no fringe at all will dramatically alter the final feel.

I sometimes embroider small accents onto the central motif after blocking to personalize each piece.

Swap the long strap for shorter handles to turn it into a handbag rather than a shoulder bag; attach handles at the same joining points shown in the photos.

Play with contrast edging colors to make the decorative arches and petals pop against the panel background.

For a festival-ready piece, add beads to the fringe or tiny charms sewn into the strap for a playful finish.

I recommend testing one motif with a sample yarn before committing to a full bag if you plan big color changes.

Consider adding a zipper beneath the top edge for extra security, stitching it in before finishing the top edge rounds.

If you prefer a sturdier strap, crochet two strips and quilt them together or insert interfacing between a folded strip and top-stitch it closed.

You can create matching accessories like a small coin pouch from a reduced-radius motif to make a coordinated set.

Common Mistakes & How to Fix Them

βœ— Ignoring the photo guide for stitch placement can cause mis-shapen petals and arches; follow each round photo closely to match stitch positions. βœ— Skipping a stitch count check after complex rounds will lead to uneven edges; count stitches at the end of key rounds and adjust as needed. βœ— Working with inconsistent tension makes the motif ripple or pucker; keep consistent tension and block the panel if necessary to even out shape. βœ— Attaching the strap without pinning can result in lopsided placement; pin and measure carefully before sewing the strap to the bag.

Delilah Boho Bag Pattern

Create a beautifully textured Delilah Boho Bag with this detailed pattern and photo guide. You will work a decorative circular panel that transforms into a rounded boho bag body, then add edging, strap and fringe for an on-trend finish. This pattern highlights layered stitches and picot-style arches for an artisan look. Perfect for makers who enjoy decorative motifs and practical accessories.

Intermediate 8-10 Hours

Materials Needed for Delilah Boho Bag Pattern

β€” Main Fabric

  • 01
    Aran/Worsted weight cotton or cotton blend yarn (approx 400-500g) main color (cream/off-white shown)
  • 02
    Extra cotton yarn for fringe (approx 150g additional)
  • 03
    Small amount of yarn for stitch markers and finishing

β€” Tools Required

  • 01
    Crochet hook size 5.0mm (H) recommended for body and edging
  • 02
    Yarn needle for sewing and weaving in ends
  • 03
    Scissors
  • 04
    Stitch markers to mark rounds and repeats
  • 05
    Measuring tape
  • 06
    Large wooden or decorative button for closure (1 piece)
  • 07
    Pins for blocking and assembly

Progress Tracker

0% Complete

Info :

These photos are to be used in conjunction with the written pattern.

β€” Main Panel :

Round 1 :

Photo reference - follow the photo for stitch placement and pattern for Round 1.

Round 2 :

Photo reference - follow the photo for stitch placement and pattern for Round 2.

Round 3 :

Photo reference - follow the photo for stitch placement and pattern for Round 3.

Round 4 :

Photo reference - follow the photo for stitch placement and pattern for Round 4.

Round 5 :

Photo reference - follow the photo for stitch placement and pattern for Round 5.

Round 6 :

Photo reference - follow the photo for stitch placement and pattern for Round 6.

Round 7 :

Photo reference - follow the photo for stitch placement and pattern for Round 7.

Round 8 :

Photo reference - follow the photo for stitch placement and pattern for Round 8.

Round 9 :

Photo reference - follow the photo for stitch placement and pattern for Round 9.

Round 10 :

Photo reference - follow the photo for stitch placement and pattern for Round 10.

Round 11 :

Photo reference - follow the photo for stitch placement and pattern for Round 11.

Round 12 :

Photo reference - follow the photo for stitch placement and pattern for Round 12.

Round 13 :

Photo reference - follow the photo for stitch placement and pattern for Round 13.

Round 14 :

Photo reference - follow the photo for stitch placement and pattern for Round 14.

Round 15 :

Photo reference - follow the photo for stitch placement and pattern for Round 15.

Round 16 :

Photo reference - follow the photo for stitch placement and pattern for Round 16.

Round 17 :

Photo reference - follow the photo for stitch placement and pattern for Round 17. Note: Photo highlights 'No ch3 space' areas; follow photo for those specific joins.

Round 18a :

Photo reference - begin the sequence shown in the photo for Round 18a, working the first section of stitch clusters and chains as pictured.

Round 18b :

Photo reference - follow the photo for Round 18b; the photo indicates a repeated section 'x5' across the panelβ€”work the repeat across as shown in the image.

Round 18c :

Photo reference - continue following the photo for Round 18c which shows the next configuration of clusters and chains; align repeats with the previous section.

Round 18d :

Photo reference - follow the photo for Round 18d to complete the visible sequence of 18-stage rounds, matching cluster placement to the image.

Round 18e :

Photo reference - follow the photo for Round 18e which completes the Round 18 group; ensure the arches and clusters line up as pictured.

Round 19 :

Photo reference - follow the photo for stitch placement and shaping for Round 19.

Round 20 :

Photo reference - follow the photo for stitch placement and shaping for Round 20; this round rounds out the lower body of the panel.

Round 21 :

Photo reference - follow the photo for Round 21; this round completes the main decorative panel before joining.

β€” Joining and Edging :

Joining row :

Photo reference - see the Joining row photo to observe how the panel edges are joined to form the bag shape; mimic the stitch density shown.

Top edge - Round 1 :

Photo reference - see Top edge Round 1 photo for the first row of top edging and for placement of any loops or button loop.

Top edge - Round 2 :

Photo reference - follow the photo for Top edge Round 2 which refines the edging and secures the button loop if present.

Top edge - Round 3 :

Photo reference - follow the photo for Top edge Round 3 to finish the top rim and tidy the edge.

β€” Strap :

Strap - Row 1 :

Photo reference - follow the Strap Row 1 photo to establish the base row of the strap along the top edge.

Strap - Row 2-61 :

Photo reference - follow the Strap Row 2-61 photo series to work straight rows for the strap; repeat the shown row stitch across rows until you reach the desired length (photo shows multiple rows up to 61).

Strap - Joining :

Photo reference - see the Strap - Joining photo to observe how the strap end is joined back to the bag body; sew securely to match the photo finish.

Assembly Instructions

  • Fold the completed panel and join the sides using the joining row method shown in the photo, matching motifs and sewing evenly to shape the bag body.
  • Work the top edge rows as shown in the photos to create a tidy rim and form the button loop; secure ends and weave in all yarn tails.
  • Crochet the strap following the Strap Row photos (Row 2-61) to your desired length, then join the strap ends to the bag using the Strap - Joining photo as reference and sew firmly.
  • Cut and attach fringe along the lower semicircular edge, spacing evenly and matching the length shown in photos for a balanced boho finish.
  • Sew on the button at the marked top center on the front panel and use the created loop to fasten; reinforce the button with multiple passes for durability.

Important Notes

  • πŸ’‘Use stitch markers to mark the start of rounds and any repeat points to keep track of increases and decorative arches.
  • πŸ’‘Match your gauge and tension to photos; blocking the panel lightly before joining can help the arches and petals sit flat.
  • πŸ’‘Pin the strap before joining to confirm placement and symmetry, and sew with secure back-and-forth stitches to prevent slippage.
  • πŸ’‘Weave in ends as you go to keep the inside of the bag neat and reduce bulk under the top edge.

Make your own Delilah Boho Bag and add a handmade touch to everyday outfits! This textured mandala-front bag is a showstopper with layered petals, arches and fringe, perfect for gifting or keeping. Create something special today β€” happy crocheting! πŸ§ΆπŸ‘œ

You ask,

we answer.

FAQs

What size will the finished piece be?

The finished bag size will depend on your tension and yarn, but using the recommended yarn and hook the panel makes a rounded bag approximately 35-40 cm wide (including fringe) and strap length is adjustable.

Can I use different yarn weights for this pattern?

Yes, you can use different yarn weights but this will affect the final size and drape; switch hook size appropriately and expect a change in the number of strap rows needed for the desired length.

Do I need prior crochet experience for this pattern?

This pattern is rated intermediate; familiarity with cluster stitches, working in rounds, and reading photo guides is recommended for best results.

How long does this project typically take to complete?

Most crocheters complete this project in 8-10 hours, depending on experience, customization, and assembly time.