🧢 Beautiful ✨ Detailed πŸ’ Adorable

Delilah Boho Bag Pattern

Delilah Boho Bag Pattern
4.8β˜… Rating
8-10 Hours Time Needed
3.8K Made This
βœ‚οΈ

Intermediate Level

Ideal for those with basic crochet experience, featuring slightly more advanced stitches and techniques to expand your skills.

⏱️

All-Day Adventure

Requires 8-10 hours, ideal for a full day of immersive crocheting.

✨

Stylish Touch

An elegant detail to elevate any look, combining traditional techniques with contemporary design sensibilities.

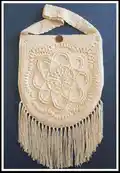
About This Delilah Boho Bag Pattern

This pattern creates a beautiful Boho-style shoulder bag featuring a layered mandala motif, textured scallops and a long strap. The design includes step-by-step photo references for each round to help you follow the shaping and decorative stitches. The finished bag includes a top edging, joining row and a long strap for comfortable wear.

Delilah Boho Bag Pattern crochet pattern - detailed view of completed project

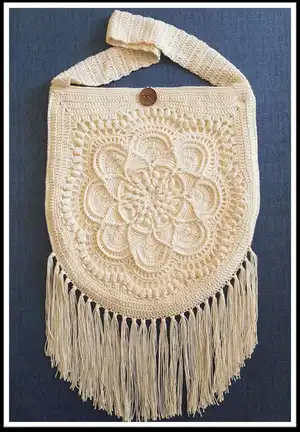
The pattern emphasizes texture and structure, using puff/popcorn-style stitches and layered arcs to form the mandala. Fringe and a wooden button finish give the bag a distinct boho look.

Why You'll Love This Delilah Boho Bag Pattern

I absolutely love this pattern because the layered mandala motif feels like creating a little piece of textile art with every round. I enjoy how the textured arcs and puff stitches add so much dimension without being overly complicated. The bag is also incredibly versatile β€” you can make it dressy or casual depending on your yarn choice. Working the strap and top edge gives a neat, finished look that I always find satisfying to complete. The fringe and button details are delightful finishing touches that really make me smile when the bag is complete.

Delilah Boho Bag Pattern step 1 - construction progress Delilah Boho Bag Pattern step 2 - assembly progress Delilah Boho Bag Pattern step 3 - details and accessories Delilah Boho Bag Pattern step 4 - final assembly and finishing

Switch Things Up

I love how easily this pattern adapts to customization β€” swap the cream cotton for bright colors to make a bold statement piece.

I often change yarn weight and hook size to create a mini or oversized version; just remember to check gauge when you switch.

I like adding a fabric lining with a zipper for extra security and longevity; it also gives the bag more structure.

Try adding beads to the fringe or weaving a contrasting cord through the top edge for a boho-chic accent that catches the eye.

I enjoy experimenting with different button styles; a raw wooden button gives a rustic look while a metal clasp makes the bag feel modern.

To make the strap adjustable, add buttonholes along the strap and a second button on the body so you can change the drop length.

If you want a softer drape, switch to a cotton blend or acrylic yarn; for a firm, structured bag, use a heavier mercerized cotton.

I sometimes add a small inner pocket sewn into the lining to keep essentials like keys and phone secure while on the go.

For a festival-ready version, use variegated yarn or carry two contrasting colors and crochet stripes into the strap for a unique look.

Don’t be afraid to mix techniques β€” embroidered details on top of the mandala add personality and make every bag one-of-a-kind.

Common Mistakes & How to Fix Them

βœ— Not checking gauge before starting can affect final bag size and fit; make a small gauge swatch and adjust hook size as needed to match proportions.
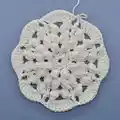
 βœ— Skipping the photo references for rounds may lead to confusion with layered stitches; refer to each round photo closely while working to ensure correct placement. βœ— Placing the strap unevenly results in an unbalanced bag when worn; measure and mark the center top and attach strap ends symmetrically before sewing. βœ— Adding fringe with inconsistent spacing looks untidy; cut multiple fringe lengths at once and use a ruler to place ties evenly along the bottom edge for a professional finish.

Delilah Boho Bag Pattern

Create a stylish Delilah Boho Bag with a decorative mandala motif and fringe for a relaxed boho look. This pattern guides you through the motif rounds, joining row, top edging and strap construction with clear photo references. You will learn layering techniques and textured stitches that make the bag stand out. Perfect for crafters who enjoy a mix of decorative detail and functional design.

Intermediate 8-10 Hours

Materials Needed for Delilah Boho Bag Pattern

β€” Main Fabric

  • 01
    100% cotton yarn, DK/8 ply (approx 300-400g total; 3-4 skeins depending on yardage)
  • 02
    Natural/cream (main color) - approx 300g
  • 03
    Extra yarn for fringe and strap - included in total quantity

β€” Tools Required

  • 01
    Crochet hook size 5.0mm (H) - recommended for sample photos
  • 02
    Alternative hook 4.5mm if fabric feels too loose
  • 03
    Scissors
  • 04
    Yarn needle for weaving ends and sewing parts
  • 05
    Stitch markers
  • 06
    Measuring tape
  • 07
    Wooden or decorative button for top closure
  • 08
    Optional blocking pins and mat for shaping motif

Progress Tracker

0% Complete

β€” Motif :

Info :

These photos are to be used in conjunction with the written pattern.

Round 1 :

Photo reference - see Round 1 image (photo shows initial center rounds and beginning of motif).

Round 2 :

Photo reference - see Round 2 image (photo shows second round and small loop spacing).

Round 3 :

Photo reference - see Round 3 image (photo shows early puff/cluster petals forming).

Round 4 :

Photo reference - see Round 4 image (photo shows petals becoming defined).

Round 5 :

Photo reference - see Round 5 image (photo shows expansion of motif petals).

Round 6 :

Photo reference - see Round 6 image (photo shows petal shaping with surrounding stitches).

Round 7 :

Photo reference - see Round 7 image (photo shows transitional row and beginning of outer shaping).

Round 8 :

Photo reference - see Round 8 image (photo shows scallop/arch formation over petals).

Round 9 :

Photo reference - see Round 9 image (photo shows arch shaping with additional rows).

Round 10 :

Photo reference - see Round 10 image (photo shows continuing arch and smoothing rows).

Round 11 :

Photo reference - see Round 11 image (photo shows rounded cup shapes forming along motif edge).

Round 12 :

Photo reference - see Round 12 image (photo shows continuation smoothing the arcs and building height).

Round 13 :

Photo reference - see Round 13 image (photo shows additional stacked stitches framing arcs).

Round 14 :

Photo reference - see Round 14 image (photo shows addition of eyelet-like spaces at arc tops).

Round 15 :

Photo reference - see Round 15 image (photo shows decorative openwork above arcs).

Round 16 :

Photo reference - see Round 16 image (photo shows a tall open-loop border forming).

Round 17 :

Photo reference - see Round 17 image (photo includes arrows and notes 'No ch3 space' marking specific spacing points where chain-3 spaces are not worked).

Round 18a :

Photo reference - see Round 18a image (photo shows start of Round 18 detail rows with a straight row of taller stitches).

Round 18b :

Photo reference - see Round 18b image (photo has a section marked 'x 5' indicating repeat of the pictured sequence five times across the edge).

Round 18c :

Photo reference - see Round 18c image (photo shows continuation of Round 18 repeat sequence).

Round 18d :

Photo reference - see Round 18d image (photo shows continuation and smoothing along edge).

Round 18e :

Photo reference - see Round 18e image (photo shows the final repeat portion of Round 18 before moving on).

Round 19 :

Photo reference - see Round 19 image (photo shows overall motif after Round 18 repeats; motif now approaching bag shape).

Round 20 :

Photo reference - see Round 20 image (photo shows outer shaping and beginning of bag base rounding).

Round 21 :

Photo reference - see Round 21 image (photo shows continued outer rows making the motif ready for joining).

β€” Joining row :

Joining row :

Photo reference - see Joining row image (photo shows the row used to create the bag opening and prepare the top edge for edging and strap attachment).

β€” Top edge :

Top edge - Round 1 :

Photo reference - see Top edge Round 1 image (photo shows first top edge row and a loop used as button closure).

Top edge - Round 2 :

Photo reference - see Top edge Round 2 image (photo shows second top edge row refining the top and forming button loop placement).

Top edge - Round 3 :

Photo reference - see Top edge Round 3 image (photo shows third top edge row, smoothing and finishing the top edge).

β€” Strap :

Strap - Row 1 :

Photo reference - see Strap Row 1 image (photo shows starting row for strap worked along top edge area).

Strap - Row 2-61 :

Photo reference - see Strap Row 2-61 image (photo shows the body of the strap worked in rows to achieve desired length; pictured sample has many rows to create a long strap).

Strap - Joining :

Photo reference - see Strap - Joining image (photo shows how the strap end is joined neatly to the top edge; use the photo for placement and finishing technique).

Assembly Instructions

  • Fold the finished motif in half to form the bag shape and use the joining row to sew the two sides together along the base and sides, leaving the top open.
  • Attach the strap to the top edges by folding strap ends under and sewing securely to the inside of the top edge, ensuring the strap is centered and evenly attached on both sides.
  • Sew a wooden or decorative button to the top center on the front panel and use the loop created at Top edge - Round 1 to fasten the bag closed.
  • Add fringe along the bottom edge by cutting equal lengths of yarn, folding each piece in half, and knotting evenly spaced along the final round edge to create a balanced fringe.
  • Weave in all loose ends on the inside of the bag and block the bag lightly if desired to even out the motif and smooth out any wavy edges.

Important Notes

  • πŸ’‘Use the photo references on each round as your primary guide for placement and shaping; photos show critical stitch placement and repeat counts visually.
  • πŸ’‘Mark the center top before attaching the strap to ensure the strap is centered and the bag hangs evenly when worn.
  • πŸ’‘Work consistent tension through the motif rounds to prevent distortion in the layered arcs and scallops; if motifs cup or ruffle, block before finishing the top edge.
  • πŸ’‘When adding fringe, cut multiple strands at once and fold them evenly to get consistent lengths and spacing.
  • πŸ’‘If your fabric looks too loose, drop down one hook size and recheck the drape before proceeding with strap construction.

This Delilah Boho Bag pattern lets you create a unique boho accessory full of texture, layered motifs and playful fringe. Add a wooden button and a long braided or crocheted strap to make it truly your own. Whether you wear it daily or save it for special outings, this bag brings a handcrafted, artistic touch to any outfit. 🧢✨

You ask,

we answer.

FAQs

What size will the finished piece be?

The finished bag measures approximately 35-38 cm across at its widest point and about 40-45 cm including fringe, depending on yarn and tension.

Can I use different yarn weights for this pattern?

Yes, you can use different yarn weights, but this will change the final size and drape; use an appropriate hook size and make a gauge swatch to adjust as needed.

Do I need prior crochet experience for this pattern?

This pattern is rated intermediate, so familiarity with puff/popcorn clusters, working in rounds, and basic shaping is recommended for best results.

How long does this project typically take to complete?

Most crafters complete this project in 8-10 hours; time may vary depending on experience level and whether you add additional details like extra fringe or lining.