๐Ÿงถ Beautiful โœจ Detailed ๐Ÿ’ Adorable

Demogorgon Plush Amigurumi Pattern

Demogorgon Plush Amigurumi Pattern
4.1โ˜… Rating
5-7 Hours Time Needed
1.8K Made This
โœ‚๏ธ

Intermediate Level

Ideal for those with basic crochet experience, featuring slightly more advanced stitches and techniques to expand your skills.

โฑ๏ธ

Weekend Treat

Takes 5-7 hours, making it an enjoyable project to finish over a couple of days.

๐Ÿงธ

Cute Companion

An adorable friend to cherish, handcrafted with love to bring comfort and joy for years to come.

About This Demogorgon Plush Amigurumi Pattern

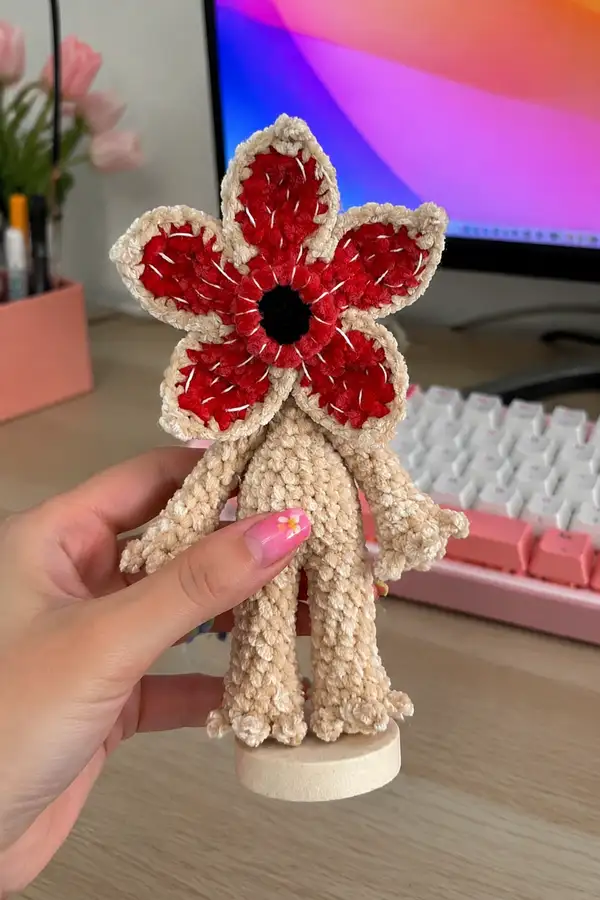
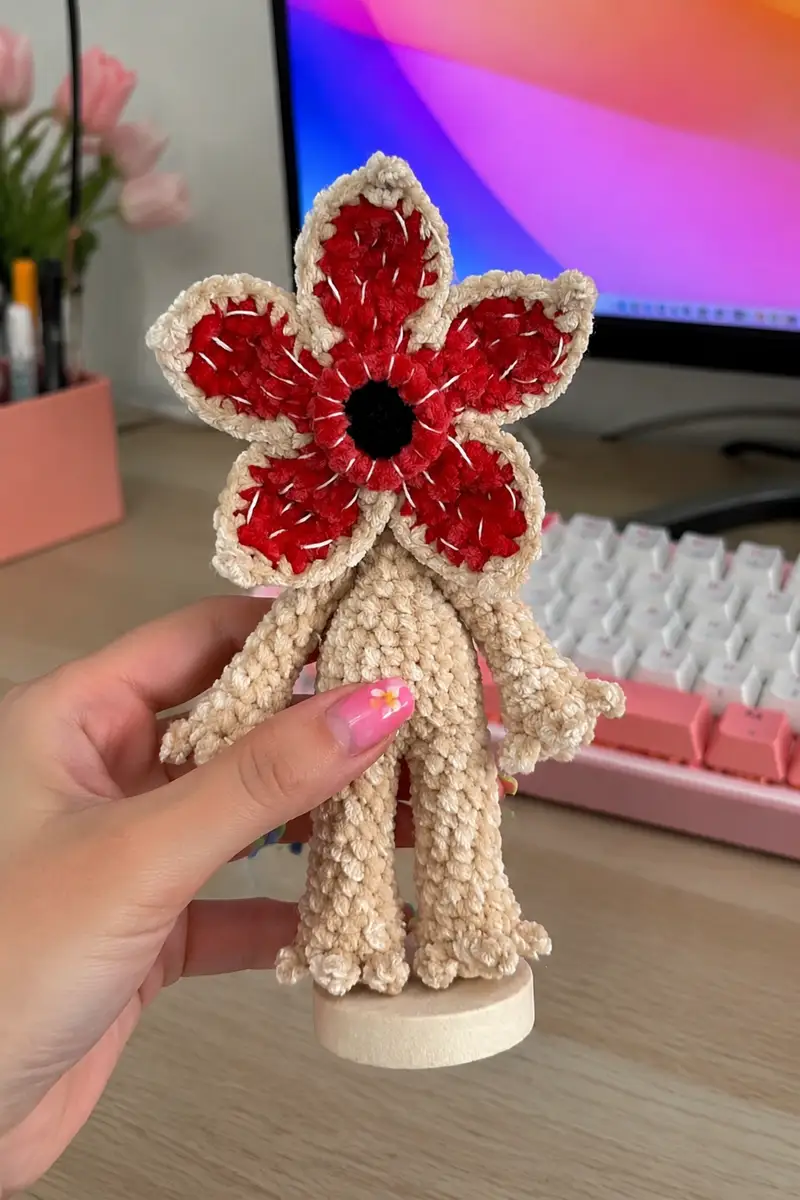
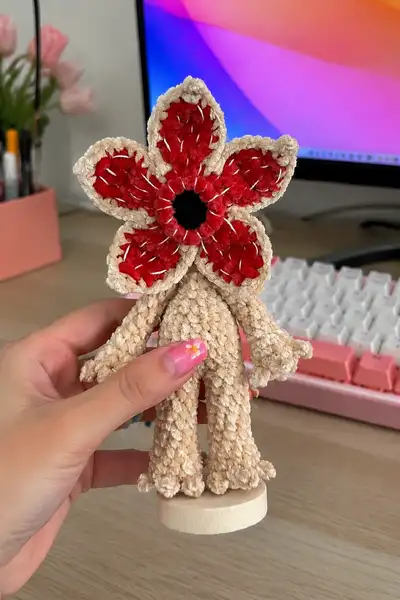
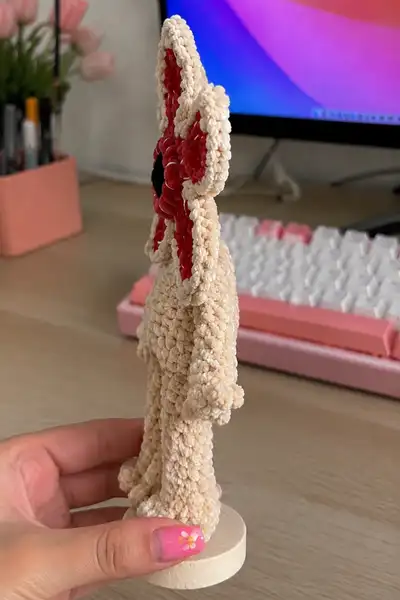
This pattern recreates the tiny Demogorgon-like plush pictured โ€” a standing amigurumi with long narrow legs, slender arms, and a multi-petal horror-flower face. The mouth consists of an inner black disk, five red petals made in turning rows, and an outer rim worked in the body color to frame each petal. The plush is worked primarily in single crochet (amigurumi style) using plush/micro-velour yarn for a dense, soft texture.

Demogorgon Plush Amigurumi Pattern crochet pattern - detailed view of completed project

The legs, body and head are crocheted continuously for a balanced shape; the flower mouth is made separately in two layers (inner red petals and outer main-color petals) and sewn to the head. Detailed finishing tips ensure the face sits centered and secure.

Why You'll Love This Demogorgon Plush Amigurumi Pattern

I love this pattern because it takes a classic amigurumi construction and adds an eye-catching, dramatic flower-mouth detail that really transforms the character. The plush velvet yarn creates an irresistible soft texture and the layered petal construction gives you the chance to practice turned rows and joining techniques. I especially enjoy how the petals frame the face โ€” it's spooky and sweet at once.

Demogorgon Plush Amigurumi Pattern step 1 - construction progress Demogorgon Plush Amigurumi Pattern step 2 - assembly progress Demogorgon Plush Amigurumi Pattern step 3 - details and accessories Demogorgon Plush Amigurumi Pattern step 4 - final assembly and finishing

Switch Things Up

I absolutely loved designing this pattern because it offers so many opportunities for creative customization while maintaining a structure that's fun and manageable to crochet. The plush velvet yarn gives a tactile result that's irresistible and perfect for small collectible displays.

What I find most exciting about this pattern is how easy it is to personalize: change the inner petal color to purple or orange for a seasonal spin, make the outer petals darker for contrast, or add embroidered veins on the petals for extra detail. You can also adjust size by using a thicker yarn and larger hook or split the mouth pattern into more petals for a fuller look.

I particularly enjoy small finishing touches โ€” tiny scallops on the feet, embroidered stitches on petals, and a painted wooden base โ€” they make each finished amigurumi feel truly unique. Don't be afraid to try a different yarn texture or to add wire for poseable limbs if you like interactive displays.

Common Mistakes & How to Fix Them

โœ— Skipping stitch markers at round starts can cause misaligned features and uneven shaping; always mark your first stitch of each round โœ— Inconsistent tension between rounds creates lumpy or uneven surfaces; practice maintaining steady, even tension throughout the entire project โœ— Not stuffing gradually as you work makes it hard to shape the narrow neck and legs later; stuff small amounts while the opening is still wide โœ— Joining the two leg pieces incorrectly when connecting them will distort the body circumference; check stitch counts and use a chain bridge of equal length โœ— Changing color without securing ends can create slipping or gaps; fasten off and weave in ends or carry yarn neatly inside when feasible โœ— Not sewing the petal layers precisely centered produces a lopsided face; pin and measure before permanently stitching the mouth piece to the head

Demogorgon Plush Amigurumi Pattern

This cuddly Demogorgon-inspired amigurumi features a signature five-petal flower mouth with a deep black center and bright red inner petals framed by a contrasting outer edge. Worked with plush velvet-style yarn for a soft, tactile finish, the design stands upright and has simple limb shaping for a stylized silhouette. Step-by-step instructions guide you through working the legs, body and head in one continuous piece, plus separate petal/mouth panels that are joined to create the iconic flower face.

Intermediate 5-7 Hours

Materials Needed for Demogorgon Plush Amigurumi Pattern

โ€” Main Fabric

  • 01
    Velvet/microplush yarn (microvelour) or similar plush bulky yarn, approximately 120-160g in main body color (beige or gray as pictured)
  • 02
    50-70g in bright red for inner petal color
  • 03
    10-15g black for the mouth center
  • 04
    Small amounts (10-15g) of contrast color for petal edging (light beige or darker gray depending on variant)

โ€” Tools Required

  • 01
    2.5mm (C) crochet hook or size recommended for your plush yarn to achieve tight amigurumi fabric
  • 02
    Optional: 3.0mm crochet hook for tighter fabric on small pieces
  • 03
    Polyester fiberfill stuffing
  • 04
    Yarn needle for sewing and weaving ends
  • 05
    Stitch markers (at least 3-4)
  • 06
    Scissors
  • 07
    Pins for assembly and alignment
  • 08
    Optional: thin florist wire or pipe cleaner for poseable limbs (secure and cover ends)
  • 09
    Optional: fabric glue for securing short yarn tails if desired

Progress Tracker

0% Complete

โ€” Notes & Gauge :

Info :

This pattern is written in continuous rounds unless otherwise noted. Use a hook 1-2 sizes smaller than suggested for your plush yarn to get a tight fabric so stuffing doesn't show. Gauge is not critical, but a finished figure using microplush yarn and a 2.5mm hook will stand approximately 18-22 cm tall. Keep a stitch marker at the first stitch of every round and count often.

โ€” Legs, Body & Head (worked continuously) :

Round 1 :

6 sc in magic ring (6)

Round 2 :

6 inc (12)

Round 3-4 :

12 sc (12) (work 2 rounds)

Round 5 :

(4 sc, dec) x2 (10)

Round 6-13 :

10 sc (10) (work 8 rounds)

Info :

These first two tubes form the two feet/legs. When both legs are complete to round 13, you will add connecting stitches to join them into one body tube. Stuff each toe/foot area lightly and keep next rounds unstuffed until legs are joined so you can flatten and sew easily.

Joining Step :

After finishing round 13 on both separate leg tubes, leave a short tail and make the following connecting chain: on the first leg, crochet 1 extra sc into the next free stitch (this will create a small bridge). On the second leg, add 6 additional sc along the side that will face the chain. Chain 2 and join to the first leg with a sc, creating a short chain bridge of 2 ch that you will work into in the next round.

Round 14 :

10 sc along first leg, 2 sc along chain, 10 sc along second leg, 2 sc along chain (24)

Round 15-20 :

24 sc (24) (work 6 rounds)

Round 21 :

(4 sc, dec) x4 (20)

Round 22 :

20 sc (20)

Round 23 :

(3 sc, dec) x4 (16)

Round 24-25 :

16 sc (16) (work 2 rounds)

Round 26 :

(2 sc, dec) x4 (12)

Round 27-28 :

12 sc (12) (work 2 rounds)

Round 29 :

(1 sc, inc) x6 (18)

Round 30 :

(2 sc, inc) x6 (24)

Round 31 :

(3 sc, inc) x6 (30)

Round 32 :

(4 sc, inc) x6 (36)

Round 33 :

(5 sc, inc) x6 (42)

Round 34-41 :

42 sc (42) (work 8 rounds)

Info :

These even rounds are the mid-torso and beginning of the head. Stuff the lower body now to a medium-firmness, leaving the upper head section empty so you can shape and stuff as you go. If you prefer a firmer body, add a small inner base of cardboard or felt for display stability.

Round 42 :

(5 sc, dec) x6 (36)

Round 43 :

2 sc, dec, (4 sc, dec) x5, 2 sc (30)

Round 44 :

(3 sc, dec) x6 (24)

Round 45 :

(2 sc, dec) x6 (18)

Round 46 :

(1 sc, dec) x6 (12)

Info :

Begin stuffing the head firmly here. Use small amounts of filling to maintain a smooth round shape. Continue stuffing with each decrease round so you can reach the interior easily and avoid overstuffing which will show through plush stitches.

Round 47 :

6 dec (6) โ€” close and leave long tail for sewing (6)

Info :

Fasten off leaving a long tail for closing. Finish stuffing and close remaining hole using the yarn tail and a yarn needle, weaving through remaining stitches and pulling tight for an invisible close. The head is now a simple round suitable for attaching the flower mouth piece at center front.

โ€” Arms (make 2) :

Round 1 :

5 sc in magic ring (5)

Round 2 :

5 inc (10)

Round 3-4 :

10 sc (10) (work 2 rounds)

Round 5 :

(3 sc, dec) x2 (8)

Round 6-13 :

8 sc (8) (work 8 rounds)

Info :

At this point you will form the hand/finger shape. If you want a palm with small finger bumps, crochet 2 additional sc, fold the piece in half and crochet 4 sc through both layers across to close the palm (this creates a flat rounded hand). Leave a long tail for sewing. Stuff hands lightly, arms slightly less so they remain flexible.

Finishing :

Make 2 of these. Sew the arms to the body approximately between rounds 27 and 28 (counting from the bottom of the work) on each side for natural placement. Use mattress stitch or ladder stitch to create an invisible join and make sure the arms sit symmetrically.

โ€” Mouth Center & Inner Petals (Inner Disk - black then red petals) :

Black center - Round 1 :

6 sc in magic ring (6)

Round 2 :

6 inc (12)

Round 3 :

(1 sc, inc) x6 (18)

Round 4 :

(2 sc, inc) x6 worked in FLO (24) - leave end and join with sl st to first to close round

Info :

After closing round 4, fasten off black yarn or leave tail for more secure sewing to head. Change to bright red yarn to work the five inner petals from the same round 4 placement.

Red petal join :

Attach red yarn to the back loop of any stitch on the black disk's round 4. You will create 5 petals around the disk. Each petal is worked in turning rows (worked flat) and then attached back to the disk.

Petal - Petal Base Row :

Make 2 ch, 4 hdc into the same stitch, turn (this creates the petal base)

Petal Row 2 :

2 hdc in first st, 2 dc across the next 2 sts, 2 hdc in last st, ch2, turn

Petal Row 3 :

2 hdc, 2 dc, 2 hdc (mirror of row 2), ch1, turn

Petal Row 4 :

dec at each end to shape petal peak if desired: (hdc dec), 2 dc, (hdc dec). Fasten off leaving tail for sewing.

Info :

Work 5 identical inner petals by moving clockwise around the black disk. When attaching each petal, leave one pick-stitch between petals (or one stitch gap) so petals don't bunch. After completing five red inner petals, change color back to main for the outer petal rim.

โ€” Outer Petal Layer (make 5 outer petals in body color) :

Info :

Each outer petal is made similarly to inner petal but slightly larger so it frames the red piece. Use the main body color (beige/gray). Work petals in flat turning rows then join two layers (inner + outer) together along their perimeter, right sides facing out, by slip-stitching or single crocheting around the edge.

Outer Petal - Row 1 :

Attach yarn to same base stitch used for inner petal, ch2, 5 hdc across into the same row positions as inner, turn

Outer Petal - Row 2 :

2 hdc in first, 3 dc across center, 2 hdc in last, ch2, turn

Outer Petal - Row 3 :

Repeat shaping to create a slightly larger teardrop - fasten off leaving tail

Assembly of petal layers :

Place inner red petal and outer main-color petal together with right sides facing out (inner visible center). Using main-color yarn, crochet or sl st them together around the perimeter. After all petals are joined, sc around the entire petal group (five petals) to create a uniform border and to join the five petals into one unified mouth piece.

Info :

When attaching the outer layer to the red inner layer, work through both layers with small, evenly spaced stitches so the petals match and curve naturally. Do NOT pull stitches too tight or the petals will pucker.

โ€” Finishing Petal Edge Decoration :

Border Round :

Once all 5 petals are joined and sc-ed around, work 1 sc in each st around the entire mouth edge to neaten. At the highest point of each petal, make a decorative cluster: in one stitch work 2 sc, ch2, sc in ch2, sc in same stitch where the first sc was made to form a little 'bump'. Repeat for each petal (5 bumps total).

Info :

These little bumps give the flower the tiny scalloped edging visible in the photo. Use white or a thin white thread stitched over the red inner petals for the stitched highlights (thin white embroidery thread sewn in short straight stitches across red area) if desired.

โ€” Attaching the Mouth to the Head :

Info :

Position the finished mouth piece centrally on the front of the head. The head top is the smallest round; orient mouth with black center directly in the center of the head. Pin in place and adjust until centered. Use the long tail or a new length of main-color yarn to sew the mouth onto the head using whip stitch or mattress stitch around the outer border, sewing through the head and petal border to ensure a secure attachment.

Attach :

Sew evenly around the full petal border with 10-12 evenly spaced stitches per petal to make sure the mouth is flat and secure. Weave in ends tightly inside the head.

โ€” Final Touches (feet shaping and base) :

Info :

To create the little scalloped feet edge seen in the photo, crochet a small round disk of 6 sc in MR under each foot or add 6 sc at the final round of each leg before closing. You can also glue or sew a small wooden disk on the bottom for display stability as seen in the photos.

Optional base :

Sew a small flat circle of felt or thin wood to the bottom using thread to secure if you wish the doll to stand upright without support.

โ€” Embellishments :

Info :

Sew thin white decorative stitches over the red inner petals (random short straight embroidery stitches) to mimic the stitched highlight shown. Add light blush to cheeks with fabric-safe paint if desired.

Info :

Weave in all loose ends and trim close to the work. For improved durability, knot and weave ends through several stitches before trimming.

Assembly Instructions

  • Attach head/mouth: Position the finished five-petal mouth centered on the head (align the black center with the exact middle of the head). Pin securely and sew through outer petal border and head using the long tail; make even small stitches all around to keep the petals flat and well attached.
  • Sew arms: Position arms approximately between rounds 27 and 28 (counting from the bottom) on each side. Pin for symmetry, then sew through arm top and body using ladder stitch for an invisible seam. Stuff arms lightly before final sewing.
  • Secure legs/body: After finishing the final decreases at the top of the head in round 47 and closing, make sure legs and body are stuffed firmly. If using a wood base, center the body bottom on the base and sew a few stitches through the felt or wrap the base edge to secure the toy upright.
  • Attach outer petal layers: If you made inner and outer petal layers separately, pin them together (inner petals facing inward) and join them edge-to-edge with single crochet or slip stitches to form a neat sandwich; then sc around the whole perimeter to unify the piece before attaching to the head.
  • Stitch decorations: Use thin white thread to make short, random stitches across the red inner petals. Tie and weave ends securely at the back of petals so they are hidden when mouth is sewn to the head.
  • Fasten all ends: After assembly, weave all yarn tails at least 3 cm into the body and trim. Knot where necessary and run the needle through several stitches to lock yarn in place.
  • Pin before finalizing: Always pin each piece in place and photograph or visually check symmetry before sewing permanently โ€” it's much easier to reposition before the last stitch!
  • Optional base: If adding a wooden base like the photos, glue the base and reinforce with a few sewing passes through the bottom to keep the toy standing.

Important Notes

  • ๐Ÿ’กUse stitch markers consistently at the beginning of each round to avoid counting errors and maintain proper shaping
  • ๐Ÿ’กStuff body parts gradually as you work rather than waiting until the end, especially for narrow openings like arms and legs
  • ๐Ÿ’กFor safety eyes, position and secure before stuffing head fully - they cannot be repositioned once locked in place (this pattern uses embroidered/ sewn features instead of safety eyes)
  • ๐Ÿ’กMaintain consistent tension throughout the project; too tight creates stiff, small pieces, too loose creates floppy, holey fabric
  • ๐Ÿ’กWhen sewing pieces together, use yarn slightly thinner than working yarn for neater, less visible seams
  • ๐Ÿ’กPin all pieces in position before final sewing to ensure proper placement and symmetry
  • ๐Ÿ’กFor amigurumi, work tightly enough that stuffing doesn't show through stitches; consider a smaller hook if using plush yarn
  • ๐Ÿ’กWhen changing colors, secure tails and weave them into the work or carry inside if working several rounds of stripes

This Demogorgon amigurumi is a fun mix of spooky and sweet โ€” each petal and stitch adds personality to your handmade companion. Assembling the layered mouth is a satisfying step where the piece truly comes to life. ๐Ÿงถ Take your time with finishing details and you'll have a charming figure ready to display or gift. Share your finished friend with pride! ๐ŸŽจ๐Ÿ‘พ

You ask,

we answer.

FAQs

What is the finished size of this amigurumi?

Based on the specified materials and hook size (microplush yarn + 2.5mm hook), the finished piece will measure approximately 18-22 cm in height. Using thicker or thinner yarn will change the final size proportionally.

Can I use different yarn weights for this pattern?

Yes! You can use any yarn weight, but adjust your hook size accordingly (generally 1-2 sizes smaller than yarn recommendation for tight amigurumi fabric). Different yarn weights will change final size and texture.

Do I need to use safety eyes or can I embroider them?

Both options work. This design uses a sewn/embroidered mouth and black yarn center rather than plastic eyes. Embroidered or safety eyes are both possible but consider safety for toys intended for children.

How much stuffing will I need?

For this size project, approximately 50-80 grams of polyester fiberfill should be sufficient. Stuff firmly but not overpacked so the plush keeps a soft, rounded look.

Can I make the arms and legs poseable?

Yes. Insert florist wire or pipe cleaners inside limbs before stuffing; bend the wire ends to avoid sharp points and continue stuffing around the wire for stability and poseability.

What if my stitch count is off?

If you notice a counting error, it is best to unravel back to where the count was correct. Trying to compensate later often creates visible distortions. Using a stitch marker at round starts helps prevent counting mistakes.

How do I prevent holes when stuffing?

Work with tight, consistent tension and a slightly smaller hook than the yarn recommends. Stuff gradually in small amounts and use a small stuffing tool or blunt pencil to push fill into narrow areas.

Can I customize colors and details?

Definitely! Swap the red inner petals for any color you like, add contrasting embroidery, or create seasonal variants. The structure is forgiving and welcomes creative variations.