🧢 Beautiful ✨ Detailed πŸ’ Adorable

Desert Crochet Cactus Amigurumi Pattern

Desert Crochet Cactus Amigurumi Pattern
4.8β˜… Rating
2-4 Hours Time Needed
3.2K Made This
βœ‚οΈ

Intermediate Level

Ideal for those with basic crochet experience, featuring slightly more advanced stitches and techniques to expand your skills.

⏱️

Bite-Sized Project

Finishes in 2-4 hoursβ€”perfect for an afternoon of creative relaxation.

🎁

Tiny Treasure

Small, sweet, and gift-worthy creations that fit perfectly in the palm of your hand with detailed charm.

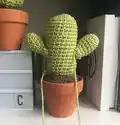
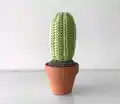
About This Desert Crochet Cactus Amigurumi Pattern

This pattern creates a small amigurumi cactus that sits inside a miniature terracotta pot. You will make a crochet soil base, a cactus body, optional arms and tiny flowers. The instructions use magic ring starts, invisible decreases and simple seaming to finish a neat, structured piece.

Desert Crochet Cactus Amigurumi Pattern crochet pattern - detailed view of completed project

Perfect for making a set of tiny cacti or a single shelf accent. Clear round-by-round instructions and photos help you assemble each part with confidence.

Why You'll Love This Desert Crochet Cactus Amigurumi Pattern

I absolutely love this pattern because it turns simple stitches into an adorable miniature cactus that brings charm to any space. I enjoy how quickly the soil and cactus take shape, making it satisfying to see results in a single sitting. The design is versatile β€” you can add arms, flowers or a bendable pipe cleaner to change the pose. I find these little pots make thoughtful handmade gifts that are easy to personalise and fun to display.

Desert Crochet Cactus Amigurumi Pattern step 1 - construction progress Desert Crochet Cactus Amigurumi Pattern step 2 - assembly progress Desert Crochet Cactus Amigurumi Pattern step 3 - details and accessories Desert Crochet Cactus Amigurumi Pattern step 4 - final assembly and finishing

Switch Things Up

I love customizing this pattern by switching yarn colors to create a whole little desert garden of cacti.

I sometimes use pale mint and soft lime together for a gradient effect on the cactus body.

To make a chunkier cactus I use a bulkier yarn with a larger hook and increase the soil circumference to fit a larger pot.

I add tiny embroidered spines with contrasting thread for a more textured look that still stays kid-safe.

For bendable arms I slip a folded pipe cleaner inside before finishing and shape to create a waving pose.

I make matching flowers in bright pinks or whites and stitch them to the top for seasonal variations.

Try grouping several different shapes and sizes in a row of pots to make an eye-catching display set.

I sometimes stuff the soil less firmly and glue in place for a flatter, more natural soil surface in the pot.

If you want a modern look, use neutral greys and creams for the cactus and pot to match minimalist decor.

Don’t be afraid to mix stitches β€” adding a row in HDC or DC can change the profile and create taller ribs on the cactus.

Common Mistakes & How to Fix Them

βœ— Not using a stitch marker for rounds leads to lost or miscounted rounds; place a marker at the first stitch of each round and move it up as you go to stay on track. βœ— Overstuffing the pieces can distort proportions and make seams difficult to close; stuff gradually and evenly, adding small amounts until you get a firm but smooth shape. βœ— Skipping the front-loop invisible decrease will produce a visible seam; perform decreases in the front loops only as instructed to maintain a neat finish. βœ— Failing to check soil circumference for your pot can make the soil too small or too large; try the soil inside your pot as you increase and continue increasing until it fits just inside. βœ— Sewing arms without pinning first can result in uneven placement; pin arms in place approximately six rounds up from the cactus base before sewing to ensure symmetry.

Desert Crochet Cactus Amigurumi Pattern

Make a charming miniature crochet cactus that sits perfectly in a small terracotta pot. This pattern guides you through a compact soil base, a cuddly cactus body with optional arms and flowers, and simple assembly steps. You'll enjoy working in the round with clear rounds and shaping notes to help you finish a delightful handmade accent. Perfect for gifting or brightening a shelf.

Intermediate 2-4 Hours

Materials Needed for Desert Crochet Cactus Amigurumi Pattern

β€” Main Fabric

  • 01
    Yarn A: 20g brown DK weight yarn (for soil)
  • 02
    Yarn B: 20g green DK weight yarn (for cactus body and arms)
  • 03
    Yarn C: Small quantity of pink or white DK weight yarn (for flowers)
  • 04
    Small amounts of contrasting yarns for optional flower details

β€” Tools Required

  • 01
    Crochet hook size US 4 (3.5mm)
  • 02
    Stitch marker
  • 03
    Sewing needle / yarn needle for sewing and weaving ends
  • 04
    Acrylic toy stuffing
  • 05
    Small Terracotta Plant Pot – 6cm x 6.8cm x 4cm
  • 06
    Pipe cleaner (optional) for bendable arms
  • 07
    Scissors

Progress Tracker

0% Complete

β€” Soil :

Info :

The first step is to make the soil which will sit below the cactus in the miniature plant pot.

Info :

Using yarn A:

Round 1 :

MR 6

Round 2 :

*Inc (12)

Round 3 :

*1 SC, Inc (18)

Round 4 :

1 SC, *Inc, 2 SC until last stitch, 1 SC (24)

Round 5 :

*3 SC, Inc (30)

Round 6 :

2 SC, *Inc, 4 SC until last 2 stitches, 2 SC (36)

Info :

Note: If your pot is larger continue increasing in this way until the circumference of the soil fits just inside the pot as pictured below.

Info :

At round 7:

Round 7-15 :

SC around (36)

Info :

Note: If your pot is larger continue until soil fits just inside the pot as pictured below.

Info :

Begin stuffing your cactus, continue stuffing as you go.

Round 16 :

2 SC, *Dec, 4 SC until last 2 stitches, 2 SC (30)

Round 17 :

*3 SC, Dec (24)

Round 18 :

1 SC *Dec, 2 SC until last stitch, 1 SC (18)

Round 19 :

*1 SC, Dec (12)

Round 20 :

*Dec (6)

Info :

FO.

β€” Cactus :

Info :

Body - Using Yarn B:

Round 1 :

MR 6 (6)

Round 2 :

*Inc (12)

Round 3 :

*1 SC, Inc (18)

Round 4 :

1 SC, *Inc, 2 SC until last stitch, 1 SC (24)

Round 5-19 :

SC around (24)

Round 20 :

1 SC *Dec, 2 SC until last stitch, 1 SC (18)

Info :

FO - leave tail for sewing.

Info :

Stuff firmly.

β€” Arms (Make 2) :

Info :

Using Yarn B:

Round 1 :

MR 6 (6)

Round 2 :

*Inc (12)

Round 3-8 :

SC around (12)

Round 9 :

(for this last row stop working in rounds) turn and do not CH, SC 8.

Info :

FO - leave tail for sewing

Info :

Lightly stuff.

Info :

If you want the arms to have more of a bend, fold a short piece of pipe cleaner so it is the length of the arm. Place inside with the stuffing.

β€” Assembly :

Info :

Sew the body of the cactus to the soil at approximately round three of the soil pattern.

Info :

To sew the arms to the cactus. Place the arms with pins to the body approximately 6 rounds up from the bottom of the body of the cactus and on opposite sides.

Info :

Place the arms facing upwards, so row 9 is facing downwards.

Info :

Sew the arm of the cactus to the body of the cactus. If you have used pipe cleaner, once sewn in place bend the pipe cleaner to create an upwards curve.

Info :

Sew to the soil.

β€” Flowers (Optional) :

Info :

Using Yarn C:

Round 1 :

MR 6

Info :

Change to Yarn D:

Round 2 :

SS to the first stitch, in the same stitch: 2 CH, 2 TR, 1 DC. For the remaining 5 stitches: SS to the next stitch, 2 CH 2 TR, 1 DC. SS to the first stitch.

Info :

FO.

β€” Tall Cactus :

Info :

Using yarn B:

Info :

CH 24

Row 1 :

In 2nd Loop from the hoop, SC, repeat for remaining 22 stitches, CH1 turn

Row 2 :

In 2nd loop from the hook, SC in the back looks only for all 23 stitches, CH 1 turn

Info :

Repeat row 2 until piece measures 11cm.

Info :

Weave through one side of the cactus, drawstring close as pictured.

Info :

Sew up the side of the cactus by crocheting through the stem of the first row and the back loop of the last row.

Info :

Stuff firmly.

Info :

Weave the other side of the cactus as above and drawstring to close.

Assembly Instructions

  • Sew the body of the cactus to the soil at approximately round three of the soil pattern to secure it inside the pot.
  • Position the arms with pins on opposite sides of the body approximately 6 rounds up from the bottom, then sew each arm in place.
  • Place the arms facing upwards so the folded/turned Row 9 sits facing downwards, creating a natural arm orientation before sewing.
  • If you used a pipe cleaner inside the arms, sew the arm in place first then bend the pipe cleaner to form the desired upwards curve.
  • Attach any optional flowers to the top of the cactus and secure them with small stitches, then tuck and weave ends into the cactus or soil.

Important Notes

  • πŸ’‘This pattern uses American crochet terminology so stitch names follow US conventions.
  • πŸ’‘If you are not familiar with the Magic Ring technique you can replace it with 2 Chains and work into the 2nd chain from the hook.
  • πŸ’‘The pattern uses an invisible decrease created by decreasing in the front loops only to keep shaping neat and subtle.
  • πŸ’‘Use stitch markers to mark the first stitch of each round to keep track of round starts and increases/decreases.
  • πŸ’‘Stuff gradually and evenly for a smooth finish; overstuffing will distort shape and make seaming harder.

This adorable Desert Crochet Cactus is perfect for brightening shelves, desks, and windowsills with handmade charm.🧢 It fits neatly in a small terracotta pot and makes a lovely gift or set of little succulents.🌡 Keep creating and have fun personalising each cactus with arms or flowers!✨

You ask,

we answer.

FAQs

What size will the finished piece be?

The finished amigurumi fits a small terracotta pot (approximately 6cm x 6.8cm x 4cm) and measures roughly palm-sized depending on stuffing and yarn tension.

Can I use different yarn weights for this pattern?

Yes, you can use different yarn weights but the final size will change; choose an appropriate hook for your yarn and adjust the soil increases to fit your pot.

Do I need prior crochet experience for this pattern?

This pattern is rated intermediate; basic familiarity with single crochet, magic ring, increases, decreases and working in the round is recommended.

How long does this project typically take to complete?

Most crocheters finish a single cactus in about 2-4 hours, though time will vary with experience level and whether you add arms or flowers.