🧢 Beautiful ✨ Detailed πŸ’ Adorable

Dog Granny Square Pattern

Dog Granny Square Pattern
4.1β˜… Rating
2-3 Hours Time Needed
4.0K Made This
βœ‚οΈ

Intermediate Level

Ideal for those with basic crochet experience, featuring slightly more advanced stitches and techniques to expand your skills.

⏱️

Bite-Sized Project

Finishes in 2-4 hoursβ€”perfect for an afternoon of creative relaxation.

🏑

Cozy Accent

A warm touch for your space that transforms ordinary corners into inviting nooks filled with handmade charm.

About This Dog Granny Square Pattern

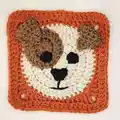
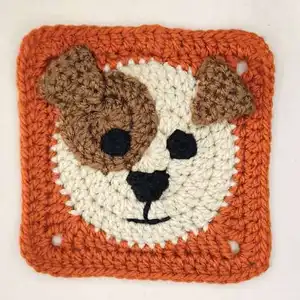
This pattern creates a delightful dog granny square with a circular face, brown patch, ears, eyes, and a nose. It combines basic rounds with a textured square border to make a playful motif. You can use it as an applique9, a cushion panel, or join many together for a themed blanket. The pattern includes full stitch counts and assembly notes for accurate placement.

Dog Granny Square Pattern crochet pattern - detailed view of completed project

Designed to be easy to customize by color or size, this square works well with any lightweight yarn. Step-by-step photos and tips help you finish tidy edges and sew facial pieces securely.

Why You'll Love This Dog Granny Square Pattern

I absolutely love this pattern because it brings so much personality with only a few small pieces. I enjoy how a simple circular base transforms into a playful dog face with just an eye patch, ears, and a tiny nose. The square border makes it easy to combine with other motifs or use on its own as a charming accent. I hope you find it as satisfying and quick to stitch as I did while designing it.

Dog Granny Square Pattern step 1 - construction progress Dog Granny Square Pattern step 2 - assembly progress Dog Granny Square Pattern step 3 - details and accessories Dog Granny Square Pattern step 4 - final assembly and finishing

Switch Things Up

I love customizing the color palette on this square; try pastel shades for a soft nursery look or bold contrasting colors for a modern accent.

I sometimes swap yarn weight and hook size to create a mini or jumbo version, which changes the scale without altering stitch counts.

Try different border stitches instead of the corner cluster to give the square a lacy or chunky finish depending on your project.

I often embroider extra facial details, such as whiskers or freckles, to give each dog its own personality.

Swap the brown patch placement or make two patches for a unique, asymmetrical face design that adds character.

Turn the square into a coaster by fastening off and weaving in ends neatly, or make a set and join them for a blanket.

Use felt or safety eyes for a different look, but when using safety eyes, make sure they are securely fastened and safe for the intended recipient.

I like to add a small crocheted bow or collar for a playful accessoryβ€”just sew it on after assembly.

You can sew two squares together with stuffing between to make a tiny pillow or plushie face for a soft toy effect.

Experiment with textured stitches inside the circular base, like working some rounds in BLO, to add subtle shading or depth to the face.

Common Mistakes & How to Fix Them

βœ— Skipping the stitch counts at the end of rounds leads to incorrect shaping and stitch totals; count your stitches after every round and correct errors immediately. βœ— Not tightening the magic ring enough can leave a visible hole in the center; pull the tail firmly when instructed and then join with a slip stitch to close the ring. βœ— Changing color incorrectly at the border can create a loose or messy join; use the color change methods described and weave in ends neatly to secure the join. βœ— Failing to pin pieces before sewing may result in asymmetric placement; position and pin the eye spot, patch, ears, and nose first so you can adjust before stitching. βœ— Using inconsistent tension between the circular base and the square border can warp the square; maintain consistent tension and use the recommended hook size for uniform results.

Dog Granny Square Pattern

Make a charming dog-faced granny square that adds personality to blankets, bags, or decor. This pattern walks you step-by-step through the circular base, square border, and small facial pieces so you can stitch a perfectly cute pup. Clear photos and exact stitch counts make it easy to follow along and customize colors to suit your style.

Intermediate 2-3 Hours

Materials Needed for Dog Granny Square Pattern

β€” Main Fabric

  • 01
    Lightweight acrylic yarn in Beige - quantity as needed for circular base (main color)
  • 02
    Lightweight acrylic yarn in Orange - quantity as needed for square border
  • 03
    Lightweight acrylic yarn in Brown - small amount for eye patch and ears
  • 04
    Lightweight acrylic yarn in Black - small amount for eyes, nose, and mouth

β€” Tools Required

  • 01
    Crochet hook size 4 mm
  • 02
    Yarn needle
  • 03
    Scissors
  • 04
    Stitch markers (optional)
  • 05
    Pins for assembly (optional)

Progress Tracker

0% Complete

β€” Square :

Round 1 :

MR, ch2, 12dc inside MR (12)

Info :

Tighten the MR by pulling on the tail and then sl st in the 1st dc (skip the ch2).

Round 2 :

ch2, *dc inc* all around (24)

Round 3 :

ch2, *dc, dc inc* all around (36)

Round 4 :

ch2, *2dc, dc inc* all around (48)

Info :

Invisible stitch: after you are done with Round 4, cut the yarn, leave a long tail, and pull it all the way through. With your needle, go into the 2nd dc from the back to the front through both loops, and then go through the center of the last dc towards the back. Pull the tail tight enough to create a stitch on top of the 1st dc and then weave in the excess yarn to secure it.

Infos :

Color Change: at the end of Round 4, you will need to do a color change. Method 1: change color at the last dc of Round 4. Method 2: finish off Round 4 with an invisible stitch and then attach the new yarn.

Round 5 :

ch1, *3sc, 2hdc, 2dc, [2tc + ch2 + 2tc] in the same stitch, 2dc, 2hdc* all around (68)

Info :

Sl st in the first sc that you did at the beginning of Round 5.

Round 6 :

ch2, *dc* all around and [2dc + ch2 + 2dc] in the ch2 space (84)

Info :

At the end of the round, finish off and weave in any excess yarn. You can finish off using the invisible stitch method or sl st in the 1st dc and then yarn over and pull it all the way through.

β€” Eye Spot Detail :

Info :

Using the brown yarn

Round 1 :

MR, ch2, 12dc inside MR (12)

Round 1 :

ch2, *dc inc* all around (24)

Info :

Finish off and leave a long tail for stitching.

β€” Ears x2 :

Info :

Using the brown yarn

Row 1 :

slip knot, ch7, *hdc* across (6)

Row 2 :

ch1, turn, *hdc* all across (6)

Row 3 :

ch1, turn, skip a st, 3 hdc across, skip a st, hdc (4)

Row 5 :

ch1, turn, *hdc* across (4)

Row 6 :

ch1, turn, skip a st, hdc, skip a st, hdc (2)

Row 7 :

ch1, turn, hdc dec (1)

Info :

Cut the yarn, finish off, and leave a long tail for stitching.

β€” Eyes x2 :

Info :

Using the black yarn

Round 1 :

MR, ch1, 5sc in MR (5)

Info :

Close the MR, finish off, and leave a long tail for stitching.

β€” Nose :

Info :

Using the black yarn

Round 1 :

MR, ch1, [2sc, dc, 2sc] in MR (5)

Info :

Tighten the MR but do not close it completely. Finish off and leave a long tail for stitching.

β€” Assembly :

Info :

Place the face components on the square. Use the tails for stitching.

Info :

The brown patch is aligned to the edge of the circular base.

Info :

The ears are aligned to the corners of the square (where the [2tc, ch1, 2tc] stitch is). Fold the ear to the front and stitch the tip of the ear to the square.

Info :

The eyes are located on Round 2.

Info :

When stitching the nose, the tip of the nose (the dc) is directed downwards. Use the black yarn to stitch a mouth that is connected to the nose.

Assembly Instructions

  • Place the face components on the square and use the yarn tails to baste them in position before permanently stitching.
  • Align the brown eye patch to the edge of the circular base and stitch it down along the curve using a whipstitch.
  • Position the ears at the corners of the square at the [2tc, ch1, 2tc] corners, fold the ear to the front, and sew the tip securely to the square.
  • Place the eyes on Round 2 of the circular base and stitch them using the long tails for a secure attachment.
  • Stitch the nose with the dc tip pointing downwards and embroider a mouth connected to the nose with black yarn.

Important Notes

  • πŸ’‘The numbers in parentheses at the end of each round indicate the total stitch count for that round; always verify your count.
  • πŸ’‘Work through the entire stitch (both loops) unless the pattern specifically directs you to use BLO or FLO for texture.
  • πŸ’‘The ch1 or ch2 at the beginning of a round does not count as a stitch unless the pattern explicitly states otherwise.
  • πŸ’‘Use consistent tension and the recommended 4 mm hook to achieve the indicated 11 cm x 11 cm square size.
  • πŸ’‘Pin parts in place prior to sewing to ensure symmetry and correct placement of facial features.

This Dog Granny Square Pattern gives you a playful, handmade accent piece that is quick to stitch and delightful to display. Perfect for adding character to cushions, bags, or blankets, it is easily customized with different yarns and colors. Enjoy making a little dog that adds handmade charm to any project you choose! 🧢🐢

You ask,

we answer.

FAQs

What size will the finished piece be?

The finished square measures approximately 11 cm x 11 cm when using the recommended lightweight yarn and a 4 mm hook.

Do I need special skills to make this square?

This pattern is rated intermediate because it uses increases, a corner cluster for the square, and small sewn details; basic knowledge of dc, hdc, sc, and magic ring is helpful.

Can I change the yarn weight or hook to make a different sized square?

Yes, substituting a different yarn weight and adjusting the hook size will change the final size; use a larger hook and bulkier yarn for a bigger square, or finer yarn and a smaller hook for a mini version.

How do I attach the small facial pieces securely?

Use the long tails left when finishing each piece to stitch them in place; baste first to check placement, then use a yarn needle and small stitches to secure each piece firmly.