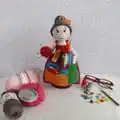
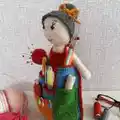
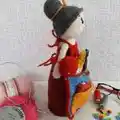
Make a charming crochet doll that doubles as a useful organizer for sewing supplies and small tools. This pattern guides you step-by-step through the head, torso, base, hair, arms and multiple pockets so you can create a functional keepsake. The finished project is sturdy and decorative, with a removable needle ball and pockets for tidy storage. Perfect for makers who enjoy both playfulness and practical design.
Progress Tracker
0% Complete
— Materials :
Info :
Yarn acryl 50 g / 125m. Crochet 2.0 mm. Fiberfill. Needle. Tread for embroider. Eyes 8 mm.
— Abbreviations :
Infos :
MR – magic ring. Ch – chain stitch. Sc – single crochet. Dec – decrease ( sc 2 stitches together ). Inc - increase ( 2 sc in 1 ch ). Sl st – slip stitch. R - round. BLO – back loops only. FLO – front loops only.
— Head and torso :
Round 1 :
(6 sc) into MR (6)
Round 2 :
(inc) x 6 = 12 sc (12)
Round 3 :
(1sc, inc) x 6 = 18 (18)
Round 4 :
(2sc, inc) x 6 = 24 (24)
Round 5 :
(3sc, inc) x 6 = 30 (30)
Round 6 :
(4sc, inc) x 6 = 36 (36)
Round 7 :
(5sc, inc) x 6 = 42 (42)
Round 8 :
(6sc, inc) x 6 = 48 (48)
Round 9 :
(7sc, inc) x 6 = 54 (54)
Round 10-19 :
= 54 sc (10 rounds) (54)
Info :
Place your eyes between the 12th and 13th rows.
Info :
Distance between eyes 8 loops
Round 20 :
(7sc, dec) x 6 = 48 (48)
Round 21 :
(6sc, dec) x 6 = 42 (42)
Round 22 :
(5sc, dec) x 6 = 36 (36)
Round 23 :
(4sc, dec) x 6 = 30 (30)
Round 24 :
(3sc, dec) x 6 = 24 (24)
Round 25 :
(2sc, dec) x 6 = 18 (18)
Info :
In the process of crocheting, put filler inside the doll
Round 26 :
Sl st = 18 (18)
Round 27 :
BLO (2sc, inc) x 6 = 24 (24)
Round 28 :
(3sc, inc) x 6 = 30 (30)
Round 29 :
(9sc, inc) x 3 = 33 (33)
Round 30 :
(10sc, inc) x 3 = 36 (36)
Info :
Change the color of the yarn to brown. This will be the color of the dress.
Round 32-37 :
= 36 sc (6 rounds) (36)
Round 38 :
(10sc, dec) x 3 = 33 (33)
Round 40 :
(9sc, dec) x 3 = 30 (30)
Round 41 :
Sl st = 30 (30)
Round 42 :
BLO (4sc, inc) x 6 = 36 (36)
Round 43 :
(5sc, inc) x 6 = 42 (42)
Round 44 :
(6sc, inc) x 6 = 48 (48)
Round 45 :
(7sc, inc) x 6 = 54 (54)
Round 46 :
(8sc, inc) x 6 = 60 (60)
Round 47-78 :
= 60 sc (32 rounds) (60)
Round 79 :
(9sc, inc) x 6 = 66 (66)
Round 80 :
(10sc, inc) x 6 = 72 (72)
— The base of the doll :
Info :
Crochet yarn color brown.
Round 1 :
(8 sc) into MR (8)
Round 2 :
(inc) x 6 = 16 sc (16)
Round 3 :
(1sc, inc) x 6 = 24 (24)
Round 4 :
(2sc, inc) x 6 = 32 (32)
Round 5 :
(3sc, inc) x 6 = 40 (40)
Round 6 :
(4sc, inc) x 6 = 48 (48)
Round 7 :
(5sc, inc) x 6 = 56 (56)
Round 8 :
(6sc, inc) x 6 = 64 (64)
Round 9 :
(7sc, inc) x 6 = 72 (72)
Info :
Do not cut the thread !
Info :
Cut a circle out of hard cardboard or plastic. The size of the circle should be the same size as the crocheted circle.
Info :
Also put 5 to 10 glass balls inside. See the photo. This is necessary for the doll to stand well.
Info :
Now we attach the base and the body.
Round 1 :
(8sc, inc ) x 8, sl st = 80 Crochet 2 loops together: 1 body loop and 1 base loop (80)
Round 2 :
(1sc, 2 ch, 1 sc ) - in 1 loop, loop 2 do not crochet, (1sc, 2 ch, 1 sc ) - in 3 loop, loop 4 do not crochet, repeat to the end of the row, sl st.
Info :
When crocheting half of the circle, place a cardboard or plastic circle inside the doll Crochet the circle to the end.
— Hands (2 parts) :
Round 1 :
(6 sc) into MR (6)
Round 2 :
(inc) x 6 = 12 sc (12)
Round 3 :
(3sc, inc) x 3 = 15 (15)
Round 4-8 :
= 15 sc (5 rounds) (15)
Round 9 :
(2sc, dec) x 5 = 10 (10)
Round 10-24 :
= 10 sc (15 rounds) (10)
Round 25 :
(dec ) x 5 = 5 (5)
Info :
Fasten off. To break yarn.
Info :
Attach arms to the torso.
— Hair (gray yarn) :
Round 1 :
(6 sc) into MR (6)
Round 2 :
(inc) x 6 = 12 sc (12)
Round 3 :
(1sc, inc) x 6 = 18 (18)
Round 4 :
(2sc, inc) x 6 = 24 (24)
Round 5 :
(3sc, inc) x 6 = 30 (30)
Round 6 :
(4sc, inc) x 6 = 36 (36)
Round 7-11 :
= 36 sc (5 rounds) (36)
Round 12 :
(4sc, dec) x 6 = 30 (30)
Round 13 :
Sl st = 30 (30)
Round 14 :
FLO (4sc, inc) x 6 = 36 (36)
Round 15 :
(5sc, inc) x 6 = 42 (42)
Round 16 :
(6sc, inc) x 6 = 48 (48)
Round 17 :
(7sc, inc) x 6 = 54 (54)
Round 18-26 :
= 54 sc (9 rounds) (54)
Round 27 :
(1sc, 1 ch, 1 sc ) - in 1 loop, loop 2 do not crochet, (1sc, 1 ch, 1 sc ) - in 3 loop, loop 4 do not crochet, repeat to the end of the row, sl st.
Info :
Crochet a hair band : 20 ch or 40 ch
Info :
See how long the tape will be beautiful.
Info :
Sew the hair to the head. Tie the ribbon around your hair. Sew the tape to the hair.
Info :
Embroider the eyebrows on the face with black thread. Embroider the nose. Embroider the mouth. See the photo.
— Needle ball :
Round 1 :
(6 sc) into MR (6)
Round 2 :
(inc) x 6 = 12 sc (12)
Round 3 :
(1sc, inc) x 6 = 18 (18)
Round 4 :
(2sc, inc) x 6 = 24 (24)
Round 5 :
(3sc, inc) x 6 = 30 (30)
Round 6 :
(4sc, inc) x 6 = 36 (36)
Round 7-9 :
= 36 sc (3 rounds) (36)
Round 10 :
(4sc, dec) x 6 = 30 (30)
Round 11 :
(3sc, dec) x 6 = 24 (24)
Round 12 :
(2sc, dec) x 6 = 18 (18)
Round 13 :
(1sc, dec) x 6 = 12 (12)
Round 25 :
( dec ) x 6 = 6 (6)
Info :
Fasten off. To break yarn.
Info :
Crochet a tape : 10 ch or 20 ch
Info :
See how long the tape will be beautiful.
Info :
Attach tape to needle ball.
— Large apron pocket (blue yarn) :
Info :
Knit in rows (not in a circle) . Start each row with 1 chain stitch, turn at the end of the row.
Round 1 :
41 ch, crochet into the 2nd ch from the hook 40 sc, turn knit
Round 2-21 :
40 sc, turn knit
Round 22 :
17 sc, turn knit
Round 23 :
1 ch, loop 1 do not crochet, 16 sc, turn knit
Round 24 :
1 ch, 15 sc, turn knit
Round 23 (alt) :
1 ch, loop 1 do not crochet, 14 sc, turn knit
Info :
To break yarn. Attach thread from the other side of the pocket
Round 22 (alt) :
15 sc, turn knit
Round 23 (alt 2) :
1 ch, loop 1 do not crochet, 14 sc, turn knit
— APRON (Red yarn) :
Info :
Knit in rows (not in a circle) . Start each row with 1 chain stitch, turn at the end of the row.
Round 1 :
41 ch, crochet into the 2nd ch from the hook 40 sc, turn knit
Round 2-29 :
40 sc, turn knit ( 28 rounds )
Round 30 :
(8sc, dec) x 4 = 36 (36)
Round 31 :
(7sc, dec) x 4 = 32 (32)
Round 32 :
(6sc, dec) x 4 = 28 (28)
Round 33 :
(5sc, dec) x 4 = 24 (24)
Info :
Place the large pocket exactly on the apron. Mark the place where the pocket ends with a marker. Parts will be attached at this point later.
Round 34 :
30 - 40 ch Attach the apron to the doll to find out how long the ribbon is needed.
Round 35 :
crochet into the 2nd ch from the hook 30 - 40 sl st
Round 36 :
24 sl st crochet on apron
Round 34 (repeat) :
30 - 40 ch
Round 35 (repeat) :
crochet into the 2nd ch from the hook 30 - 40 sl st
Round 36 (cont) :
Crochet sc along the side of the apron. When crochet to marker, crochet apron and large pocket together.
Info :
Crochet all 3 sides of the apron to attach a large pocket. To break yarn.
Info :
On the 4th side of the apron, attach the thread to the 7th loop.
Round 1 (side piece) :
1 ch, 12 sc, turn knit
Round 2-8 :
12 sc, to break yarn.
Info :
Attach thread from the lower right side of this piece. Crochet 1 side of the part sc.
Info :
Crochet 30 - 40 ch for the ribbon. Crochet into the 2nd ch from the hook 30 - 40 sl st.
Info :
Crochet 2 top part sc. Crochet 30 - 40 ch for the ribbon. Crochet into the 2nd ch from the hook 30 - 40 sl st.
Info :
Crochet 3 side of the part sc. To break yarn.
— Small pockets :
Info :
1 pocket ( orange yarn )
Round 1 :
21 ch, crochet into the 2nd ch from the hook 20 sc, turn knit
Round 2-12 :
20 sc . To break yarn.
Info :
2 pocket ( green yarn )
Round 1 :
11 ch, crochet into the 2nd ch from the hook 10 sc, turn knit
Round 2-20 :
10 sc . To break yarn.
Info :
Crochet the sides of small pockets sc. In the corners, crochet 3 loops in 1. It will be beautiful.
Info :
Divide the large pocket into 3 parts. To do this, sew the pocket to the apron in 2 places at the top of the pocket.
Info :
Sew small pockets to big pocket.
Info :
Put an apron on the doll. Tie the ribbons. Place the needle ball on your hand.
Info :
DOLL ORGANIZER READY!
This Doll Organizer is a delightful blend of function and charm, perfect for craft lovers who like everything in its place. The pockets and needle ball make it a practical helper on your sewing table, while the handmade details give it personality and warmth. Make it in colors you love and enjoy a beautiful, useful keepsake every time you pick up your hook. 🧶✨