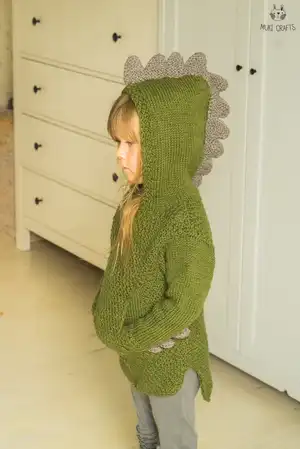
Create a playful hooded Dragon Rex Sweater for children with this detailed intermediate knitting pattern. The design features a textured body, roomy hood with spikes, and optional pocket details for a fun, wearable dinosaur look. You will find step-by-step instructions, needle and yarn recommendations, and helpful assembly notes so you can make a cozy, imaginative sweater your little one will love.
Progress Tracker
0% Complete
— Sizes & Finished Measurements :
Info :
Sizes: 1-2/3-4/5-6/7-8/9-10/11-12-year-old. Finished measurements after blocking are about (chest circumference x front length): 1-2-y-o: 23.2 x 14.2" (59 x 36 cm), 3-4-y-o: 24.8 x 16.1" (63 x 41 cm), 5-6-y-o: 26 x 16.9" (66 x 43 cm), 7-8-y-o: 28 x 18.9" (71 x 48 cm), 9-10-y-o: 29.9 x 20.9" (76 x 53 cm), 11-12-y-o: 31.9 x 21.7" (81 x 55 cm).
— Materials :
Info :
Aran (8 wpi; 10 ply; no 4: Medium) weight yarn such as Drops Alaska (50g; 75 yards in one ball; 100% wool), color 45 as MC and color 49 as CC. MC (green) about 350-450g or 525-675 yards and CC (gray) yarn about 50g or 75 yards. Circular knitting needles US 8 (5 mm) or to obtain gauge 4" x 4" (10 cm x 10 cm) = 17 sts x 22 rows (in stockinette stitch). Knitting needles one or two sizes smaller such as US 7 (4.5 mm) for making the decorations. Tapestry needle, removable marker, stitch holders (2), sewing pins.
— Pattern Notes :
Infos :
P - purl. Sl - slip. M1 - make one stitch. Kfb - knit in front and back of stitch. K2tog - knit two stitches together. Ssk - slip slip knit. Before you start, check your gauge. The CC yarn is used only for decorations. The sweater is worked bottom up, back and front separately. The back piece is longer. The hood can be knitted separately with straight needles or by picking up stitches with circular needles.
— The Pattern :
Row 1 :
(RS): k1, *p1, k1*, repeat from *-* all across.
Row 2 :
(WS): p1, *k1, p1*, repeat from *-* all across.
— Front :
Info :
With MC yarn cast on 47/51/53/57/61/65 sts (choose depending on the size 1-2/3-4/5-6/7-8/9-10/11-12-yo and follow the given numbers throughout the pattern).
Row 1 :
Work the Pattern (see above) 3 times, that is for 12 rows total.
Info :
Next two rows continue in the Pattern but cast on 2 sts at the end of both rows (51/55/57/61/65/69 sts total), continue in the Pattern until the front measures 2.8/4.5/4.7/5.5/6.3/6.3" (7/12/12/14/16/16 cm) from the cast on row.
Row (Pocket Row 1) :
(RS): work 13/14/14/15/16/17 sts in the Pattern, slip the next 25/27/29/31/32/34 sts on a stitch holder and keep them in front, cast on the same amount of sts, work the last 13/14/14/15/16/17 sts of the row in the Pattern.
Row (Pocket Row 2) :
(WS): work 13/14/14/15/16/17 sts in the Pattern, purl next 25/27/29/31/32/34 sts, work the last 13/14/14/15/16/17 sts in the Pattern.
Row (Pocket Row 3) :
work 13/14/14/15/16/17 sts in the Pattern, knit the next 25/27/29/31/32/34 sts, work the last 13/14/14/15/16/17 sts in the Pattern.
Info :
Repeat Pocket Row 2 and 3, until the front measures 7.1/10.6/11/12.6/14.2/14.2" (18/27/28/32/36/36 cm) from the cast on row, end with a WS row.
Row (Armhole Row 1) :
(RS): bind off 3 sts, when you have worked 10/11/11/12/13/14 sts in the Pattern, bind off 26/27/29/31/32/34 sts, work the remaining sts in the Pattern.
Info :
Alternative method for more advanced knitter: slip the bind off sts to a stitch holder instead of binding them off and knit them together when the top layer of the pocket.
Row (Armhole Row 2) :
(WS): bind off 3 sts, work the next 10/11/11/12/13/14 sts in the Pattern.
Info :
At this point knit the top layer of the pocket.
Item Name (Top layer of the Pocket) :
Slip the 25/27/29/31/32/34 sts from your stitch holder to an extra set of needles or to your left working needle. With a new yarn ball (leave a longer end for sewing, about 15" or 40 cm) work the 25/27/29/31/32/34 sts in the Pattern, continue in the Pattern on these sts the same amount of rows you knitted stockinette stitch for the inner layer. You end on the WS, slip the sts to your left needle with WS facing, cut the extra thread of yarn leaving again a longer end. Continue with Armhole Row 2, work all sts in the Pattern.
Row (Armhole Row 3) :
bind off 1 st, work all sts in the Pattern.
Row (Armhole Row 4) :
bind off 1 st, work the remaining sts in the Pattern (43/47/49/53/57/61 sts left). Continue in the pattern until the piece measures from the cast on row 12.6/14.6/15.4/17.3/19.3/20.1" (32/37/39/44/49/51 cm) on measure the back piece as the front but do it from the marker.
— Left Shoulder :
Row (Left Shoulder Row 1) :
(RS): work 15/15/16/17/18/20 sts in the Pattern, turn.
Row (Left Shoulder Row 2) :
(WS): bind off 2 sts, work the remaining sts in the Pattern, turn (13/13/14/15/16/18 sts left for this shoulder).
Row (Left Shoulder Row 3) :
work 13/13/14/15/16/18 sts in the Pattern, turn.
Row (Left Shoulder Row 4) :
bind off 1 st, work the remaining sts in the Pattern, turn (12/12/13/14/15/17 sts left).
Info :
Work 4 more rows in the Pattern, cast off the 12/12/13/14/15/17 sts. With RS facing join yarn to the remaining sts and bind off 13/17/17/19/21/21 sts if you’re going to work the hood flat or slip these sts on a stitch holder after knitting them in the Pattern, work the remaining sts of this row in the Pattern (15/15/16/17/18/20 sts).
— Right Shoulder :
Row (Right Shoulder Row 2) :
(WS): work 15/15/16/17/18/20 sts in the Pattern, turn.
Row (Right Shoulder Row 3) :
(RS): bind off 2 sts, work the remaining sts in the Pattern, turn (13/13/14/15/16/18 sts left for this shoulder).
Row (Right Shoulder Row 4) :
work 13/13/14/15/16/18 sts in the Pattern.
Row (Right Shoulder Row 5) :
bind off 1 st, work the remaining sts in the Pattern (12/12/13/14/15/17 sts left). Next work 3 more rows in the Pattern, bind off the remaining sts. With WS facing sew the top and bottom edge of the pocket to the main piece.
— Back :
Info :
The back piece is worked as the front only without the pocket, the back piece is 12 rows longer. Cast on the same amount of sts as for the front and work the Pattern 3 times. Place a removable marker at the start of next row and keep it in for measuring. From now on measure the back piece as the front but do it from the marker.
Info :
Repeat the Pattern 3 times more (you can skip this part if you want the back in the same length as the front). Continue as the front ignoring the instructions for the pocket, knit until the armholes are done. Start shaping for the neckline when the back measures 13.4/15.4/16.1/18.1/20.1/20.9" (34/39/41/46/51/53 cm).
Row (Left Shoulder Row 1) :
(RS): work 15/15/16/17/18/20 sts in the Pattern, turn.
Row (Left Shoulder Row 2) :
(WS): bind off 2 sts, work the remaining sts in the Pattern, turn (13/13/14/15/16/18 sts left for this shoulder).
Row (Left Shoulder Row 3) :
work 13/13/14/15/16/18 sts in the Pattern, turn.
Row (Left Shoulder Row 4) :
bind off 1 st, work the remaining sts in the Pattern, turn (12/12/13/14/15/17 sts left). Work 1 more row in the Pattern, cast off these sts.
Info :
With RS facing join yarn to the remaining sts and bind off 13/17/17/19/21/21 sts if you’re going to work the hood flat or slip these sts on a stitch holder after knitting them in the Pattern, knit the remaining sts of this row in the Pattern.
Row (Right Shoulder Row 2) :
(WS): work 15/15/16/17/18/20 sts in the Pattern, turn.
Row (Right Shoulder Row 3) :
(RS): bind off 2 sts, work the remaining sts in the Pattern, turn (13/13/14/15/16/18 sts left for this shoulder).
Row (Right Shoulder Row 4) :
work 13/13/14/15/16/18 sts in the Pattern.
Row (Right Shoulder Row 5) :
bind 1 st, work the remaining sts in the Pattern (12/12/13/14/15/17 sts left). Next row bind off all sts.
— Sleeves (Make 2) :
Info :
Cast on 25/25/27/27/31/31 sts. Work the Pattern 2 times and knit stockinette stitch for 2 rows, 10 rows done.
Row :
Continue the sleeve in stockinette stitch but at the same time increase (preferably with M1 knit or purl-wise) 1 stitch after the first and before the last stitch of the row (+2 sts on a row). Do this 10/12/12/13/13/17 times after every 2/3/3/4/5/4 rows, you will have 45/49/51/53/57/65 sts total on your needles.
Info :
Continue in stockinette stitch to reach sleeve length 6.7/10.2/11.4/13.4/15.4/16.9" (17/26/29/34/39/43 cm). Each next 6 rows bind off 5/5/6/6/6/7 first sts of the row, next row bind off.
Info :
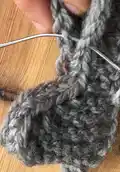
Block the pieces. Sew the back and front from the shoulders, attach the sleeves to the armholes (picture 3). Sew the sleeves under arm down the sides up to the row where you added 2 extra stitches on both sides, leaving the rest of the bottom edge open.
— Hood :
Info :
Knitted separately with straight needles: Cast on 46/58/58/66/70/70 sts.
Row (Hood Row 1) :
(RS): k1, (p1, k1)*2 times, knit until 5 sts left: (p1, k1)*2 times, k1.
Info :
Continue with Hood Row 2 below.
Info (Knitted with circular needles) :
With front piece facing, keep the first 6/8/8/9/10/10 sts on your stitch holder and slip the remaining sts to your needle. Here will be the start of the hood which is front center, pick up 10/12/12/14/14/14 from the first shoulder, slip the back sts to your needle and pick up 10/12/12/14/14/14 from the other shoulder, slip the remaining sts of the front to your needle.
Row (Hood Row 1 RS circular) :
sl1, (p1, k1)*2 times, knit until 5 sts left: (p1, k1)*2 times, k1 (46/58/58/66/70/70 st total).
Row (Hood Row 2) :
(WS): sl1, (p1, k1)*2 times, purl until 5 sts left: (p1, k1)*2 times, k1.
Row (Hood Row 3) :
sl1, (k1, p1)*2 times, knit until 5 sts left: (k1, p1)*2 times, k1.
Row (Hood Row 4) :
sl1, (k1, p1)*2 times, purl until 5 sts left: (k1, p1)*2 times, k1.
Info :
Keep repeating Hood Rows 1-4, at the same time next 9/5/7/4/2/2 RS rows increase (kfb or M1) before and after the marker (+2 sts on one row). On WS work back without adding more sts. You will have 64/68/72/74/74/74 sts total after the increases.
Info :
Keep repeating Hood Rows 1-4 until the hood measures 9.5/10.5/11/11/11/11" (24/27/28/28/28/28 cm) from the pick-up or cast on row.
Info :
Next 3 RS rows ssk before and k2tog after the marker (-2 sts on each RS row, on WS work back without adding more decreases).
Info :
Bind off all sts and fold the hood so that one longer edge meets the other, sew the top together with WS facing through inner loops.
Info :
Alternative method for more advanced knitter: fold the hood so that one longer edge meets the other and with WS facing use 3-needle-bind-off.
Info :
If you knitted the hood separately, attach it with the cast on row to the neck opening so that the Pattern edges would be front center, sew it in place with WS facing.
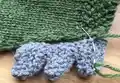
— Hood Spikes (Make 2) :
Info :
Cast on 3 stitches.
Row 2 :
k1, kfb, k1 (4 sts).
Row 3 :
k1, kfb, k2 (5 sts).
Row 4 :
k3, kfb, k1 (6 sts).
Row 5 :
k1, kfb, k4 (7 sts).
Row 6 :
k5, kfb, k1 (8 sts).
Row 7 :
k1, kfb, k6 (9 sts).
Row 8 :
k7, kfb, k1 (10 sts).
Row 13 :
bind off 7 sts, k3 (3).
Info :
Repeat Rows 2-13, 9 times more. You will have 10 spikes (feel free to add more spikes so they would go down the back piece until the bottom edge), bind off all sts. Cut the yarn.
Info :
When two sets of spikes are done sew them together first with the triangle edges, do it WS facing (feel free to add some filling material or yarn scraps to make the spikes firm), then turn RS facing and sew the long straight edges.
Info :
Attach the spikes to the hood seam first with sewing pins, then sew the spikes firmly in place (MC yarn used for that). Weave in all ends.
— Sleeve Spikes (Make 4) :
Info :
Cast on 3 stitches.
Row 9 :
bind off 7 sts, k3 (3).
Info :
Repeat Rows 2-9, 2 times more. You will have 3 spikes, bind off all sts. Cut the yarn.
Info :
Sew the sleeve spikes together as the hood spikes and attach them to the sleeves with the first spike to the sleeve cuff. Weave in all ends.
Info :
Now go and find a little dragon to wear it!
This Dragon Rex Sweater pattern turns everyday knitwear into imaginative playtime magic with a hood and spikes that kids adore. It combines practical construction with whimsical details for a truly memorable handmade gift. Knit one up and watch your little dragon take flight! 🦖🧶