🧢 Beautiful ✨ Detailed πŸ’ Adorable

Duck No Sew Amigurumi Pattern

Duck No Sew Amigurumi Pattern
4.7β˜… Rating
2-4 Hours Time Needed
1.1K Made This
βœ‚οΈ

Intermediate Level

Ideal for those with basic crochet experience, featuring slightly more advanced stitches and techniques to expand your skills.

⏱️

Bite-Sized Project

Finishes in 2-4 hoursβ€”perfect for an afternoon of creative relaxation.

🎁

Tiny Treasure

Small, sweet, and gift-worthy creations that fit perfectly in the palm of your hand with detailed charm.

About This Duck No Sew Amigurumi Pattern

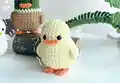
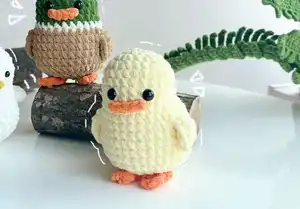
This pattern creates a small, palm-sized duck amigurumi worked from the body up with no sewing required. It includes instructions for a plain yellow duck, a mallard variation with color changes, and a rooster variation with special details. The pattern uses super bulky (category 6) yarn and a 3.5mm (E) hook for a plush, textured finish.

Duck No Sew Amigurumi Pattern crochet pattern - detailed view of completed project

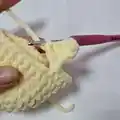
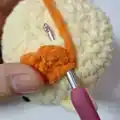
You'll find step-by-step rounds, leg and beak instructions, and assembly notes for accurate placement. Helpful photos accompany key steps so you can follow along with confidence.

Why You'll Love This Duck No Sew Amigurumi Pattern

I absolutely love this pattern because it turns simple stitches into a charming, palm-sized friend that feels handmade and delightful. I enjoy the no-sew construction β€” it makes assembly quick and satisfying while still producing a neat, finished look. The color-change option for a mallard and the rooster variation mean you can make a whole flock with the same base technique. I also love how adaptable the pattern is; small changes to yarn or hook size give you different sizes and textures.

Duck No Sew Amigurumi Pattern step 1 - construction progress Duck No Sew Amigurumi Pattern step 2 - assembly progress Duck No Sew Amigurumi Pattern step 3 - details and accessories Duck No Sew Amigurumi Pattern step 4 - final assembly and finishing

Switch Things Up

I love experimenting with colors β€” try pastel shades for a soft nursery-friendly version or high-contrast colors for playful characters.

I often change yarn weight and hook size to make minis or larger cuddly versions; a smaller hook than recommended tightens stitches for neater stuffing control.

I sometimes embroider tiny eyelashes or add tiny crocheted scarves and hats for personality β€” these little accessories make each duck unique.

For a keychain or bag charm, make a mini version using thinner yarn and a smaller hook, then attach a keyring through a securely fastened loop.

I enjoy using safety eyes for durability, but for baby gifts you can embroider eyes instead for safety and softness.

Want a posable friend? Add a short length of wire inside the legs or neck to help the figure stand or tilt its head.

I also recommend experimenting with textured stitches for seasonal versions β€” bobble stitches or puff stitches give a cute fluffy effect for winter birds.

Try making a whole set β€” a yellow duck, a mallard, and a rooster β€” and display them as a charming handmade collection or give them as coordinating gifts.

If you like, add tiny felt wings or a small crocheted flower to the head for extra charm; glue or stitch these in place securely.

I always pin parts in place before sewing or joining to check symmetry; it helps me make final adjustments for a balanced, professional finish.

Common Mistakes & How to Fix Them

βœ— Skipping the magic ring technique can leave a hole at the top of your piece; start with a tight magic ring and pull it closed before the first round. βœ— Forgetting to attach safety eyes at the correct rounds will make placement tricky later; attach the eyes between the specified rounds and double-check spacing before continuing. βœ— Overstuffing the body makes shaping difficult and may distort the stitch texture; stuff gradually and evenly while working the decreasing rounds to keep a smooth silhouette. βœ— Not keeping the leg yarn tails when instructed will prevent you from joining the feet neatly; keep the yarn without cutting it and slip stitch the feet into the body positions.

Duck No Sew Amigurumi Pattern

Create an adorable no-sew duck amigurumi using super bulky yarn and simple crochet techniques. This pattern guides you step-by-step from the body up to the head and includes legs, beak (speculum), and variations for a mallard and a rooster. You'll enjoy a quick, satisfying make with clear rounds and helpful photos to guide your assembly.

Intermediate 2-4 Hours

Materials Needed for Duck No Sew Amigurumi Pattern

β€” Main Fabric

  • 01
    Super Bulky yarn (Category 6) - primary for body (small skeins of each color listed below)
  • 02
    Yellow - for duck body (small amount, approx. 20-40g)
  • 03
    Orange - for beak and feet (small amount, approx. 10-20g)
  • 04
    Green - for mallard head (small amount, approx. 20-40g)
  • 05
    White - accent color for mallard and rooster bodies (small amount, approx. 20-40g)
  • 06
    Brown - for mallard body (small amount, approx. 20-40g)
  • 07
    Red - for rooster comb (small amount, approx. 5-10g)
  • 08
    Yellow (or mustard) - for rooster beak (small amount, approx. 5-10g)
  • 09
    Fiberfill - stuffing for body and limbs

β€” Tools Required

  • 01
    Crochet hook size 3.5mm (E)
  • 02
    Stitch maker (stitch marker)
  • 03
    Sewing needle (yarn needle) for weaving ends or small sewing if needed
  • 04
    Scissors
  • 05
    Plastic safety eyes 8mm (for duck and mallard)
  • 06
    Plastic safety eyes 6mm (for rooster)
  • 07
    Hot gun glue (optional for securing small parts)
  • 08
    Fiberfill stuffing

Progress Tracker

0% Complete

β€” Duck (Yellow) :

Info :

Use Yellow yarn

Round 1 :

6 SC in an MR (6)

Round 2 :

6 INC (12)

Round 3 :

(SC, INC) 6 times (18)

Round 4 :

(2 SC, INC) 6 times (24)

Round 5-8 :

24 SC (24)

Round 9 :

5 INC, 14 SC, 5 INC (34)

Round 10 :

9 SC, (5 Ch, turn: SC, HDC, 2 DC), Sk 2, 12 SC, (5 Ch, turn: SC, HDC, 2 DC), Sk 2, 9 SC (34)

Round 11 :

9 SC, 2 SC (Crochet into the two skip stitches in R10), 12 SC, 2 SC (Crochet into the two skip stitches in R10), 9 SC (34)

Round 12-16 :

34 SC (34)

Round 17 :

17 DEC (17)

Info :

*Stuffing*

Round 18 :

(SC, DEC) 5 times, 2 SC (12)

Round 19 :

6 DEC (6)

Info :

Weave in the yarn end and cut

β€” Legs (Make 2) :

Info :

Use Orange yarn

Round 1 :

Make 3 CH. Start in the second stitch from the hook: 2 SC (2)

Round 2-3 :

2 SC (2)

Infos :

Keep the yarn without cutting it. Crochet 2 Slip stitches into the body at the position of the feet. Attach eyes on rows 7 and 8, spaced 4 stitches apart.

β€” Speculum (Beak) :

Info :

Begin with Orange

Round 1 :

4 Slip stitch into the 4 stitches between rows 8 and 9 (the 4 stitches between the eyes), turn.

Round 2 :

Ch, 4 SC

Info :

Cut the yarn

β€” Mallard Duck :

Info :

Use Green yarn

Round 1 :

6 SC in an MR (6)

Round 2 :

6 INC (12)

Round 3 :

(SC, INC) 6 times (18)

Round 4 :

(2 SC, INC) 6 times (24)

Round 5-8 :

24 SC (24)

Info :

Change to White yarn

Round 9 :

5 INC, 14 SC, 5 INC (34)

Info :

Change to Brown yarn

Round 10 :

9 SC, (5 Ch, turn: SC, HDC, 2 DC), Sk 2, 12 SC, (5 Ch, turn: SC, HDC, 2 DC), Sk 2, 9 SC (34)

Round 11 :

9 SC, 2 SC (Crochet into the two skip stitches in R10), 12 SC, 2 SC (Crochet into the two skip stitches in R10), 9 SC (34)

Round 12-16 :

34 SC (34)

Round 17 :

17 DEC (17)

Info :

*Stuffing*

Round 18 :

(SC, DEC) 5 times, 2 SC (12)

Round 19 :

6 DEC (6)

Info :

Weave in the yarn end and cut

β€” Mallard Legs (Make 2) :

Info :

Use Orange yarn

Round 1 :

Make 3 CH. Start in the second stitch from the hook: 2 SC (2)

Round 2-3 :

2 SC (2)

Infos :

Keep the yarn without cutting it. Crochet 2 Slip stitches into the body at the position of the feet. Attach eyes on rows 7 and 8, spaced 4 stitches apart.

β€” Speculum (Mallard) :

Info :

Begin with Orange

Round 1 :

4 Slip stitch into the 4 stitches between rows 8 and 9 (the 4 stitches between the eyes), turn.

Round 2 :

Ch, 4 SC

Info :

Cut the yarn

β€” Rooster Wings :

Info :

WINGS: MAKE 2. Use white yarn

Round 1 :

Make 4 chains, start with the second chain from the hook: INC, SC, 4SC in the last stitch, SC, INC, 2CH, Picot, CH, SLST in the first stitch

Info :

Weave in the yarn end and cut

β€” Rooster Body (Crochet from the body up to the head) :

Info :

You'll switch to black yarn the text is in bold and underlined. Use white yarn

Round 1 :

6 SC in an MR (6)

Round 2 :

6 INC (12)

Round 3 :

(SC, INC) 6 times (18)

Round 4 :

(2 SC, INC) 6 times (24)

Round 5 :

(3 SC, INC) 6 times (30)

Round 6 :

(4 SC, INC) 6 times (36)

Round 7-8 :

36 SC (36)

Round 9 :

7SC, 4SC with the 1st arm, 14SC, 4SC with the 2nd arm, 7SC (36)

Round 10-11 :

36SC (36)

Round :

Make 6CH, SLST in the first st, repeat 3 times, crochet with 2 pieces together with 10SLST

Info :

*Stuffing*

Round 12 :

CH, 16SC (16)

Round 13 :

(3SC, INC) 4 times (20)

Round 14-15 :

20SC (20)

Round 16 :

(2 SC, DEC) 5 times (15)

Round 17 :

(SC, DEC) 5 times (10)

Info :

*Stuffing*

Round 18 :

DEC 5 times (5)

Info :

Weave in the yarn end and cut

β€” Comb :

Info :

Use red yarn.

Round :

Crochet crest from R17 to R18

Round :

The starting point is straight from the tail going up: (3CH, DC in the same st, SLST in the next stitch) 3 times

Info :

Cut the yarn.

Info :

Make the mouth with yellow yarn, 3 lines like this at R13

Info :

Attach the eyes between R14-R15, apart 3 stitches.

Assembly Instructions

  • Attach legs to the body: Crochet 2 slip stitches from each leg into the body at the position of the feet and secure the yarn tail for a neat join.
  • Position safety eyes for the duck between rows 7 and 8 spaced 4 stitches apart, and for the rooster attach the eyes between rounds 14 and 15 spaced 3 stitches apart.
  • Sew or slip-stitch the speculum (beak) into the 4 stitches between rows 8 and 9 (the 4 stitches between the eyes), then weave in the end.
  • For the mallard, change colors at the indicated rounds (switch to white at R9 and brown at R10) and ensure color changes are carried neatly along the inside to avoid loose ends.
  • Attach the comb to the rooster by crocheting the crest from R17 to R18 as instructed, then secure and weave in the ends to prevent fraying.

Important Notes

  • πŸ’‘Use a stitch marker to mark the beginning of each round to avoid losing your place during continuous rounds.
  • πŸ’‘Stuff gradually and intermittently while closing with decreases to achieve a smooth shape and avoid lumps in the body.
  • πŸ’‘Weave in yarn ends as you work or right after finishing each piece to keep assembly quick and tidy.

This adorable no-sew duck and its friends were designed to be quick, sweet makes that bring handmade charm to your home. Whether you make a sunny yellow duck, a mallard with color changes, or a cheerful rooster, each piece is delightful to crochet and gift. Happy crocheting and enjoy your new flock! 🧢🧡✨

You ask,

we answer.

FAQs

What size will the finished piece be?

The finished amigurumi measures approximately palm-sized (around 8-12 cm tall) when using super bulky yarn and a 3.5mm (E) hook; size may vary with yarn and hook choice.

Can I use different yarn weights for this pattern?

Yes, you can use different yarn weights, but it will affect the final size; use an appropriate hook size and adjust stuffing amounts to suit your chosen yarn.

Do I need prior crochet experience for this pattern?

This pattern is rated intermediate since it uses continuous rounds, increases, decreases, and some shaping techniques; basic knowledge of single crochet, increases, and decreases is recommended.

How long does this project typically take to complete?

Most crocheters finish a single duck in about 2-4 hours depending on experience and speed; making multiple variations or adding details may take longer.