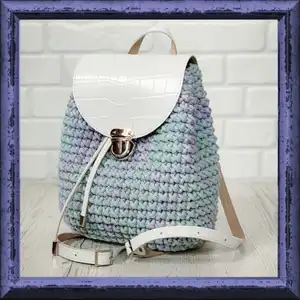
Make a charming, handmade backpack using t-shirt or cotton braided cord in just a few hours. This pattern walks you through attaching a ready-made leather bottom and lock kit, crocheting the body with cross single crochet, and finishing with a neat lining and hardware. You will love how quickly the bag comes together and how customizable it is with colors and hardware choices. The instructions include photos and measurements for a consistent finished result.
Progress Tracker
0% Complete
— Materials and tools :
Info :
Cotton braided cord, 5 mm, 165 yards (150 meters) (t-shirt yarn 7-9 mm or polyester cord 4-5 mm, 175 yards (150 meters). In this example, I'm using the cotton cord - Bobbiny, 5 mm.
Info :
Kit for backpack (bottom 10*20 cm, valve with lock, 2 handles, tightening with tips). Kit you can purchase from leather/hardware suppliers.
Info :
Hook N4 = 4 mm and N6 = 6 mm. Scissors. Small Phillips screwdriver.
Info :
Finished backpack from the specified materials: length - 9 1/2 inches (24 cm), width - 6 inches (15 cm), height - 11 1/2 inches (29 cm). Gauge: 9 stitches and 8 row = 4*4 inches (10*10cm).
— Abbreviations :
Infos :
CH - chain stitch. SlSt - slip stitch. SC - single crochet. CrSC - cross stitch single crochet. Inc - increase (2 CrSC in 1).
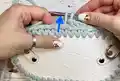
— Trim the bottom :
Info :
Leave the end of the thread about 40 inches (1 meter) long.
Info :
Insert the hook in the hole of the bottom. Pull out the loop, crochet CH.
Round 1 :
Crochet SC in each hole of the bottom.
Round 2 :
Crochet the last SC with the end of the thread and pull it out. Insert the hook from the wrong side in the 1st SC of the row, pull the end. Tighten the end back into the last loop of the row.
Info :
Don't cut the working thread.
Info :
Next, crochet the wall-side of the backpack.
— Crochet the wall-side :
Info :
Insert the hook on the back loop and jumper only. Pull out the loop and crochet CH.
Info :
Next, crochet CrSC. For this, yarn over the thread under the hook.
Round 1 :
1 row. Crochet this row on the back loop and jumper only. Crochet row CrSC. Make 6 Inc in the places identified on the photo. If your bottom has 43 holes, you will have 49 CrSC in this row; your bottom may have a different amount of holes and therefore a different CrSC count.
Info :
Bind off the row with the end of the thread (and each subsequent row). Twist the working thread and the end. Insert the hook under the last loop of the previous row, pull out the loop, crochet CH.
Round 2 :
2 row. 49 CrSC, CH.
Round 3-16 :
3-16 rows. 49 CrSC, CH.
Round 17 :
17 row. 49 CrSC, insert the hook on the back loop only, pull out the loop, CH.
Info :
Tie-in a new piece of the thread in case you run out of the end that is binding off the rows.
Round 18 :
18 row. 49 CrSC on the back loop only, CH.
Round 19 :
19 row. 49 CrSC. Cut the thread, pull out in the loop, bind off the row. Tie a knot in both ends on the wrong side. Hide the ends. Fold the sides with your hands.
— Crochet in the valve :
Info :
Count the number of CrSC that equals the number of holes on the valve on the back side of the backpack, in the middle.
Info :
Crochet in the 3rd row from the top.
Info :
Start out the thread from the inside. Insert the hook in the 1st hole, pull out the loop. Insert the hook in the next hole, skip 1 CrSC. Pull out the loop, SlSt.
Info :
Next, crochet SlSt in each hole, skipping 1 CrSC. Last SlSt crochet behind the valve. Cut the thread, pull out in the loop, tighten back on the wrong side.
Info :
At the beginning of crocheting, pull out the thread to the front side behind the valve. Insert the hook under the 1st loop, pull out the thread, tighten it back to the wrong side. Strengthen and hide the ends on the wrong side.
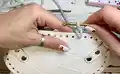
— Install the lower part of the lock :
Info :
Cut off 3 pieces of cord 8 inches (20 cm) long each.
Info :
Put the lock on the back side. Press down with a plate and clamp. Cut off the excess with scissors if the plate sticks out.
Info :
Position the lower part of the lock where it is supposed to be.
Info :
Pull out the pieces on the wrong side. Tie 3 knots in pairs. Strengthen, cut and hide the ends.
— Assembly :
Info :
Count 3 CrSC from the lock to the right and to the left. Insert the tightening. Put it through 6 CrSC on the front side, through 3 CrSC on the wrong side, then through 6 CrSC on the front side.
Info :
Put the tightening on the other side mirrored. Put on the stopper.
Info :
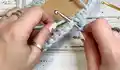
Fasten the handles with a small Phillips screwdriver. Adjustable part of handles should be at the bottom. Fix all the screws with a drop of superglue or colorless nail polish.
— Sew in the lining :
Info :
The lining should repeat the shape of the backpack.
Info :
Put the lining inside. Straighten the lining with your hands. You can also pin it with pins.
Info :
Sew the lining to the bag with hidden stitches. All seams should be hidden inside. Insert the needle over the edge of the lining. Make a few strengthening stitches around the perimeter of the seam.
Info :
Steam the seam with an iron through a damp cloth, if necessary.
Info :
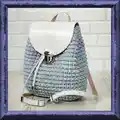
Congratulations! Your cute backpack is ready.
This approachable backpack pattern makes a beautiful handmade accessory you can finish in an afternoon. It combines simple crochet techniques with ready-made hardware for a polished result. Personalize it with colors and handles to create a one-of-a-kind bag. 🧶👜