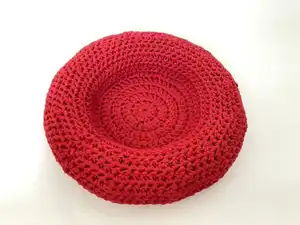
This easy doughnut-shaped pet bed pattern teaches you how to crochet a cozy circular bed for cats or small dogs using chunky yarn. You will make a sturdy inner circle, build up the sides, and finish by stuffing inside old stockings for a neat, removable filling. The pattern includes full round-by-round instructions for Small, Medium, Large and Extra Large sizes so you can make the perfect fit for your pet.
Progress Tracker
0% Complete
— Special Stitches and Techniques :
2 double crochet together (2dc-tog) :
YOH, insert H into indicated st, pull up a loop (3 loops on H, photo 1), YOH, pull through 2 loops (photo 2), YOH, insert H into next st and pull up a loop (4 loops on H, photo 3), YOH and pull through 2 loops, (3 loops on H, photo 4), YOH and pull through all 3 loops (photo 5)
magic circle :
Create a loop or circle with the yarn as shown in photo 6. Let the yarn coming from the skein/ball cross in front, then position it under the circle of yarn through the centre. Insert your hook from right to left over the outer circle and under the yarn in the centre (photo 7). Grab the circle at the crossing at the top with your left hand, while picking up the hook with your right hand (photo 8). Pull the centre yarn up as a loop over your hook (photo 9), you now have your magic circle! (photo 10) Start with the instructions Round 1. Take care when you make the stitches into the magic circle, always crochet over two strands of the circle - you may have to pull on the starting tail to make the circle smaller if your starting tail was not long enough. (photo 12 - starting tail too short, pull a little to make it longer - photo 13)
— Customising the Bed Size :
Infos :
The pattern is written for a small size bed, with options for medium, large and extra large included as well. Small works well for miniature breeds, while medium works well for an average cat. However, you can customise the size of the bed to any size you want if you follow this principle: Decide how big you want the inner circle of the doughnut to be and crochet any number of rounds until you are happy with the size. Mark this round, as this will be the round onto which you will attach the outer edge of the doughnut. Add 3 more rounds with normal increases - this will form the underside of the stuffed outer circle of the doughnut. Make 3 rounds without any increases (only one dc per stitch) - this will make the sides "stand up" and will form the outer edge of the doughnut. Make 3 rounds with decreases - this will curl the edge inwards. Make 3 rounds without any increases or decreases and finish off. Attach to the round marked with a stitch marker.
— Small Bed :
Info :
Start with a magic circle and your 8mm H
Round 1 :
ch 3 (counts as first dc, photo 11), make 11 dc in the magic circle (photo's 12-14), tighten the circle (photo 15), join with a sl st into top of ch 3 [12 sts]
Round 2 :
ch 3, dc in same st (this will be in the top of the ch 3 where the sl st was made to end the prev round, photo's 16-17), 2 dc in each st around, join with a sl st in top of ch 3 [24 sts]
Round 3 :
ch 3, (2 dc in next st (photo 19), 1 dc in next st) x 11, 2 dc in the next st, join with a sl st in top of ch 3 [36 sts]
Round 4 :
ch 3, dc in same st (this will be in the top of the ch 3 where the sl st was made to end the prev round), (dc in the next 2 sts, 2 dc in the next st) x 11, dc in the next 2 sts, join with a sl st in top of ch 3 [48 sts]
Round 5 :
ch 3, dc in next 2 sts, (2 dc in next st, dc in next 3 sts) x 11, 2 dc in the next st, join with a sl st in top of ch 3 [60 sts] - this will be the size of the inside of the doughnut
Round 6 :
ch 3, dc in same st (this will be in the top of the ch 3 where the sl st was made to end the prev round), (dc in the next 4 sts, 2 dc in the next st) x 11, dc in the next 4 sts, join with a sl st in top of ch 3 [72 sts]
Round 7 :
ch 3, dc in next 4 sts, (2 dc in next st, dc in next 5 sts) x 11, 2 dc in the next st, join with a sl st in top of ch 3 [84 sts]
Round 8 :
ch 3, dc in same st (top of ch 3 where the sl st was made to end the prev round), (dc in the next 6 sts, 2 dc in the next st) x 11, dc in the next 6 sts, join with a sl st in top of ch 3 [96 sts]
Round 9-11 :
ch 3, dc in next st and in each st around, join with a sl st in top of ch 3 [96 sts]
Round 12 :
ch 3, dc in next 5 sts, (2dc-tog in next st, dc in next 6 sts) x 11, 2dc-tog in next st, join with a sl st in top of ch 3, [84 sts]
Round 13 :
ch 3, (2dc-tog, dc in next 5 sts) x 11, 2dc-tog, dc in next 4 sts, join with a sl st in top of ch 3 [72 sts]
Round 14 :
ch 3, dc in next 3 sts, (2dc-tog over next 2 sts, dc in next 4 sts) x 11, 2 dc tog over next 2 sts, join with a sl st in top of ch 3 [60 sts]
Round 15-17 :
ch 3, dc in next st and in each st around, join with a sl st in top of ch 3 [60 sts]. DO NOT FASTEN OFF. Proceed to Finishing.
— Medium Bed :
Info :
Start with a magic circle and your 8mm H
Round 1 :
ch 3 (counts as first dc, photo 11), make 11 dc in the magic circle (photo's 12-14), tighten the circle (photo 15), join with a sl st into top of ch 3 [12 sts]
Round 2 :
ch 3, dc in same st (this will be in the top of the ch 3 where the sl st was made to end the prev round, photo's 16-17), 2 dc in each st around, join with a sl st in top of ch 3 [24 sts]
Round 3 :
ch 3, (2 dc in next st (photo 19), 1 dc in next st) x 11, 2 dc in the next st, join with a sl st in top of ch 3 [36 sts]
Round 4 :
ch 3, dc in same st (this will be in the top of the ch 3 where the sl st was made to end the prev round), (dc in the next 2 sts, 2 dc in the next st) x 11, dc in the next 2 sts, join with a sl st in top of ch 3 [48 sts]
Round 5 :
ch 3, dc in next 2 sts, (2 dc in next st, dc in next 3 sts) x 11, 2 dc in the next st, join with a sl st in top of ch 3 [60 sts]
Round 6 :
ch 3, dc in same st (this will be in the top of the ch 3 where the sl st was made to end the prev round), (dc in the next 4 sts, 2 dc in the next st) x 11, dc in the next 4 sts, join with a sl st in top of ch 3 [72 sts]
Round 7 :
ch 3, dc in next 4 sts, (2 dc in next st, dc in next 5 sts) x 11, 2 dc in the next st, join with a sl st in top of ch 3 [84 sts]
Round 8 :
ch 3, dc in same st, (dc in the next 6 sts, 2 dc in the next st) x 11, dc in the next 6 sts, join with a sl st in top of ch 3 [96 sts]
Round 9 :
ch 3, dc in next 6 sts, (2 dc in next st, dc in next 7 sts) x 11, 2 dc in next st, join with a sl st in top of ch 3 [108 sts]
Round 10 :
ch 3, dc in same st, (dc in the next 8 sts, 2 dc in the next st) x 11, dc in the next 8 sts, join with a sl st in top of ch 3 [120 sts] - this will be the size of the inside of the doughnut
Round 11 :
ch 3, dc in next 8 sts, (2 dc in next st, dc in next 9 sts) x 11, 2 dc in the next st, join with a sl st in top of ch 3 [132 sts]
Round 12 :
ch 3, dc in same st, (dc in the next 10 sts, 2 dc in the next st) x 11, dc in the next 10 sts, join with a sl st in top of ch 3 [144 sts]
Round 13 :
ch 3, dc in next 10 sts, (2 dc in next st, dc in next 11 sts) x 11, 2 dc in next st, join with a sl st in top of ch 3 [156 sts]
Round 14-16 :
ch 3, dc in next st and in each st around, join with a sl st in top of ch 3 [156 sts]
Round 17 :
ch 3, dc in next 10 sts, (2dc-tog in next st, dc in next 11 sts) x 11, 2dc-tog over next 2 sts, join with a sl st in top of ch 3 [144 sts]
Round 18 :
ch 3, (2 dc-tog, dc in next 10 sts) x 11, 2dc-tog, dc in next 9 sts, join with a sl st in top of ch 3 [132 sts]
Round 19 :
ch 3, dc in next 8 sts, (2dc-tog over next 2 sts, dc in next 9 sts) x 11, 2dc-tog over next 2 sts, join with a sl st in top of ch 3 [120 sts]
Round 20-22 :
ch 3, dc in next st and in each st around, join with a sl st in top of ch 3 [120 sts]. DO NOT FASTEN OFF. Proceed to Finishing.
— Large Bed :
Info :
Start with a magic circle and your 8mm H
Round 1 :
ch 3 (counts as first dc, photo 11), make 11 dc in the magic circle (photo's 12-14), tighten the circle (photo 15), join with a sl st into top of ch 3 [12 sts]
Round 2 :
ch 3, dc in same st (this will be in the top of the ch 3 where the sl st was made to end the prev round, photo's 16-17), 2 dc in each st around, join with a sl st in top of ch 3 [24 sts]
Round 3 :
ch 3, (2 dc in next st (photo 19), 1 dc in next st) x 11, 2 dc in the next st, join with a sl st in top of ch 3 [36 sts]
Round 4 :
ch 3, dc in same st (this will be in the top of the ch 3 where the sl st was made to end the prev round), (dc in the next 2 sts, 2 dc in the next st) x 11, dc in the next 2 sts, join with a sl st in top of ch 3 [48 sts]
Round 5 :
ch 3, dc in next 2 sts, (2 dc in next st, dc in next 3 sts) x 11, 2 dc in the next st, join with a sl st in top of ch 3 [60 sts]
Round 6 :
ch 3, dc in same st (this will be in the top of the ch 3 where the sl st was made to end the prev round), (dc in the next 4 sts, 2 dc in the next st) x 11, dc in the next 4 sts, join with a sl st in top of ch 3 [72 sts]
Round 7 :
ch 3, dc in next 4 sts, (2 dc in next st, dc in next 5 sts) x 11, 2 dc in the next st, join with a sl st in top of ch 3 [84 sts]
Round 8 :
ch 3, dc in same st, (dc in the next 6 sts, 2 dc in the next st) x 11, dc in the next 6 sts, join with a sl st in top of ch 3 [96 sts]
Round 9 :
ch 3, dc in next 6 sts, (2 dc in next st, dc in next 7 sts) x 11, 2 dc in next st, join with a sl st in top of ch 3 [108 sts]
Round 10 :
ch 3, dc in same st, (dc in the next 8 sts, 2 dc in the next st) x 11, dc in the next 8 sts, join with a sl st in top of ch 3 [120 sts]
Round 11 :
ch 3, dc in next 8 sts, (2 dc in next st, dc in next 9 sts) x 11, 2 dc in the next st, join with a sl st in top of ch 3 [132 sts]
Round 12 :
ch 3, dc in same st, (dc in the next 10 sts, 2 dc in the next st) x 11, dc in the next 10 sts, join with a sl st in top of ch 3 [144 sts]
Round 13 :
ch 3, dc in next 10 sts, (2 dc in next st, dc in next 11 sts) x 11, 2 dc in next st, join with a sl st in top of ch 3 [156 sts]
Round 14 :
ch 3, dc in same st, (dc in the next 12 sts, 2 dc in the next st) x 11, dc in the next 12 sts, join with a sl st in top of ch 3 [168 sts]
Round 15 :
ch 3, dc in next 12 sts, (2 dc in next st, dc in next 13 sts) x 11, 2 dc in next st, join with a sl st in top of ch 3 [180 sts] - this will be the size of the inside of the doughnut
Round 16 :
ch 3, dc in same st, (dc in the next 14 sts, 2 dc in the next st) x 11, dc in the next 14 sts, join with a sl st in top of ch 3 [192 sts]
Round 17 :
ch 3, dc in next 14 sts, (2 dc in next st, dc in next 15 sts) x 11, 2 dc in next st, join with a sl st in top of ch 3 [204 sts]
Round 18 :
ch 3, dc in same st, (dc in the next 16 sts, 2 dc in the next st) x 11, dc in the next 16 sts, join with a sl st in top of ch 3 [216 sts]
Round 19 :
ch 3, dc in next 16 sts, (2 dc in next st, dc in next 17 sts) x 11, 2 dc in next st, join with a sl st in top of ch 3 [228 sts]
Round 20 :
ch 3, dc in same st, (dc in the next 18 sts, 2 dc in the next st) x 11, dc in the next 18 sts, join with a sl st in top of ch 3 [240 sts] - this will be the size of the inside of the doughnut
Round 21 :
ch 3, dc in next 18 sts, (2 dc in next st, dc in next 19 sts) x 11, 2 dc in next st, join with a sl st in top of ch 3 [252 sts]
Round 22 :
ch 3, dc in same st, (dc in the next 20 sts, 2 dc in the next st) x 11, dc in the next 20 sts, join with a sl st in top of ch 3 [264 sts]
Round 23 :
ch 3, (2dc-tog, dc in next 15 sts) x 11, 2dc-tog, dc in next 14 sts, join with a sl st in top of ch 3 [192 sts]
Round 24 :
ch 3, dc in next 13 sts, (2dc-tog over next 2 sts, dc in next 14 sts) x 11, 2dc-tog over next 2 sts, join with a sl st in top of ch 3 [180 sts]
Round 25-27 :
ch 3, dc in next st and in each st around, join with a sl st in top of ch 3 [180 sts]. DO NOT FASTEN OFF. Proceed to Finishing.
— Extra Large Bed :
Info :
Start with a magic circle and your 8mm H
Round 1 :
ch 3 (counts as first dc, photo 11), make 11 dc in the magic circle (photo's 12-14), tighten the circle (photo 15), join with a sl st into top of ch 3 [12 sts]
Round 2 :
ch 3, dc in same st (this will be in the top of the ch 3 where the sl st was made to end the prev round, photo's 16-17), 2 dc in each st around, join with a sl st in top of ch 3 [24 sts]
Round 3 :
ch 3, (2 dc in next st (photo 19), 1 dc in next st) x 11, 2 dc in the next st, join with a sl st in top of ch 3 [36 sts]
Round 4 :
ch 3, dc in same st (this will be in the top of the ch 3 where the sl st was made to end the prev round), (dc in the next 2 sts, 2 dc in the next st) x 11, dc in the next 2 sts, join with a sl st in top of ch 3 [48 sts]
Round 5 :
ch 3, dc in next 2 sts, (2 dc in next st, dc in next 3 sts) x 11, 2 dc in the next st, join with a sl st in top of ch 3 [60 sts]
Round 6 :
ch 3, dc in same st (this will be in the top of the ch 3 where the sl st was made to end the prev round), (dc in the next 4 sts, 2 dc in the next st) x 11, dc in the next 4 sts, join with a sl st in top of ch 3 [72 sts]
Round 7 :
ch 3, dc in next 4 sts, (2 dc in next st, dc in next 5 sts) x 11, 2 dc in the next st, join with a sl st in top of ch 3 [84 sts]
Round 8 :
ch 3, dc in same st, (dc in the next 6 sts, 2 dc in the next st) x 11, dc in the next 6 sts, join with a sl st in top of ch 3 [96 sts]
Round 9 :
ch 3, dc in next 6 sts, (2 dc in next st, dc in next 7 sts) x 11, 2 dc in next st, join with a sl st in top of ch 3 [108 sts]
Round 10 :
ch 3, dc in same st, (dc in the next 8 sts, 2 dc in the next st) x 11, dc in the next 8 sts, join with a sl st in top of ch 3 [120 sts]
Round 11 :
ch 3, dc in next 8 sts, (2 dc in next st, dc in next 9 sts) x 11, 2 dc in the next st, join with a sl st in top of ch 3 [132 sts]
Round 12 :
ch 3, dc in same st, (dc in the next 10 sts, 2 dc in the next st) x 11, dc in the next 10 sts, join with a sl st in top of ch 3 [144 sts]
Round 13 :
ch 3, dc in next 10 sts, (2 dc in next st, dc in next 11 sts) x 11, 2 dc in next st, join with a sl st in top of ch 3 [156 sts]
Round 14 :
ch 3, dc in same st, (dc in the next 12 sts, 2 dc in the next st) x 11, dc in the next 12 sts, join with a sl st in top of ch 3 [168 sts]
Round 15 :
ch 3, dc in next 12 sts, (2 dc in next st, dc in next 13 sts) x 11, 2 dc in next st, join with a sl st in top of ch 3 [180 sts]
Round 16 :
ch 3, dc in same st, (dc in the next 14 sts, 2 dc in the next st) x 11, dc in the next 14 sts, join with a sl st in top of ch 3 [192 sts]
Round 17 :
ch 3, dc in next 14 sts, (2 dc in next st, dc in next 15 sts) x 11, 2 dc in next st, join with a sl st in top of ch 3 [204 sts]
Round 18 :
ch 3, dc in same st, (dc in the next 16 sts, 2 dc in the next st) x 11, dc in the next 16 sts, join with a sl st in top of ch 3 [216 sts]
Round 19 :
ch 3, dc in next 16 sts, (2 dc in next st, dc in next 17 sts) x 11, 2 dc in next st, join with a sl st in top of ch 3 [228 sts]
Round 20 :
ch 3, dc in same st, (dc in the next 18 sts, 2 dc in the next st) x 11, dc in the next 18 sts, join with a sl st in top of ch 3 [240 sts] - this will be the size of the inside of the doughnut
Round 21 :
ch 3, dc in next 18 sts, (2 dc in next st, dc in next 19 sts) x 11, 2 dc in next st, join with a sl st in top of ch 3 [252 sts]
Round 22 :
ch 3, dc in same st, (dc in the next 20 sts, 2 dc in the next st) x 11, dc in the next 20 sts, join with a sl st in top of ch 3 [264 sts]
Round 23 :
ch 3, dc in next 20 sts, (2 dc in next st, dc in next 21 sts) x 11, 2 dc in next st, join with a sl st in top of ch 3 [276 sts]
Round 24-26 :
ch 3, dc in next st and in each st around, join with a sl st in top of ch 3 [96 sts]
Round 27 :
ch 3, dc in next 20 sts, (2dc-tog in next st, dc in next 21 sts) x 11, 2dc-tog over next 2 sts, join with a sl st in top of ch 3 [264 sts]
Round 28 :
ch 3, (2dc-tog, dc in next 20 sts) x 11, 2dc-tog, dc in next 19 sts, join with a sl st in top of ch 3 [252 sts]
Round 29 :
ch 3, dc in next 18 sts, (2dc-tog over next 2 sts, dc in next 19 sts) x 11, 2dc-tog over next 2 sts, join with a sl st in top of ch 3 [240 sts]
Round 30-32 :
ch 3, dc in next st and in each st around, join with a sl st in top of ch 3 [240 sts]. DO NOT FASTEN OFF. Proceed to Finishing.
— Finishing :
Prepare your stuffing-stocking :
You can use old socks or stockings to insert the stuffing into. However, I found nylon stockings to be the best since you can stretch it with the stuffing to the length and thickness you desire. For bigger beds, you may need more than one pair of stockings. For the small bed, one leg of the stocking should be long enough. Insert some stuffing into the nylon stocking until you have roughly 5-6 inches of stuffed stocking (photo 20). Set aside.
Assembly :
Choose which side of the doughnut you would like on the outside. You have made the doughnut thus far with the "right side" facing you, and the "wrong side" facing away from you. However, I quite like the look of the "wrong side", so I popped my doughnut inside out so that the "right side" was in the middle and the sides that popped over was showing the "wrong side". It doesn't really matter, you choose! From now on I will refer to the side where you see the popped over sides, as the top side, and the underside that will look like a circle, as the bottom side.
Info :
*Instructions are given for the Small bed, with Medium, Large and Extra Large sizes given in brackets* On the top side, position the finished edge to align with Round 5 (10, 15, 20) so that the stitch count for the finished edge and the round onto which you will attach the edge, is the same (photo 21): this will be 60 sts for the small bed (120, 180, 240 sts). This way it will be much easier to align your outer edge perfectly and you can use the stitches to guide your joining.
Info :
*Instructions are given to join the seam with slip stitches, but if you prefer, you can sew it together* Remove the loop of yarn from your H and insert the H from underneath the bottom side to come out at the beginning of Round 5 (10, 15, 20), in the top of the ch 3 at the beginning of Round 5 (10, 15, 20) (photo 22). Now place the loop of yarn back onto your H and pull the loop through to the bottom side (photo's 23-24).
Info :
You will now slip stitch Round 17 (22, 27, 32) onto Round 5 (10, 15, 20): insert your H from the bottom into the next st on Round 5 (10, 15, 20) AND in the next st on Round 17 (22, 27, 32) (photo 25), pull the yarn through to the bottom side and pull it through the loop on your H (photo's 26-28, first sl st made). Keep making slip stitches (photo 29) through both Round 5 (10, 15, 20) and Round 17 (22, 27, 32), but stop after a few stitches to insert your stocking filled with stuffing (photo 30-31, it is easier to "stuff-as-you-go"- try to stuff as tightly as you can). Continue making slip stitches, stopping every few stitches to add more stuffing to the stocking. If you are using only one leg of the stocking, cut the stocking and tie a knot to keep the stuffing from coming out (photo 32). Insert the end next to the beginning of the stocking and make sure you spread the stuffing evenly (photo 33). Cut your yarn, fasten off and weave in the ends.
This doughnut-shaped pet bed makes a cozy, stylish resting spot your pet will love. The chunky stitches are quick to work up and very forgiving for beginners learning circular increases. Make one in Bernat Blanket or try t-shirt yarn or scrap yarn for a sturdy, eco-friendly version. 🧶🐱