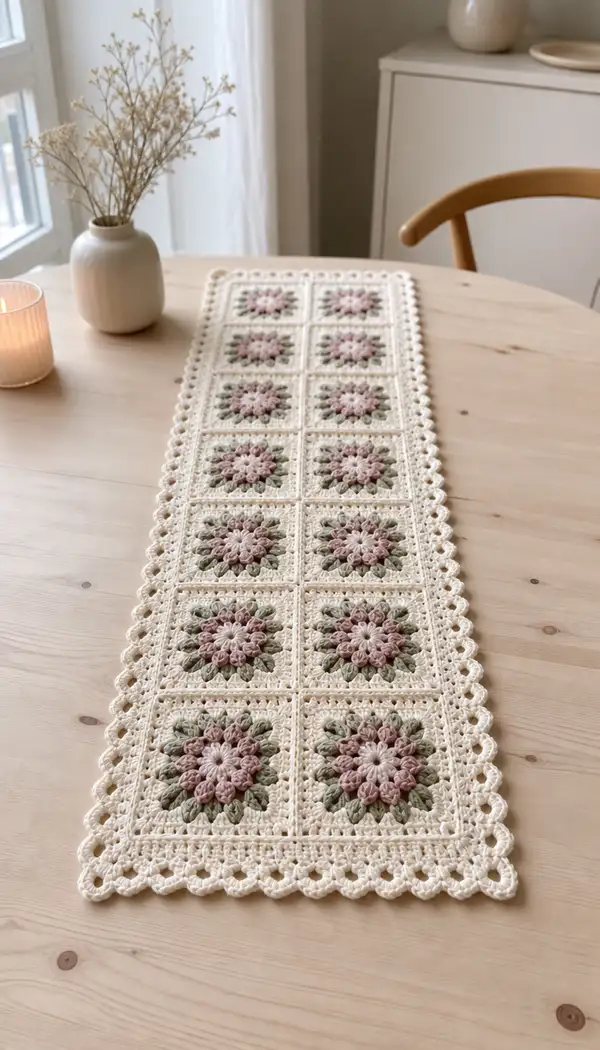
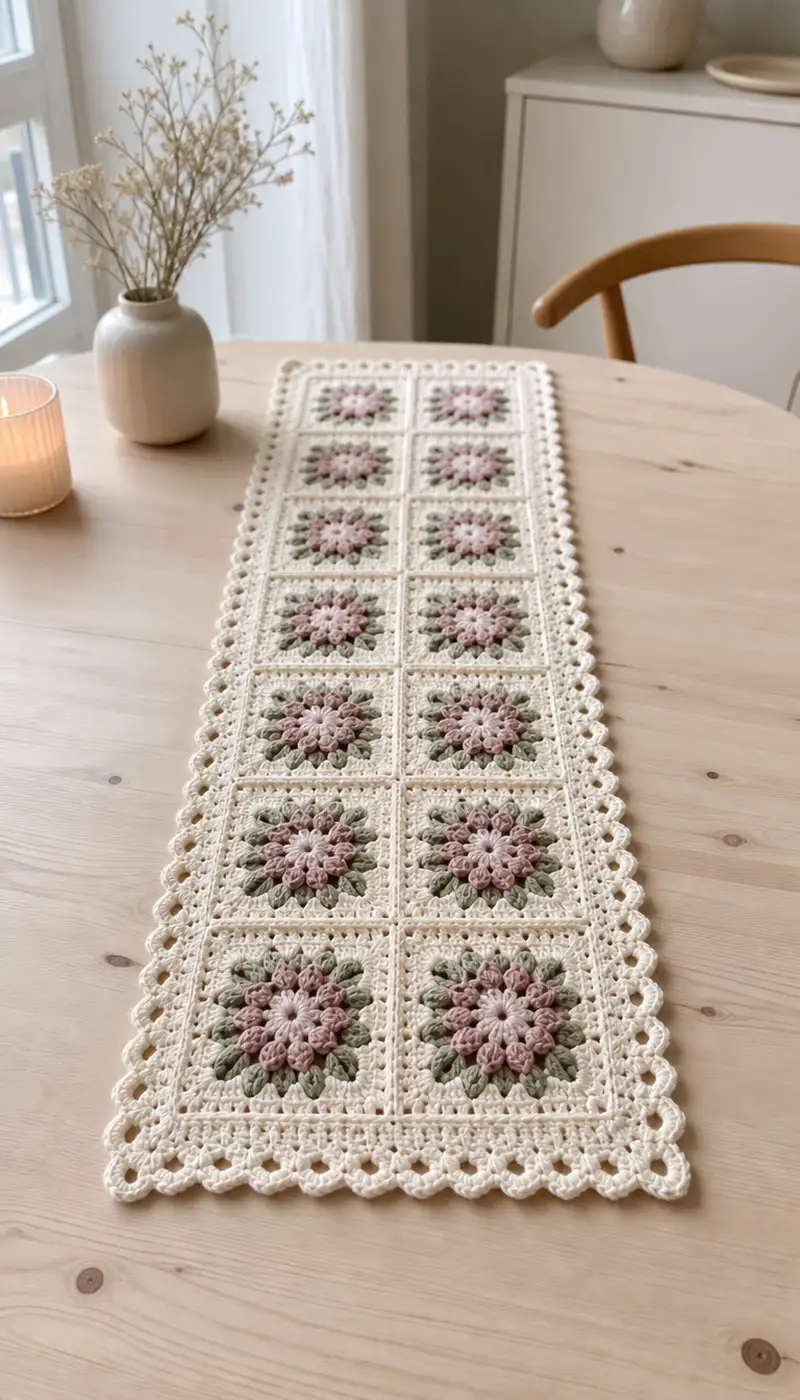
Create a delicate, vintage-inspired table runner composed of floral granny squares in soft cream, dusty rose and sage. This pattern uses puff/cluster petals framed by leafy rounds, joined into a long narrow runner and finished with a scalloped picot border. The finished piece lays flat and elegant on a dining or console table, adding a gentle, handmade touch to modern and rustic interiors alike.
Progress Tracker
0% Complete
— Notes & Gauge :
Info :
This pattern is written in US terms. Gauge is not critical for this runner but to approximate finished size, each completed motif measures roughly 10.5 cm / 4.1 in square using worsted weight yarn and a 3.5 mm hook. Make a test square and block if exact sizing is important. Work with a tight, consistent tension for the best texture and crisp stitches.
Info :
Puff stitch used in the flower petals is made by yarn over, insert hook, yarn over pull up loop repeat 3 times (total 7 loops on hook), yarn over draw through all loops, ch1 to close. Keep tension even so petals sit nicely raised above the background.
— Motif (Flower Granny Square) :
Round 1 :
With Dusty Rose, make a mr. Ch1 (does not count as st), work 12 puff stitches evenly into ring. Join with sl st to first puff top to close ring. (12 puffs)
Info :
When forming the center puffs, pull loops to a consistent height so petals match. If your puff stitch is much taller or shorter than mine, change hook for this round (smaller to tighten or larger to open).
Round 2 :
Ch1, in front loop only of each puff work 1 sc across to create a small dividing ring: (1 sc in FLO of next puff) x12. Join with sl st to first sc. (12 sc)
Round 3 :
Change to Light Neutral (or Cream) with standing dc in any sc. Ch2 (counts as first dc hereafter). *In next sc work 3-dc cluster (cluster = yarn over, insert, pull up, yarn over draw through 2, leave loop on hook; repeat twice more; yarn over draw through all loops), ch1, skip next sc, dc in next sc; rep from * around to make 6 clusters spaced by ch1. Join with sl st to top of first dc. (6 clusters, 6 ch-1 spaces)
Info :
This cluster round gives a slightly open ring between the center petals and the leaves. Use a stitch marker at the first cluster if helpful to keep track of start.
Round 4 :
Change to Sage Green. Sl st into nearest ch-1 space, (ch2, 3 dc, ch2, 3 dc) in same ch-1 space to create the first leaf shell (corner-like petal), *skip cluster, sl st into next ch-1 space, (3 dc, ch2, 3 dc) in ch-1 space; repeat from * for total 6 leaf shells. Join with sl st to first dc. (6 shells)
Info :
Each of these leaf shells will visually become leaf clusters around the flower. Keep shells centered in the ch-1 spaces; block later for smooth shape.
Round 5 :
Working into the back of leaf shells to give dimension: Sl st to center of a 3-dc shell, ch1, *sc in center of next shell, ch3, sc in center of next shell; repeat around to create 6 ch-3 loops between scs. Join with sl st. (6 sc, 6 ch-3 loops)
Round 6 :
Change to Cream (main). Work in the ch-3 loops: sl st into first ch-3 space, (ch3, 2 dc, ch3) into same ch-3 space to begin corner, *skip next sc, (2 dc, ch3, 2 dc) into next ch-3 loop to form a corner shell, repeat around so you have 6 corner-like groups shaping into a round that will be squared next. Join with sl st. (6 groups)
Info :
We are building an intermediate round that eases transformation from round to square. Keep stitch count even by working same group into each ch-loop. This helps later when forming square corners.
Round 7 :
Ch1, *sc in next 2 dc, (sc, ch2, sc) in the center ch-3 of a corner group to form an actual corner, sc in next 2 dc; repeat around to make 6 mini-corners. Join with sl st. (24 sc with 6 corner ch-2 spaces)
Round 8 :
Work in BLO for a slight ridge: Ch1, 1 sc in each sc around, but when you come to ch-2 corner, work (1 sc, ch2, 1 sc) into ch-2. Join. (24 sc, 6 corner ch-2)
Info :
Back loops only on this round creates a definition line around the flower motif. This helps separate decorative center from the granny square rounds that follow.
Round 9 :
Ch3 (counts as dc), (2 dc, ch2, 3 dc) in same corner ch-2 (corner made), *skip next 3 sc, (3 dc, ch2, 3 dc) in next corner ch-2; repeat around for 4 big corners that begin the square shape. Join with sl st to top of ch3. (4 big corners)
Round 10 :
Ch1, sc in same st, *ch3, skip 2 sts, sc in next dc, ch3, skip 2 sts, sc in next dc across to corner; in corner work (sc, ch3, sc); repeat to form the square mesh. Join with sl st. (This round creates ch-3 spaces along sides to build side shells)
Info :
If your motif is not square yet, you can add or remove one ch-3 space per side to bring it to an even square that measures the same as your other motifs after blocking.
Round 11 :
Change to Cream if not already. Work along each side in pattern: (sc, ch3, sc) in each side ch-3 space; in corners work (sc, ch3, sc, ch3, sc) to keep corners open. Join with sl st. (Edges now show uniform ch-3 spaces)
Round 12 :
Final motif neat round: Ch1, 1 sc in each sc and (sc, ch1, sc) in each corner to square off. Work evenly so each finished square measures approximately 10.5 cm / 4.1 in. Fasten off and weave in ends, leaving long tail (approx. 40 cm) if planning to sew rather than join-as-you-go. (Final motif complete)
Info :
Make 15 motifs in total, keeping the same orientation for each so the flower faces the same way in every square. Block each motif lightly to square up edges before joining. Blocking yields more accurate joins and an even border later.
— Preparation & Layout :
Info :
Arrange motifs on your blocking mat in a 3 (width) x 5 (length) grid. Use pins to keep 1.5 cm spacing between squares while you decide join method. Pin all motifs with the flower centers aligned in the same orientation to maintain visual continuity. This runner layout makes a narrow long runner ideal for a 4-seater table or console.
Info :
Decide whether to join-as-you-go (JAYG) or whip/stitch join after making all motifs. JAYG reduces finishing sewing but requires working into active motif edges. The following joining instructions assume an invisible whip-stitch join for a slightly raised seam; JAYG notes are included in Info sections where applicable.
— Joining Motifs (Whip-Stitch Invisible Join) :
Round 1 :
Lay two motifs right sides together aligning edges. Use the long cream tail from Round 12. Thread a tapestry needle and begin at a corner stitch. Insert needle through the back loop only of both motifs' corner scs, pull yarn through leaving a 6 cm tail. Work single whip or mattress stitch through corresponding loops every 3-4 sts along side until reaching next corner. Repeat to join motifs across the row. (Join 3 motifs per row)
Info :
When joining sides, work through the loops that sit closest to the surface to keep the seam invisible. Pull gently but do not cinch—the seam should be neat but not puckered. For sturdier joins, use two passes: one for stability and a second for neater appearance.
Round 2 :
Join the second row of 3 motifs the same way. Prepare all 5 rows separately and press seams flat on the wrong side with pins. After joining motifs into rows, join rows together: align the short edges of the rows and mattress stitch through corresponding scs across to form the full 3 x 5 rectangle. Fasten off and weave ends securely. (All motifs joined into runner)
Info :
If you prefer join-as-you-go (JAYG): On the final round 12 of each motif, instead of fastening off, slip-stitch into the adjacent completed motif corner and continue around, slip-stitching side-to-side through the ch-3 spaces to join. This gives a flatter join similar to crocheted seams. Work this only if comfortable reading the motif edge and keeping counts consistent.
Round 3 :
Once joined, gently block the entire runner on a flat surface, pinning every corner and several mid-edge points per side so the runner is squared and flat. Allow to dry completely. Blocking evens motif edges and opens the lacy border later on. (Runner blocked)
Info :
If you plan to change color seam accents, use a contrasting thin yarn for the seam before blocking. A thin sage or dusty rose running stitch will add a subtle framed look between motifs.
— Base Frame Round (Unifying Round Around Whole Runner) :
Round 1 :
With Cream, join at any outer corner of the joined runner by sl st. Work 1 sc evenly along the entire outer edge of the runner, placing (sc, ch2, sc) into each corner to keep edges square. Work closely so sides measure evenly. Approximate stitch count depends on blocked runner perimeter; maintain even distribution. Join with sl st. (Even sc border created)
Info :
To keep a clean seam, aim for scs spaced so the number per side divides evenly by the repeating shell pattern you plan to use in the edging. Note the stitch count on each side for edge consistency.
Round 2 :
Ch1, 1 sc in each sc around, working (sc, ch2, sc) in each corner. Join. (Neat single crochet border)
Info :
Work in rounds around the entire rectangle without turning; when you reach a corner, work the corner cluster to maintain shape. This base frame strengthens joins so the final lacy edging looks and behaves evenly.
Round 3 :
Ch2 (counts as hdc). Work 1 hdc in each sc around, placing (hdc, ch2, hdc) in each corner to emphasize corners. Join with sl st. (hdc round)
Round 4 :
Ch1, 1 sc in each hdc around. If you want a more delicate ridge, work this round in BLO to make a dividing line between base frame and decorative edging. Join and fasten off. (Even sc border, optional BLO)
Info :
Record total stitches on each side after this round. You will use those counts to space scallops evenly so the lacy border sits symmetric. If sides have slightly different counts due to blocking, compensate by spacing one extra sc between scallops on longer sides.
— Scalloped Lace Edge (Scallop + Picot Rows) :
Round 1 :
With Cream, join at any side sc. *Ch5, skip 2 sts, sc in next st; repeat along side. At corner work (sc, ch5, sc) to turn. Continue around the rectangle to create long looped arches. Join with sl st. (Ch-5 arches all around)
Info :
These ch-5 arches act as foundation loops for the scallop shells. Adjust ch-5 to ch-4 or ch-6 depending on your yarn thickness to keep scallops proportional; just make sure you repeat the same count for consistency.
Round 2 :
Into each ch-5 arch: (sc, hdc, 3 dc, hdc, sc) to form a scallop shell. In corner arches, work (sc, hdc, 5 dc, hdc, sc) to keep corners full. Join with sl st. (One scallop per arch)
Info :
Maintain consistent stitch counts in each scallop. The 3-dc center provides height and the hdc shoulders allow the scallop to sit neatly up from the runner surface.
Round 3 :
Ch1, sc in top of each scallop shell stitch and in each valley between scallops. Around corners work an extra sc to anchor. Join. (Even sc anchoring round)
Info :
This anchoring round prepares the edge for picot loops that will create the lacy eyelet finish. Keep the same orientation as you go around to ensure uniform picot spacing.
Round 4 :
Picot loop row: *Ch6, sl st into 3rd chain from hook to form a small picot loop, sl st into next sc to anchor; repeat across scallops. At corners adjust to keep smooth curve by using ch7 for a slightly larger picot if needed. Join. (Picot loops around scallops)
Info :
Picots add the delicate bubble edge you see in the image. Keep tension relaxed when working picots so they remain rounded rather than pulled flat.
Round 5 :
Decorative bead of shells: Into each picot loop work: (sl st, ch3, 1 sc around the picot loop, ch3, sl st into same stitch) to create a small round bead. Join and fasten off. Weave in ends through the underside of the scallop shells. (Delicate scalloped-picot finish)
Info :
For a slightly more pronounced lacy edge, repeat Round 4 and Round 5 to add a double row of picot beads. This will increase the overall width of the border by approximately 1.5-2 cm.
— Optional Decorative Raised Border (for extra texture) :
Round 1 :
With Cream, rejoin at any outer sl st. Work 1 sl st in each sc around to create a raised purl-like line. Join. (Raised slip-stitch round)
Round 2 :
Work 1 sc in each sl st, but on the long sides, after every 10 sc work a small 3-dc cluster to create subtle texture. This adds a rhythmic raised motif between scallops. Join. (Subtle raised clusters)
Info :
This optional border is purely decorative and shown in some variations of the runner. Only add if you like more surface texture; avoid if you prefer a flatter runner for plates and centerpieces.
— Finishing Touches :
Round 1 :
Trim all ends and weave into the wrong side of the runner, tunneling yarn through several stitches. Block one last time to set the scalloped edge and ensure the runner sits flat. Flatten corners and allow to dry fully. (Runner finished)
Info :
For a slight sheen, press gently with a cool iron through a damp cloth after blocking. Test on a single motif first to ensure your yarn tolerates light pressing.
Round 2 :
Optional: Add a very light hand-applied fabric pigment to petal tips for depth. Use a small brush and test on scrap before applying to finished runner. Let dry and seal if desired. (Optional color shading)
Info :
To launder, hand wash cold with a gentle soap and reshape while damp. Lay flat to dry to preserve the lace and puff stitches. Avoid machine washing to keep scallops intact.
Info :
Troubleshooting: If sides ripple after joining, re-pin and reblock under slightly more tension. If edges look too tight, add one more sc evenly along the side during the base frame round to ease tension.
This floral granny square table runner brings a delicate, handmade accent to your home. Each puff-petal motif forms into a long elegant strip framed by a lacy scalloped border that feels both vintage and modern. Blocked and finished, the runner adds a soft, textured layer to your table setting—a perfect project to slow down with and gift to someone special. 🧶🌸😊