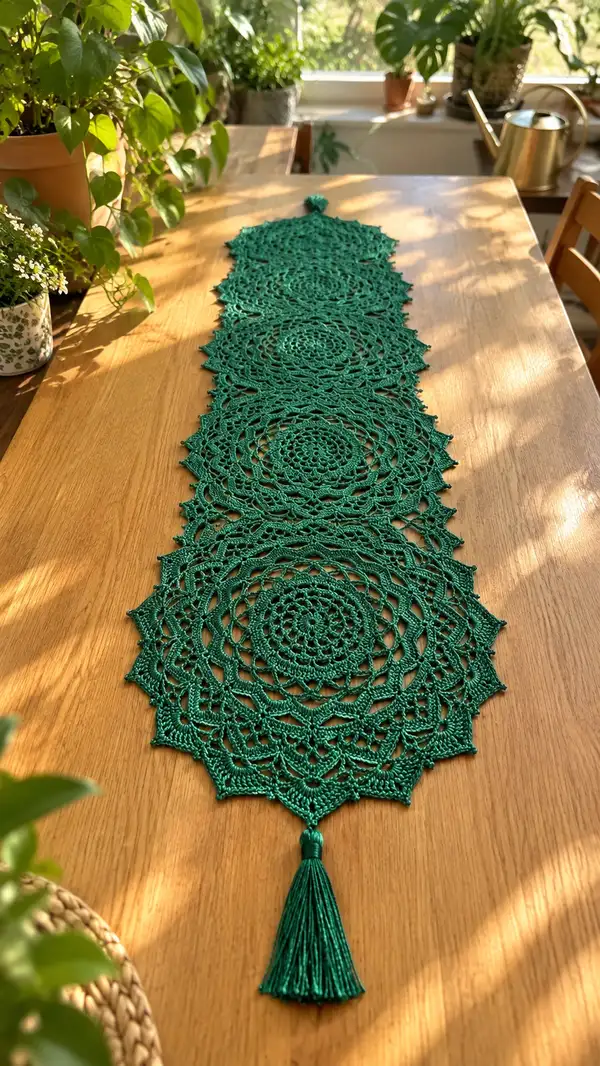
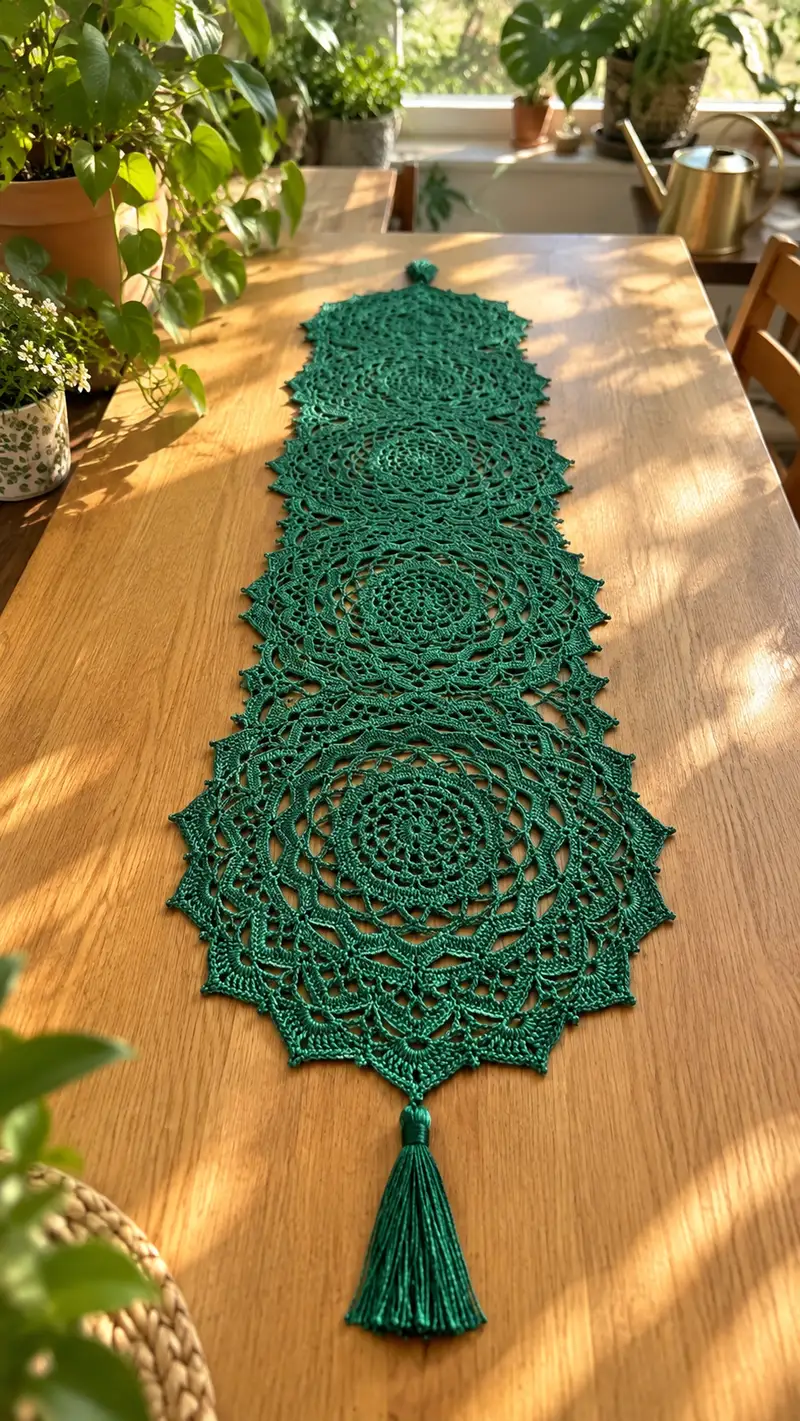
Create a stunning, long lace table runner made of linked circular medallions and finished with elegant tassels. This pattern features five intricately crocheted round motifs joined in a straight line, delicate picot and shell details, and a graceful pointed scalloped edge. Worked in fine cotton thread, it lies flat and drapes beautifully across a dining table or sideboard. Perfect for gifting or dressing up a special table setting.
Progress Tracker
0% Complete
— Materials & Gauge :
Info :
Use size 10 crochet thread with a 2.0mm hook for crisp lace. Gauge is not strict for this decorative runner but each completed medallion should measure approximately 22-24 cm (8.5-9.5 in) across after blocking when using the suggested materials.
— Notes Before You Start :
Info :
All medallions are worked identical and then joined using a join-as-you-go method (JAYG) explained later. Work loosely enough to allow blocking but tight enough that holes remain neat. Use stitch markers to identify the beginning of rounds when working long even sections.
— Medallion (Make 5) :
Round 1 :
Make a magic ring, ch3 (counts as dc), 11 dc into mr, sl st to top of ch3 to join (12 dc)
Round 2 :
Ch4 (counts as dc+ch1), *dc in next st, ch1; rep from * around, sl st to 3rd ch of starting ch4 (12 dc, 12 ch-1 sps)
Round 3 :
Into each ch-1 space work (sc, hdc, 3 dc, hdc, sc); sl st to first sc to join (12 shells)
Info :
Each 'shell' occupies one previous ch-1 space. After this round you will visually see 12 rounded petals. Use a stitch marker at the first shell to mark round start.
Round 4 :
Ch3 (counts as dc), dc in same st, *ch2, sk next 3 sts across the top of next shell and into the center of the next shell work 2 dc, ch2, 2 dc (shell separation arches); rep from * around, sl st to top of starting ch3 (24 dc and 12 arches)
Round 5 :
Ch1, sc in same st, *in each ch2 arch: (ch3, 3 dc, ch3) then sc in top of next shell; rep from * around, sl st to first sc (12 decorative arches and 12 sc anchors)
Info :
This round begins the look of layered rings. Keep tension even to allow next rounds to lie flat. If your medallion cups, block after finishing to flatten before proceeding to later rounds where joins rely on flat surfaces.
Round 6 :
Ch4 (counts dc+ch1), dc in next dc, *ch1, dc in next dc; across the top of each ch3 arch work (sc, ch5, sc) into the central apex (creating elongated loop), rep from * around, sl st to top of starting ch4 (24 dc, 12 sc with ch5 loops)
Round 7 :
Ch1, sc in same st, into each ch5 loop work (2 dc, ch3, 2 dc), sc in the anchor st between loops; rep around, sl st to first sc (12 large shell clusters)
Round 8 :
Ch2 (counts hdc), hdc in same st, *ch3, sk to next cluster and work (hdc, hdc) over central dc of cluster; rep around, sl st to top of first hdc (24 hdc and 12 ch3 spaces)
Info :
Rounds 6-8 create an airy ring. Count clusters to ensure you have 12 repeating units. Use blocking if needed between motifs to make joining easier later.
Round 9 :
Ch3 (counts dc), dc in same st, *ch5, sk to next cluster and work 2 dc into top of cluster; rep from * around to make 12 2-dc groups separated by ch5 loops; sl st to top of starting ch3 (24 dc groups, 12 ch5 loops)
Round 10 :
Ch1, sc in same st, *in each ch5 loop work (sc, ch7, sc), sc in the top of the 2-dc group; rep around, sl st to first sc (12 lacy arches with ch7 centers)
Round 11 :
Ch3, dc in same st, *into ch7 loop: (sc, 3 dc, picot, 3 dc, sc), sc in top of next 2-dc group; rep around, sl st to top of starting ch3 (12 ornate loops)
Info :
For picot: ch3, sl st in 3rd chain or into the same loop per your preference. These picots form the delicate points that will later become scalloped star tips.
Round 12 :
Ch1, sc in same st, *ch4, sk to next ornate loop and sc in the base between loops; rep around, sl st to first sc (12 ch4 sps)
Round 13 :
Ch3, dc in same st, *in each ch4 sp work (2 dc, ch2, 2 dc), sk to next base and dc in base; rep around, sl st to top of starting ch3 (48 dc grouped into 12 shell clusters)
Info :
Round 13 builds a wide textured ring. Check that each 'shell cluster' contains 4 dc separated by ch2; total shells x12 creates 48 dc placed evenly.
Round 14 :
Ch1, sc in same st, *into the ch2 space work (sc, ch5, sc), then sc in each of next 3 dc; rep around, sl st to first sc (12 ch5 loops and 36 sc total)
Round 15 :
Ch3, dc in same st, *in each ch5 loop work (2 dc, ch3, 2 dc), then dc in next sc; rep around, sl st to top of starting ch3 (12 raised arches)
Round 16 :
Ch1, sc in same st, *ch6, sk to next arch apex and sc in base between arches; rep around, sl st to first sc (12 ch6 elongated loops)
Info :
These extended loops create the airy lace that will visually separate medallions when joined. Keep loops even; use your finger to gently stretch loops as you work to maintain consistent size.
Round 17 :
Ch2 (counts hdc), hdc in same st, *into each ch6 loop work (hdc, ch4, hdc), hdc in next sc; rep around, sl st to top of first hdc (24 hdc and 12 ch4 loops)
Round 18 :
Ch3, dc in same st, *(2 dc, ch2, 2 dc) into each ch4 loop to form small shells; dc in next hdc; rep around, sl st to top of starting ch3 (48 dc across 12 shell units)
Round 19 :
Ch1, sc in same st, *in the ch2 space of each new shell work (sc, picot, sc), then sc in the next dc; rep around, sl st to first sc (12 picot points visible)
Info :
Picot placement gives the motif its starry points. Ensure you count the picots so there are 12 around. These will be exaggerated in the next rounds into distinct points.
Round 20 :
Ch4, tr in same st, *sk next 3 sts, into picot point work (5 dc cluster) anchored at the picot base, ch2; rep around, sl st to top of starting tr (12 raised points)
Round 21 :
Ch1, sc in same st, *in each ch2 sp between points work (sc, ch3, sc), sc in next dc cluster base; rep around, sl st to first sc (12 small arches)
Round 22 :
Ch3, dc 2 more times in same st (3 dc cluster), *in each ch3 arch work (3 dc, ch1, 3 dc), then 3 dc in base of next point; rep around, sl st to top of starting ch3 (multiple 3-dc cluster groups forming scalloped edge)
Info :
Round 22 builds the scalloped points into a decorative edge. Keep the final edge flat; if it ruffles, slightly adjust your tension or add a blocking step before joining medallions.
Round 23 :
Ch1, sc in same st, *(picot, sc) into the center dc of each 3-dc grouping, then sc around the curve to next point base; rep around, sl st to first sc (finalized picot scallops)
Round 24 :
Ch2, hdc in same st, *hdc in each dc and sc around the scallop to tidy the edge and add stability; maintain even stitch distribution so the medallion measures approximately 22-24 cm across when relaxed; sl st to top of starting hdc
Info :
Finish off this medallion by weaving tail through several stitches and pulling snug. Block to final size using pins so that all medallions match before joining.
— Create Additional Medallions :
Info :
Repeat the full Medallion sequence exactly to make 5 identical medallions. Block each medallion after finishing and allow to dry flat. Label them 1-5 so you know the joining order.
— Join-As-You-Go (JAYG) to Form Central Runner :
Info :
You will join medallion 2 to medallion 1 during Round 12 of medallion 2 (the ch7 decorative round equivalent in our pattern). The method is to replace half of the slip-stitch joins with slip stitches into corresponding ch-loops of adjacent blocked medallion. This creates a smooth seam without hand sewing.
Joining Round (During Round 12 of Medallion 2) :
Work Round 12 as written until you reach the first of the 12 ch4 loops that will align with Medallion 1. Instead of completing the ch4 loop, ch4, sk to next, sc in next base; when at joining point: ch4, align the loop over the corresponding ch4 of Medallion 1, sl st through both loops (medallion 2 loop and medallion 1 loop) to join, ch4, continue. Join at 6 evenly spaced points around the meeting edge so the motifs sit flat. Complete Round 12 and finish.
Info :
Pin two blocked medallions together aligning their scalloped edges before attempting the JAYG slip-stitch joins so you can mark the exact corresponding loops. For a runner, join medallions sequentially in a straight line: 1-2, then 2-3, etc.
Joining Rounds for Remaining Medallions :
Repeat the JAYG method when working the same round of each additional medallion so each pair is joined at identical locations (6 joined points per seam). When joining medallion 3 to medallion 2, mirror the placements and ensure all joins face the same side so the runner looks consistent.
— Center Strip & Reinforcement Rounds :
Info :
Once all medallions are joined in a straight line, you will add a narrow connecting reinforcement row across the seam on the reverse side to stabilize the runner. Work a single crochet row in BLO along the seam junction points across the back to keep the runner flat.
Reinforcement Round 1 :
With right sides facing up, join yarn at a seam point in the middle of runner length on the back side. Ch1, sc evenly across the seam area in BLO through both medallions' back loops where possible, working approx 2-3 sc per joined point across the seam, sl st to join. Fasten off. This adds a subtle, invisible reinforcement (approx 60-80 sc along full seam depending on medallion counts).
Info :
Keep this back reinforcement subtle; check drape and flattening on table. If you prefer no visible reinforcement, tack the seam every few inches with small whipstitches using tapestry needle instead.
— Outer Edge Decorative Border (Optional) :
Round 1 (Edge Starting) :
With runner lying flat, join yarn at any outer scallop point. Ch1, sc in same st, *ch3, sk to next tapered point, sc in next picot base; rep around entire outer perimeter of runner, placing a sc in each picot base and ch3 between for a tidy looped edging; sl st to first sc.
Round 2 :
Ch3, dc in same st, *into each ch3 loop work (5 dc) then sl st into sc base to anchor; rep around so each outerch forms a small fan or shell. This emphasizes the scallop points and stabilizes the border; sl st to top of ch3.
Round 3 :
Ch1, sc in same st, *picot, sc into center of fan (picot made by ch3 sl st in 3rd ch) to create crisp pointed tips; rep around, sl st to first sc. Fasten off and weave in ends neatly on the back.
Info :
This border is optional but helps the runner hold its shape on the table. If your runner already lies flat you may omit this and proceed to tassel finishing.
— Tassel (Make 2) :
Step 1 :
Wind thread around a 7-9 cm wide piece of cardboard 40-60 times depending on desired fullness. Carefully slide the windings off and tie a 15 cm length of thread tightly around one end to create the head loop.
Step 2 :
Fold tassel strands in half, then tie another short piece of thread 1 cm below the top knot to make the decorative neck. Trim ends evenly to desired length (approx 12-15 cm finished tassel length).
Step 3 :
Sew or tie the tassel to the center point of the end scallop of the final medallion. Secure with multiple wrapped turns and fasten ends into the back of the medallion and weave in tightly.
Info :
For extra polish, wrap the tassel neck with contrasting thread or add a small bead above the head. Make sure tassels are balanced and centered on each end of runner.
— Blocking & Finishing :
Info :
Blocking is essential for lace pieces. Lightly dampen runner or use a spray bottle and pin each scallop point to the desired spread on a blocking mat. Use rust-proof pins and allow to dry completely. Check joins and weave any loose ends through several stitches and trim close to work.
Final :
Once completely dry, remove pins and press lightly with a warm iron through a cloth if desired for extra flatness. Your table runner is now ready to display.
Assembly Instructions
- Block each medallion to the same diameter and pin them in a row with scallop points aligned before joining to ensure consistent joins.
- Join medallions sequentially using the join-as-you-go method during Round 12 of the incoming medallion; pin corresponding loops to align before slip-stitching across both loops.
- After completing all JAYG joins, reinforce the seam on the back using 1 sc in BLO along the seam points to prevent stretching and ensure a flat runner.
- Attach tassels to the central end scallop of each end medallion: wrap tie thread tightly, secure with weaving and hide tails inside medallion backing.
- If you added the optional outer edge, work it after all medallions are joined and blocked. Pin the runner and work edging in one long continuous round for smoothness.
- Weave in all loose ends on the back side of the runner with a tapestry needle, trimming ends close but secure to prevent unraveling.
Important Notes
- 💡Use stitch markers consistently at the beginning of each round to avoid counting errors and maintain proper shaping.
- 💡Block each completed medallion before joining so all pieces are the same size for a neat runner.
- 💡Work the join-as-you-go row slowly and pin pieces before joining to avoid pulling the motifs out of shape.
- 💡Keep tension consistent throughout; slight differences will cause medallions to vary in diameter and cause joining issues.
- 💡Weave in ends through several stitches and on the back side to keep the front clean and decorative.
- 💡If substituting yarn weight, adjust hook size and expect finished medallion diameter to change proportionally.
- 💡When adding tassels, ensure the wrapping is tight and ends are woven into the medallion center for secure attachment.
Completing this elegant lace medallion runner is such a satisfying experience—watching each medallion bloom and then join seamlessly into a long, graceful table accent feels like stitching time into a statement piece. The green thread gives it a fresh, jewel-like glow, and the tassels bring a playful, finished touch. Display it proudly, gift it lovingly, and enjoy the compliments that follow. 🧶🌿✨