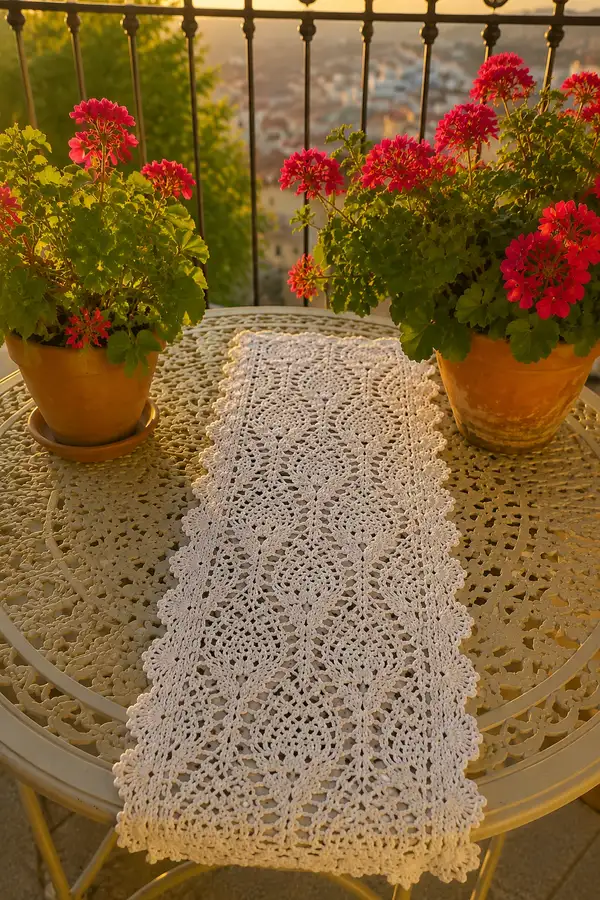
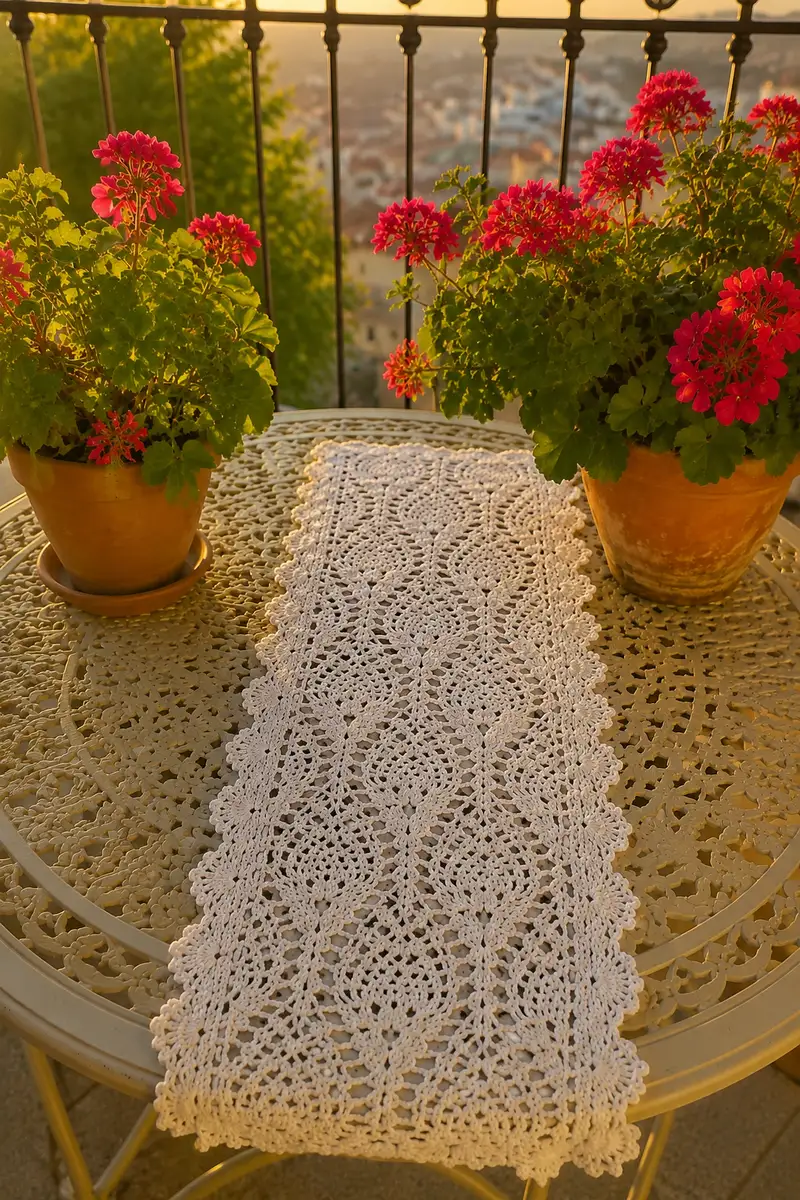
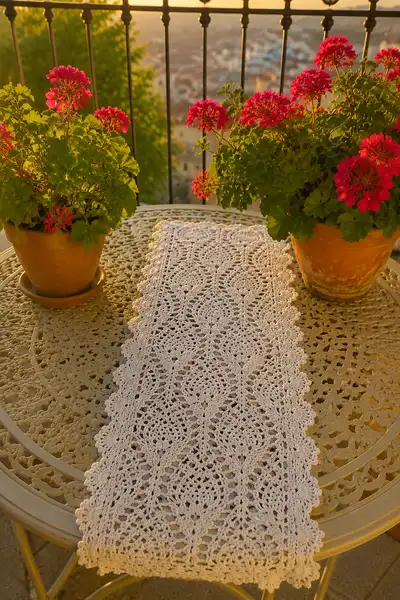
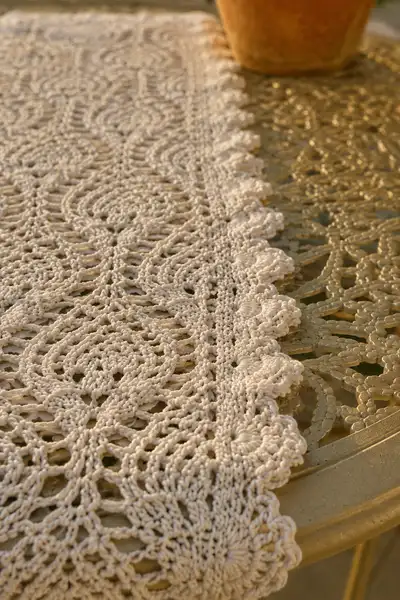
A delicate, vintage-inspired pineapple lace table runner worked in fine cotton thread. This long, narrow runner features symmetrical pineapple motifs, openwork arches and a scalloped picot edge—perfect for dressing a breakfast table or dresser. Worked flat in repeating lace rows, the runner showcases crisp stitch definition in soft white cotton that catches light and shadow beautifully.
Progress Tracker
0% Complete
— Notes & Gauge :
Info :
This runner is worked flat in rows with a foundation chain multiple of 12 + 1. All 'round' numbers here correspond to rows worked back and forth; odd numbered rounds are RS (right side), even numbered rounds are WS (wrong side). Gauge is not critical for lace look, but for reference a 6 motif across sample in size 10 thread measures approximately 18 cm (7 in) across after blocking with the hook sizes listed. Adjust hook for your preferred openness.
Info :
Read through the full pattern before beginning. Where counts are indicated, they are based on a foundation chain of 97 (8 full 12-stitch repeats across + 1). You may change width by adding or removing motif multiples (12 sts per motif). Throughout the pattern, count shells and chain-spaces carefully to keep motifs aligned.
— Foundation Row :
Round 1 :
Chain 97 (multiple of 12 + 1). This is the foundation chain for a runner ~20 cm wide in size 10 thread with 1.75 mm hook (adjust according to yarn and desired width).
Info :
Foundation chain: keep chains loose but consistent. If you prefer a firmer starting edge, use a chainless foundation or begin with a foundation single crochet method to avoid a loose first row.
— Base Groundwork (Establishing the Mesh) :
Round 2 :
RS: Dc in 4th ch from hook (counts as dc), *ch2, sk 2 ch, dc in next ch; rep from * across to last ch, dc in last ch. End row with 1 turning ch (97 sts/spaces overall; pattern works to base chain.)
Round 3 :
WS: Ch3 (counts as dc), turn. *Ch2, sk next ch-space, dc in next dc; rep from * across to end; dc in top of turning ch. (This row maintains the ground mesh: one dc every established stitch and ch-2 arches between.)
Info :
Maintain the same number of vertical 'dc positions' across each row (97 equivalent positions). The ch-2 spaces will be used as anchors for future shell stitches. Place a stitch marker in the 1st dc of the row to mark row starts if desired.
Round 4 :
RS: Ch4 (counts as dc + ch1), turn. *Sk ch2 space, (dc, ch2, dc) into next dc (creating a small shell separated by a ch1), ch1, sk next ch2 sp; rep from * across finishing with dc into final dc position. This begins generating the small arch framework for the pineapples.
Round 5 :
WS: Ch3, turn. Work dc into each dc and ch1 across, placing a dc into top of ch4 turning at row end. Keep stitches even and do not add or reduce stitch positions (maintains 97 positions).
Info :
Work the first 6 rounds slowly to ensure alignment; the small shells placed on Round 4 mark centers of future pineapple arches. If your stitch count drifts, recount the foundation chain and adjust at this early stage where corrections are easier.
— Pineapple Motif Build: Repeat Unit (Rows 6-29 = One Pineapple Vertical Repeat) :
Round 6 :
RS: Ch4, turn. *Sk next ch1 sp, dc into next dc, ch3, sk next ch1 sp, dc into next dc; rep across creating alternating ch3 arches over the small shells. End row with dc in last st. (This expands arch height for pineapple side loops.)
Round 7 :
WS: Ch3, turn. Dc in each dc and into ch3 arches as follows: dc, ch1, dc into center of each ch3 arch; work evenly across maintaining placement. (This starts the mesh that surrounds the pineapple body.)
Round 8 :
RS: Ch4, turn. *Work (dc, ch2, dc) into the next dc to create a shell; ch2, sk one dc; rep across, aligning shells to create the lower basis of pineapple feet. End with dc into top of turning ch.
Round 9 :
WS: Ch3, turn. Dc into each stitch and into ch2 spaces: dc into middle of each shell (count should remain aligned with 97 positions). This row tightens shell foundations.
Info :
The first 4-6 rows of the motif form the 'foot' of the pineapple. Keep shells centered over the initial small shells from Round 4. If your shells drift to one side, check tension in chain arches and slightly ease or tighten as necessary.
Round 10 :
RS: Ch4, turn. *Sk next dc, 5 dc into next ch2 sp (creating a 5-dc fan), sk next dc, ch3, sk next dc; rep across so that fans begin to create the pineapple scales. End with dc into turning chain top.
Round 11 :
WS: Ch3, turn. Dc into each dc across; into the ch3 spaces work (dc, ch1, dc) to preserve vertical arches. Maintain alignment with fans below. (Stitch count across remains consistent.)
Round 12 :
RS: Ch4, turn. In each fan from Round 10 work 3 dc separated by ch1: (dc, ch1, dc, ch1, dc) into fan center spaces to broaden the pineapple body; between fans work dc into established dc positions. This begins the widening midsection of the pineapple.
Round 13 :
WS: Ch3, turn. Dc across into every dc and ch1 space. This evens the row and prepares for the next increase of scale shells.
Info :
At this stage the pineapple is expanding. Visual checks are important: each pineapple vertical column is formed from repeated fans and shells stacked. If a motif looks compressed, loosen tension slightly on the fan rounds to allow the lace to breathe.
Round 14 :
RS: Ch4, turn. *Work (sk next dc, 7 dc in next ch2 sp, sk next dc, ch3) across, placing larger fans aligned over previous fans. These 7-dc fans are the widest part of the pineapple scale body.
Round 15 :
WS: Ch3, turn. Dc in each dc and in each ch3 arch work (dc, ch1, dc). This stabilizes the 7-dc fans so they form a smooth pineapple curve.
Round 16 :
RS: Ch4, turn. *Work into center of each 7-dc fan (dc, ch1, dc), and between fans work dc across; rep across so that the largest fan row is narrowed slightly into a defined pineapple bulge.
Round 17 :
WS: Ch3, turn. Dc across row as before. Keep the number of dc positions consistent so motifs remain vertically aligned.
Info :
If you prefer a taller pineapple, repeat Rounds 14-17 once more before beginning the taper. For the pictured look, proceed to the taper rows now.
Round 18 :
RS: Ch4, turn. *Work (sk next dc, 5 dc in next ch2 sp, sk next dc, ch3) across, reducing fan size to begin tapering the pineapple toward the top.
Round 19 :
WS: Ch3, turn. Dc across, working dc into the ch3 arches (dc, ch1, dc) as established to maintain balance.
Round 20 :
RS: Ch4, turn. *Work (sk next dc, 3 dc in next ch2 sp, sk next dc, ch3) across. These smaller fans shape the pineapple crown base.
Round 21 :
WS: Ch3, turn. Dc across, placing dc into fan centers and ch3 arches as before. Keep your stitch count and spacing uniform.
Info :
Begin checking vertical repeat counts: Rounds 6-21 complete one vertical pineapple motif. Note where each pineapple column lines up with its neighbors—regular alignment means repeating the same sequence produces long rows of motifs in the runner.
Round 22 :
RS: Ch4, turn. *Sk next dc, dc into next dc, ch2, dc into next dc; rep across forming the small arch row that transitions into the crown. This compresses the motif gently.
Round 23 :
WS: Ch3, turn. Dc across row into each dc and into ch2 spaces as established. This evens the crown foundation.
Round 24 :
RS: Ch4, turn. *Work (dc, ch2, dc) into every third dc (center of the smaller fan clusters) and dc into remaining dc positions across. This begins forming the top closure of the pineapple.
Round 25 :
WS: Ch3, turn. Dc in each dc and chain space across. Keeping counts identical ensures motifs remain continuous along the runner.
Round 26 :
RS: Ch4, turn. *Sk next dc, sk next ch-space, dc in next dc, ch1, dc in next dc; rep across to tighten the pineapple top into small arches. This row narrows the top into a neat apex.
Round 27 :
WS: Ch3, turn. Dc into each stitch across, smoothing the apex line. This is the last even row before finishing the pineapple repeat.
Round 28 :
RS: Ch4, turn. *Work (dc into next dc, ch1, dc into next dc) over every apex pair to create a small shell ridge at the top of each pineapple; rep across. End with dc in turning ch.
Round 29 :
WS: Ch3, turn. Dc across in each stitch. This completes one full pineapple vertical repeat (Rounds 6-29). The stitch count remains steady and motifs stack cleanly when repeated along the length.
Info :
Repeat Rows 6-29 for the number of vertical motif repeats you desire down the length of the runner. In the photographed runner there are 6 full vertical repeats lengthwise; this pattern will list a standard 6-repeat length and then a border. To extend length, repeat Rounds 6-29 additional times to achieve desired final length.
— Main Panel Repeat (Make Repeats to Achieve Desired Length) :
Round 30-53 :
Repeat Rounds 6-29 sequentially twice more (this yields three vertical repeats so far). Work exactly as established to maintain motif alignment. Each full repeat set is 24 rows; repeating this set builds vertical length without altering width.
Info :
At the end of each vertical motif repeat set, check motif alignment across the width. You should see distinct pineapple columns; if they shift sideways, re-count foundation multiples and make adjustments before proceeding to the border rows.
Round 54-77 :
Repeat Rounds 6-29 again to create a total of 4 vertical repeats. For a runner the length pictured, plan to repeat the 24-row pineapple block 6 times total down the length. Continue repeating until your runner reaches the desired length, leaving 6-8 rows for a top border sequence.
Info :
At halfway through your repeats, measure the runner against your table to confirm length. This prevents overshooting your desired finished size and allows you to stop at a balanced final motif.
Round 78-101 :
Continue repeating Rounds 6-29 until you have completed 6 vertical pineapple repeats total (this pattern uses Rounds 6-29 x6). When finished, stop after a WS row (even numbered row) and prepare for the top border and scalloped edge.
Info :
If you are making a shorter runner, you can stop after 4 repeats for a table length of approx. 60-75 cm. For a dresser runner, 2-3 repeats may be sufficient. Always finish on a WS row before beginning edging so the scallops sit on the RS cleanly.
— Top Finishing Rows Before Border :
Round 102 :
RS: Ch3, turn. Dc across entire row into each dc and chain space to create a dense finishing row that will anchor the border. Keep counts aligned with foundation (97 positions).
Round 103 :
WS: Ch1, turn. Sc evenly across the row, placing 1 sc into each dc and chain-space across (97 sc). This tight single crochet row forms a stable base for the scalloped edging.
Info :
If your foundation seems slightly stretched, sc row is the time to gently ease any tension; sc pulls fabric in slightly and will flatten arching edges in preparation for scallops.
Round 104 :
RS: Ch3, turn. Dc into next 3 stitches, *skip 2 sc, 5 dc into next sc (scallop base), skip 2 sc, dc into next 3 sts; rep from * across. If needed, adjust by adding or removing a small dc pair at the start or end to keep scallops even across the width. End with dc in last st.
Round 105 :
WS: Ch1, turn. Sc across scallop bases: into each 5-dc group work 5 sc evenly across, and single crochet into the dc groups between scallops to stabilize. This firms the scallop before picots are added.
Info :
Scallop placement: The scallops are the prominent edge decoration visible in photos. Keep them symmetrical by ensuring the same number of stitches are worked in each scallop. If you see a smaller or larger scallop, unpick and re-space the scallops before proceeding.
— Picot Scallop Edge (Final Decorative Edge) :
Round 106 :
RS: Ch1, turn. *Into the next sc (center of scallop) work: sc, ch3, sl st in 3rd ch (picot), sc into same sc; then sc into next 2 sc between scallops; rep from * across. At each scallop tip make a picot cluster (this forms the little raised points visible along the runner edge).
Round 107 :
WS: Ch1, turn. Working from back, weave one sc evenly across the back loops only of the picot row to tidy and reinforce the edge. This keeps picots upright on the RS and creates a neat reverse finish.
Info :
For a deeper scallop, you can add a second round of 7-dc groups before adding picots. The photographed runner uses a single scallop round with picots for a clean, vintage look.
Round 108 :
RS: Ch1, turn. Sl st across to the edge and make a finishing border: *ch3, sc into base between scallops, rep from * across to create a small raised beaded edge. Fasten off and weave in ends securely. Block the runner to final measurements using pins and steam or wet blocking.
Info :
Blocking is essential: wet block or spray lightly and pin each scallop and pineapple point to create crisp lace geometry. Allow to dry completely before removing pins. The runner will flatten and open up significantly after blocking, revealing the fine pineapple lace.
— Alternative Edge Option (Optional More Decorative Border) :
Round 109 :
If you prefer the more ornate edge seen on some versions, after Round 103 (sc row) work: RS: Ch3, turn. *Sk next sc, 7 dc in next sc, sk next sc, ch5, sl st into base between scallops; rep across to create tall arches that will later be topped with layered picots and small shells for a lacy scallop. Continue with two additional stabilizing rows of dc and sc before adding picots as described earlier.
Info :
Use this option if you want a heavier, more dimensional border. It adds complexity but gives a dramatic finish. Ensure you have enough thread left before committing to this larger border.
— Final Finishing & Blocking :
Round 110 :
Weave all loose ends by threading the tail on a yarn needle and weaving through the nearest reverse stitches for several centimeters before trimming. Tuck ends into fabric rather than trimming flush to avoid unraveling.
Round 111 :
Soak runner in lukewarm water with a tiny amount of gentle detergent or snp (no harsh agitation), rinse, gently press out excess water by rolling in a towel. Pin to blocking surface stretching each scallop and pineapple point to desired shape. Allow to dry completely (12-24 hours depending on humidity).
Info :
For precise edges, use rust-proof pins and block each scallop individually. A spray starch finish (optional) will give a crisp look and preserve lace for display, but test on a scrap first.
— Sizing & Adjustments :
Round 112 :
To make the runner wider: increase the foundation chain by multiples of 12 (each extra 12 adds one pineapple column across). To make it longer: add more vertical repeats (R 6-29) as desired. Each vertical pineapple repeat equals 24 rows; plan accordingly for length and yarn usage.
Round 113 :
Estimate yarn usage: for the pictured runner with 6 vertical repeats and width multiple of 8 pineapple columns you will use approx. 400-500 g of size 10 cotton. Thicker yarn increases yarn consumption. Always have extra thread to finish the border consistently.
Info :
Keep a notebook to mark the number of motif repeats, especially if you are making multiple runners or matching pairs. This ensures uniformity between finished pieces.
Completing this elegant pineapple lace runner is a truly satisfying experience—every repeat builds a classic, heirloom-quality motif that looks spectacular when blocked. The delicate scalloped edge and neat pineapple columns create a timeless piece for dining, gift-giving or display. I love the way the white cotton catches late-afternoon light and the subtle shadows that define the lace. 🧶✨ A little patience and careful blocking reward you with a piece to cherish for years. Happy stitching! 🌿