🧶 Beautiful ✨ Detailed 💝 Adorable

ELENDAN mushroom with mouse Amigurumi Pattern

ELENDAN mushroom with mouse Amigurumi Pattern
4.7★ Rating
2-3 Hours Time Needed
2.0K Made This
✂️

Intermediate Level

Ideal for those with basic crochet experience, featuring slightly more advanced stitches and techniques to expand your skills.

⏱️

Bite-Sized Project

Finishes in 2-4 hours—perfect for an afternoon of creative relaxation.

🎁

Tiny Treasure

Small, sweet, and gift-worthy creations that fit perfectly in the palm of your hand with detailed charm.

About This ELENDAN mushroom with mouse Amigurumi Pattern

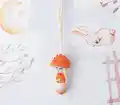
This pattern makes a tiny mushroom pendant with a small gnome/mouse tucked inside, ideal as a necklace or charming ornament. You will crochet the stem, cap (top and inner), and a small gnome body, then assemble and decorate as desired. The finished pendant is compact and designed to be crocheted tightly for structure.

ELENDAN mushroom with mouse Amigurumi Pattern crochet pattern - detailed view of completed project

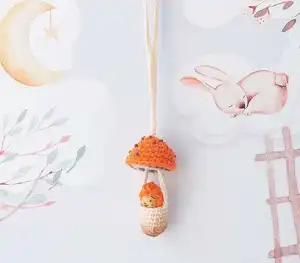
Detailed rounds and helpful photos guide you through every step, including optional bead or painted details. The pattern is perfect for making a small keepsake or gift that is quick to complete.

Why You'll Love This ELENDAN mushroom with mouse Amigurumi Pattern

I absolutely love this pattern because it turns simple stitches into a delightful miniature world you can wear or gift. I enjoy how fast it is to crochet yet how charming the finished pendant looks, making it a perfect last-minute handmade present. The design allows for lots of personalization — from paint and beads to tiny embroidered faces — so each piece feels unique. I also love the balance between technique and simplicity; it stretches your skills without being overwhelming.

ELENDAN mushroom with mouse Amigurumi Pattern step 1 - construction progress ELENDAN mushroom with mouse Amigurumi Pattern step 2 - assembly progress ELENDAN mushroom with mouse Amigurumi Pattern step 3 - details and accessories ELENDAN mushroom with mouse Amigurumi Pattern step 4 - final assembly and finishing

Switch Things Up

I love to switch up colors and textures to give each mushroom a new personality; try warm autumn tones or pastel shades for a softer look.

I sometimes replace the wooden bead with a small crocheted ball made in a contrasting color for a cohesive handmade finish.

To change the finished size, I experiment with different yarn weights and hooks — thicker yarn with a larger hook makes a chunkier pendant while thinner yarn makes a tiny charm.

I often add embroidery to the gnome's face instead of paint for a long-lasting, hand-sewn expression that is machine-wash friendly.

For extra durability I choose to make the cap dots from tiny crocheted circles and sew them on, rather than paint, so they remain textured and tactile.

I enjoy adding beads to the cap for a sparkling detail; if you do, attach them before assembling the inner cap for easier sewing.

If you want a posable look, try threading a thin wire through the stem chain before finishing to give a bit of structure for shaping.

I sometimes shorten or lengthen the hanging chain (ch 250 in the pattern) to turn the pendant into a keychain or a long necklace depending on my gift idea.

Try using variegated yarn for the cap to create a speckled, natural mushroom effect without extra embellishment.

I also make matching sets in coordinating colors — a mushroom pendant and a tiny matching gnome keyring — to create a cute gift pair that people love.

Common Mistakes & How to Fix Them

✗ Crocheting too loosely causes stuffing to show through and the pendant to lose shape; maintain rather tight tension throughout and use a slightly smaller hook if needed. ✗ Forgetting to use a marker when working spiral rounds makes it hard to find the row start; place a marker after finishing each row to see the beginning of the next row clearly. ✗ Not hiding tails and ends can make the inside bulky and visible; try to hide tails inside as you work and weave in ends neatly as instructed. ✗ Overstuffing the gnome or stem puckers the seams and distorts shape; stuff gradually and only enough to keep the shape firm and smooth. ✗ Skipping the step of turning the cap top inside out can make joining the inner part awkward; follow the instruction to turn the top part of cap inner side out before crocheting the inner part and joining.

ELENDAN mushroom with mouse Amigurumi Pattern

Create a tiny, whimsical mushroom pendant with a little gnome mouse tucked inside — perfect as a gift, charm, or wearable decoration. This pattern guides you through the stem, cap, and a tiny gnome using clear step-by-step rounds and helpful photos. You will learn tight amigurumi techniques and simple finishing tips to make a durable, adorable piece. Enjoy a sweet, portable project that adds handmade charm to your day.

Intermediate 2-3 Hours

Materials Needed for ELENDAN mushroom with mouse Amigurumi Pattern

— Main Fabric

  • 01
    100% cotton yarn 100g/200m (3.5 oz/218 yds) — this thickness corresponds yarn weight No2 — fine/DK yarn
  • 02
    Small amounts of yarn in main cap color (approx. 5-15g) and stem/color for gnome (approx. 5-10g) — choose colors as desired
  • 03
    Wooden bead for gnome’s head 10-14 mm (or crochet ball made from same yarn)
  • 04
    Piece of toy filler (polyester stuffing)
  • 05
    Contrast thread for marker (small piece)

— Tools Required

  • 01
    Crochet hook 1.75 mm (US steel/thread hook 4 or UK steel/thread hook 2)
  • 02
    Scissors
  • 03
    Wooden bead for gnome's head (10-14 mm) or small crocheted bead
  • 04
    Needle for yarn (usually tapestry needle with wide enough eye)
  • 05
    Piece of toy filler (polyester stuffing)
  • 06
    Tools for decor: textile markers or acrylic paints with brush, pastels to tint stem, beads, sewing thread in matching colors with suitable needle
  • 07
    Piece of thread in contrast color as a marker (or other markers of rows)

Progress Tracker

0% Complete

— Terms & abbreviations :

Infos :

approx. - approximately. ch - chain. sl st – slip stitch. sc – single crochet = UK double crochet. dc – double crochet = UK treble crochet. inc – increase with single crochet. dec – decrease with single crochet. dc inc – increase with double crochet. (6) – number in brackets means total single crochet amount in a row (slip stitches, chains not included).

— Materials :

Info :

Note! You may choose thicker or thinner yarn and suitable hook to obtain the toys bigger or smaller than mine. Just remember, that crocheting must be rather tight, otherwise the mushroom won't keep solid and straight. With suggested materials finished mushroom pendant size is approx. 2" height (4.5 x 4 cm), gnome is approx. 1.75" height (3.5 cm).

Materials list :

1. 100% cotton yarn 100g/200m (3.5 oz/218 yds – this thickness corresponds yarn weight №2 – fine/DK yarn); 2. 1.75 mm crochet hook (US steel/thread hook 4 or UK steel/thread hook 2); 3. Scissors; 4. Wooden bead for gnome’s head (10-14 mm) (wooden bead may be replaced with crochet ball, see details in chapter “Gnome”); 5. Needle for yarn (usually tapestry needle with wide enough eye); 6. Piece of toys filler; 7. Tools for decor: textile markers or acrylic paints with brush to paint the gnome’s face or dots on mushroom’s cap, pastels to tint stem, beads, sewing thread in matching colors with suitable needle etc.; 8. Piece of thread in contrast color as a marker (or other markers of rows).

— MUSHROOM pendant :

Info :

Work in spiral rows (rounds). Use marker after finishing each row to see the beginning of next row if needed.

STEM :

Make a magic loop (adjustable ring) or ch 2, insert hook into 1-st ch.

Row 1 :

sc 6 (6) (try to hide the tail of yarn inside while crocheting);

Row 2 :

inc 6 (12);

Row 3 :

[inc, sc 2] x 4 (16);

Rows 4-8 :

sc in each stitch (16), ch 250 (this would be approx. 65 cm strand to hang on neck as a necklace; you may ch as many as you wish), sl st into sc 7 of last row (into the middle of last row), fasten off, weave in the tail.

— CAP :

Top part :

Make a magic loop (adjustable ring) or ch 2, insert hook into 1-st ch.

Row 1 :

sc 6 (6) (try to hide the tail of yarn inside while crocheting);

Row 2 :

inc 6 (12);

Row 3 :

[inc, sc 2] x 4 (16);

Row 4 :

into front loop only [inc, sc 3] x 4 (20);

Row 5 :

[inc, sc 4] x 4 (24);

Rows 6-7 :

sc in each stitch (24), fasten off, weave in the tail. If you wish to sew the beads to the cap top, it would be more comfortable to make it before next step.

Inner part :

Turn the top part of cap inner side out.

Row 1 :

sc into each back loop of top part row 3 (16);

Row 2 :

sc in each stitch (16);

Row 3 :

[dc inc, dc 3] x 4 (20), fasten off, weave in the tail.

Info :

Pull the stem chain through the center of cap (I use thick hook for this purpose).

— GNOME :

Info :

Make a magic loop (adjustable ring) or ch 2, insert hook into 1-st ch.

Row 1 :

sc 6 (6);

Row 2 :

[inc, sc] x 3 (9);

Rows 3-5 :

sc into each stitch (9);

Rows 6-8 :

ch 1, turn, sc 6 (6); stuff it. Fold the borders.

Row 9 :

sl st 3 through both borders. Fasten off, leaving long tail to sew the bead *. Pull the tail with a needle through the bead as showed and fix it. To make a quiff I let small tail of yarn left after sewing the bead remain on the outside ☺ Otherwise just hide the tail inside. Make face features with textile marker/ acrylic paint (I sometimes prefer to paint the face before sewing not to spoil the yarn around with paint).

Info :

*wooden bead may be replaced with crochet ball in suitable color of same yarn and hook: Crochet inner side out.

Row 1 (bead) :

sc 6 in a magic ring (6);

Row 2 (bead) :

sc into each stitch (6);

Row 3 (bead) :

dec 3 (3). Fasten off, hide the tail inside. You may embroider face with sewing thread (for me it’s easier to make a face after joining with body).

— DECORATION :

Info :

You may decorate mushroom with pastels / acrylic paints / textile markers. For example, tint the stem in the bottom. Sew beads or make paint dots on the cap. You may also crochet small white circles and sew them to it (honestly, I prefer quicker decor techniques :-P). Maybe you’d also like to embroider it.

Assembly Instructions

  • Pull the stem chain through the center of the cap and position the cap layers so the inner part sits inside the top part, then adjust and secure the chain so the cap hangs evenly.
  • If using beads on the cap top, sew them to the cap before stitching the inner part in place, as it is more comfortable to attach beads at that stage.
  • Insert the wooden bead (or small crocheted bead) into the gnome body opening, pull the long tail through the bead with a needle and secure it; leave a small tail outside if you want a quiff or hide it inside for a smooth finish.
  • Stuff the gnome lightly before folding the borders, then sl st 3 through both borders to close; fasten off leaving a tail for sewing the gnome into the stem pouch.
  • Attach the finished gnome into the stem pouch and close the pouch opening by slip stitching into the target stitch (sl st into sc 7 of last stem row) then weave in all ends neatly.

Important Notes

  • 💡Work with a rather tight tension so the mushroom keeps solid and straight; loose stitches will reveal stuffing and reduce stability.
  • 💡Use a stitch marker after finishing each row to identify the beginning of the next round when working in spirals.
  • 💡Hide tails of yarn inside while crocheting where possible to reduce bulk and keep the inside neat; weave in ends securely after finishing.
  • 💡Stuff the gnome gradually and not too firmly to avoid distorting the shape; fold borders carefully before closing.
  • 💡If you plan to sew beads to the cap, attach them before assembling the inner cap for easier handling and more comfortable sewing.

This tiny mushroom pendant with its sweet gnome mouse is a delightful little project that fits perfectly as a gift or wearable charm. The pattern blends quick crochet rounds with charming finishing touches to create a memorable handmade piece. Whether you paint, bead, or embroider the details, it will bring tiny moments of joy and whimsy to your day. 🧶✨

You ask,

we answer.

FAQs

What size will the finished piece be?

The finished mushroom pendant is approximately 2" in height (4.5 x 4 cm) and the gnome is approximately 1.75" (3.5 cm) when using the recommended materials.

Can I use different yarn weights for this pattern?

Yes, you can use thicker or thinner yarn and an appropriate hook to change the finished size, but be sure to crochet rather tightly to maintain structure.

Do I need experience with amigurumi to make this pendant?

This pattern is rated intermediate and assumes familiarity with basic crochet stitches such as single crochet, increases, decreases, working in the round, and reading short round sequences.

How long does this project typically take to complete?

Most crafters finish this bite-sized project in about 2-3 hours, depending on experience and how much time you spend on decoration and finishing touches.