🧢 Beautiful ✨ Detailed πŸ’ Adorable

Elephant Amigurumi Pattern

Elephant Amigurumi Pattern
4.5β˜… Rating
5-7 Hours Time Needed
2.6K Made This
βœ‚οΈ

Intermediate Level

Ideal for those with basic crochet experience, featuring slightly more advanced stitches and techniques to expand your skills.

⏱️

Weekend Treat

Takes 5-7 hours, making it an enjoyable project to finish over a couple of days.

🧸

Cute Companion

An adorable friend to cherish, handcrafted with love to bring comfort and joy for years to come.

About This Elephant Amigurumi Pattern

This pattern guides you through making a sweet elephant amigurumi with a round body, expressive trunk and cute ears. It includes photo references and step-by-step round instructions for every part. You will learn to shape the head and body, attach limbs, and add finishing details like the embroidered stomach and scarf.

Elephant Amigurumi Pattern crochet pattern - detailed view of completed project

Designed for intermediate crocheters, the pattern uses single crochet shaping and basic increases/decreases. Clear joining instructions help you assemble the toy with a professional finish.

Why You'll Love This Elephant Amigurumi Pattern

I absolutely love this pattern because it combines simple amigurumi shaping with playful details like the embroidered tummy and curled trunk. I enjoyed testing the proportions until the elephant had a gentle, friendly expression that I adored. I appreciate how the step-by-step rounds make the construction predictable and satisfying. I hope you feel the same joy making and gifting this little companion.

Elephant Amigurumi Pattern step 1 - construction progress Elephant Amigurumi Pattern step 2 - assembly progress Elephant Amigurumi Pattern step 3 - details and accessories Elephant Amigurumi Pattern step 4 - final assembly and finishing

Switch Things Up

I love changing up colors to personalize each elephant; try soft pastels for a baby-themed toy or bright contrast colors for a playful look.

I sometimes make mini versions by using thinner yarn and a smaller hook to create keychain-sized elephants.

I also enjoy making chunky, squishy elephants by using a bulkier yarn and a larger hook for a cuddly version.

I often swap the embroidered tummy for a felt applique or a tiny pocket to add a functional detail.

I like to experiment with eye types: safety eyes for durability or embroidered eyes for a totally baby-safe toy.

I sometimes add wire in the trunk or limbs for posability, which lets me pose the elephant in cute stances.

I add tiny crocheted accessories like a bow, hat, or blanket to give each elephant a unique personality.

I recommend trying different stitch textures on the body, like alternating BLO rounds, to create subtle stripes or ribbing.

I often adjust limb placement slightly to change the sitting posture and make the elephant more dynamic.

I enjoy creating small matching sets β€” a tiny elephant with a mini blanket or scarf makes a lovely gift set that feels handmade and special.

Common Mistakes & How to Fix Them

βœ— Skipping stitch markers during rounds can cause you to lose the start of each round; place a marker at the first stitch of every round and move it as you go. βœ— Not stuffing gradually makes shaping difficult and lumpy; stuff in small amounts and shape as you crochet to maintain smooth curves. βœ— Forgetting to install safety eyes at the correct rounds will misplace facial features; install the eyes between rounds 19-20 with 11 stitches between them as instructed. βœ— Pulling yarn too tight when joining parts creates puckering and poor joins; use even tension and pin pieces in place before sewing to ensure smooth seams.

Elephant Amigurumi Pattern

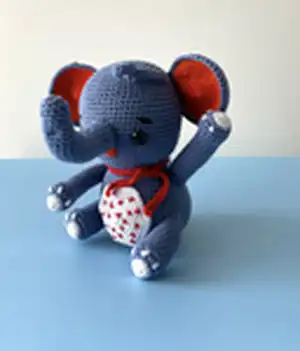
Create a charming handmade elephant with this clear, photo-assisted crochet pattern. You will enjoy shaping the head, trunk, ears and limbs while learning helpful assembly tips. The pattern includes full round-by-round instructions and a materials list so you can start right away. Perfect as a gift or a sweet nursery companion.

Intermediate 5-7 Hours

Materials Needed for Elephant Amigurumi Pattern

β€” Main Fabric

  • 01
    Yarn suitable for 2.5 mm hook - Main Color: Dark Blue
  • 02
    Color A: White - for stomach and toes
  • 03
    Color B: Orange - for ear interior
  • 04
    Color C: Red - for scarf and embroidery

β€” Tools Required

  • 01
    Crochet hook size 2.5 mm (or size that fits your yarn)
  • 02
    Safety eyes (2 pieces)
  • 03
    Scissors
  • 04
    Polyester stuffing
  • 05
    Tapestry/yarn needle for sewing
  • 06
    Stitch marker
  • 07
    Pins for assembly

Progress Tracker

0% Complete

β€” Head & Body :

Round 1-8 :

Rnd 1-8 sc in a mr

Round 2-8 :

Rnd 2-8 sc inc(16)

Round 3 :

Rnd 3-(8 times)1 sc into sc next inc(24)

Round 4 :

Rnd 4-(8 times)2 sc into sc next inc(32)

Round 5 :

Rnd 5-(8 times)3 sc into sc next inc(40)

Round 6 :

Rnd 6-(8 times)4 sc into sc next inc(48)

Round 7 :

Rnd 7-(8 times)5 sc into sc next inc(56)

Round 8-10 :

Rnd 8-10 ch turn 10 ch into hdc 1sc into sc again 10 ch.Ch into hdc sc into sc(56)

Round 9 :

Rnd 9- Leave strands of hair out. go on. sc into sc (56)

Round 10-12 :

Rnd 10-12-(3 ring)sc into sc(56)

Round 13 :

Rnd 13-(8 times)6 sc into sc next inc(64)

Round 14-21 :

Rnd 14-21-(8 ring)sc into sc(64)

Info :

Install the safety eyes between rnd 19-20. there should be 11 sc between them

Round 22 :

Rnd 22-(8 times)6 sc into sc next dec(56)

Round 23 :

Rnd 23-sc into sc(56)

Round 24 :

Rnd 24-(8 times)5 sc into sc next dec(48)

Round 25 :

Rnd 25-sc into sc(48)

Round 26 :

Rnd 26-(8 times)4 sc into sc next dec(40)

Round 27 :

Rnd 27-sc into sc(40)

Round 28 :

Rnd 28-(8 times)3 sc into sc next dec(32)

Round 29-31 :

Rnd 29-31-(3 ring)sc into sc(32)

Info :

Tightly fill the head

Round 32 :

Rnd 32-(8 times)3 sc into sc next inc(40)

Round 33 :

Rnd 33-sc into sc(40)

Round 34 :

Rnd 34-(8 times)4 sc into sc next inc(48)

Round 35 :

Rnd 35-(8 times)5 sc into sc next inc(56)

Round 36-39 :

Rnd 36-39-(4 ring)sc into sc(56)

Round 40 :

Rnd 40-(8 times)6 sc into sc next inc(64)

Round 41-49 :

Rnd 41-49-(9 ring)sc into sc(64)

Round 50 :

Rnd 50-in flo sc into sc(64)Tightly fill the body

Round 51 :

Rnd 51-(8 times)6 sc into sc next dec(56)

Round 52 :

Rnd 52-(8 times)5 sc into sc next dec(48)

Round 53 :

Rnd 53-(8 times)4 sc into sc next dec(40)

Round 54 :

Rnd 54-(8 times)3 sc into sc next dec(32)

Round 55 :

Rnd 55-(8 times)2 sc into sc next dec(24)

Round 56 :

Rnd 56-(8 times)1 sc into sc next dec(16)

Round 57 :

Rnd 57-(8 times)1 sc into sc next dec(8)

Round 58 :

Rnd 58-(8 times)1 sc into sc next dec(4)fo.

β€” Arms :

Info :

MAKE 2 - A COLOR

Round 1-6 :

Rnd 1-6 sc in a mr-

Round 2-6 :

Rnd 2-6 sc inc(12)

Info :

MAIN COLOR

Round 3-4 :

Rnd 3-4 sc into sc(4 sc inc)4 sc into sc(16)

Round 4-6 :

Rnd 4-6-(3 ring)sc into sc(16)

Round 7 :

Rnd 7-4 sc into sc(4 sc dec)4 sc into sc(12)

Info :

Fill sleeves keep filling as you go

Round 8-27 :

Rnd 8-27-(19 ring)sc into sc(12)

Round 28 :

Rnd 28-Straighten it. sink the needle into both layers. 6 sc fo. Leave a long thread to sew on.

Info :

Do it by sewing the paws. Repeat the stitch 3 times.

β€” Legs :

Info :

MAKE 2 - A COLOR

Round 1-6 :

Rnd 1-6 sc in a mr

Round 2-6 :

Rnd 2-6 sc inc(12) Ana color

Round 3-4 :

Rnd 3-4 sc into sc(4 sc inc)4 sc into sc(16)

Round 4-6 :

Rnd 4-6 sc into sc(4 sc inc)6 sc into sc(20)

Round 5 :

Rnd 5-sc into sc(20)

Round 6 :

Rnd 6-6 sc into sc(4 sc dec)6 sc into sc(16)

Round 7-16 :

Rnd 7-16-(10 ring)sc into sc(16)

Round 17 :

Rnd 17-Straighten it. sink the needle into both layers. (8 sc)fo.

Info :

Leave a long thread to sew on.

β€” Ears :

Info :

MAKE 4 - MAIN COLOR 2 - B COLOR 2

Round 1-6 :

Rnd 1-6 sc in a mr

Round 2 :

Rnd 2-6 sc inc(12)

Round 3 :

Rnd 3-(6 times)1 sc into sc next inc(18)

Round 4 :

Rnd 4-(6 times)2 sc into sc next inc(24)

Round 5 :

Rnd 5-(6 times)3 sc into sc next inc(30)

Round 6 :

Rnd 6-(6 times)4 sc into sc next inc(36)

Round 7 :

Rnd 7-(6 times)5 sc into sc next inc(42)

Round 8-9 :

Rnd 8-9(2 ring)sc into sc (42)

Round 10 :

Rnd 10-Combine the main color and A color ears. Knit the edge with the main color yarn. sc into sc(42)fo. a long thread for sewing leave it.

β€” Trunk :

Info :

MAIN COLOR

Round 1-6 :

Rnd 1-6 sc in a mr

Round 2 :

Rnd 2-(4 times)sc inc(10)

Round 3-12 :

Rnd 3-12-(10 ring)sc into sc(10)

Round 13 :

Rnd 13-(2 times) sc inc(12) Fill the elephant's trunk. Keep filling as you go.

Round 14-23 :

Rnd 14-23-(10 ring)sc into sc(12)

Round 24 :

Rnd 24-(2 times) sc inc(14)

Round 25-31 :

Rnd 25-31-(7 ring) sc into sc(14)fo.Leave a long thread to sew on.

β€” Stomach :

Info :

A COLOR

Round 1-6 :

Rnd 1-6 sc in a mr

Round 2-6 :

Rnd 2-6 sc inc(12)

Round 3 :

Rnd 3-(6 times)1 sc into sc next inc(18)

Round 4 :

Rnd 4-(6 times)2 sc into sc next inc(24)

Round 5 :

Rnd 5-(6 times)3 sc into sc next inc(30)

Round 6 :

Rnd 6-(6 times)4 sc into sc next inc(36)

Round 7 :

Rnd 7-(6 times)5 sc into sc next inc(42)

Round 8 :

Rnd 8-(6 times)6 sc into sc next inc(48)fo.Leave a long thread to sew on.

β€” Tail :

Info :

A COLOR

Round 1-6 :

Rnd 1-6 sc in a mr

Round 2 :

Rnd 2-2 sc inc(8)

Info :

Ana color

Round 3 :

Rnd 3-(4 times)1 sc into sc next inc(12)

Round 4-8 :

Rnd 4-8-(5 ring)sc into sc(12)

Round 9 :

Rnd 9-2 sc dec(10)Fill the tail. keep filling as you go

Round 10-23 :

Rnd 10-23-(14 ring)sc into sc(10)

Round 24 :

Rnd 24-Straighten it. sink the needle into both layers 5 sc fo. Leave a long thread to sew on.

β€” Scarf :

Round 1 :

Rnd 1-80 ch.

Round 2 :

Rnd 2-80 ch into sc(80 sc)fo.

β€” Joining Parts :

Info :

Sew the ears on both sides between Rnd 10-17. There should be 18 sc between them.

Info :

Sleeves- Sew between first sleeve rnd 37-42. Lift second arm up and sew between rnd 37-42.

Info :

Sew the legs on both sides between rnd 44-51.

Info :

Sew the hose in the middle of the two eyes between rnd 15-20.

Info :

Mark the middle of the body with the tail back. Sew between rnd 48-51.

Assembly Instructions

  • Sew the ears on both sides between Rnd 10-17, leaving 18 single crochet stitches between them for proper spacing.
  • Attach the sleeves by sewing between the first sleeve rounds 37-42; lift the second arm and sew between rounds 37-42 for a natural pose.
  • Sew the legs on both sides between rounds 44-51, spacing them evenly and securing firmly so the toy sits upright.
  • Position and sew the trunk (hose) in the middle between the two eyes between rounds 15-20, ensuring it is centered and secure.
  • Mark the middle of the body using the tail as a reference and sew the tail between rounds 48-51 to locate the midpoint accurately.

Important Notes

  • πŸ’‘Use stitch markers to mark the beginning of each round and to keep track of decreases and increases for accurate shaping.
  • πŸ’‘Stuff parts gradually and evenly; overstuffing can distort the shape while understuffing will make parts floppy.
  • πŸ’‘Pin pieces in place before sewing to ensure correct alignment and symmetry, especially for ears and limbs.
  • πŸ’‘Weave in ends as you go to avoid a long finishing session and to secure color changes neatly.

This adorable elephant amigurumi brings a touch of handmade charm to any nursery or shelf. The pattern includes full round-by-round instructions, photos and joining tips for a neat finish. Make one in your favorite colors and share the love! πŸ§ΆπŸ˜πŸ’™

You ask,

we answer.

FAQs

What size will the finished piece be?

The finished amigurumi measures around 20 cm in circumference and about 10 cm in length using the recommended yarn and 2.5 mm hook.

Can I use a different hook size or yarn weight?

Yes, you can change yarn weight and hook size, but the finished size will change; choose an appropriate hook for your yarn and expect adjustments to stuffing and proportions.

Do I need safety eyes and when are they installed?

Safety eyes are recommended and should be installed between rounds 19-20 with 11 single crochets between them for correct placement.

How long does this project typically take to complete?

Most makers finish this project in 5-7 hours depending on experience and assembly speed.

Is this pattern suitable for beginners?

This pattern is rated intermediate because it involves shaping, joining multiple parts and basic embroidery for details; beginner crocheters with patience can try it.