🧢 Beautiful ✨ Detailed πŸ’ Adorable

Elloth Granny Square Pattern

Elloth Granny Square Pattern
4.6β˜… Rating
2-3 Hours Time Needed
1.4K Made This
βœ‚οΈ

Intermediate Level

Ideal for those with basic crochet experience, featuring slightly more advanced stitches and techniques to expand your skills.

⏱️

Bite-Sized Project

Finishes in 2-4 hoursβ€”perfect for an afternoon of creative relaxation.

🏑

Cozy Accent

A warm touch for your space that transforms ordinary corners into inviting nooks filled with handmade charm.

About This Elloth Granny Square Pattern

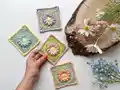
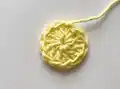
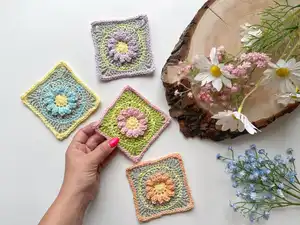
This photo tutorial teaches you how to crochet the Elloth Granny Square, a pretty floral motif that finishes to about 4 x 4 inches. The pattern uses three colors to create a small flower center and rounds out into a square with clean corners. Detailed step-by-step photos accompany each round so you can follow along with confidence.

Elloth Granny Square Pattern crochet pattern - detailed view of completed project

Youll learn popcorn stitches, standing stitches, and simple corner shaping for a tidy edge. Perfect for coasters, motif blankets, or quick gift projects.

Why You'll Love This Elloth Granny Square Pattern

I absolutely love this pattern because it blends a classic granny-square shape with a delightful flower center that really pops. I enjoy how quickly one square comes together, making it so satisfying to complete and easy to produce multiples. The photo tutorial format means I can show each tricky step clearly, especially the popcorns and standing stitches, so other crocheters can follow along easily. It warms my heart to see bright color combinations transform into a cohesive little motif.

Elloth Granny Square Pattern step 1 - construction progress Elloth Granny Square Pattern step 2 - assembly progress Elloth Granny Square Pattern step 3 - details and accessories Elloth Granny Square Pattern step 4 - final assembly and finishing

Switch Things Up

I love to change up the colors in this pattern; try soft pastels for a vintage vibe or bright contrasting tones for a modern look.

For a larger motif, I switch to a sport or worsted weight yarn and increase hook size; this gives a chunkier square perfect for blankets.

I sometimes swap the popcorn round for a puff stitch to create a different textured flower center that still reads as a petal motif.

Want smaller squares? Use a DK or fingering weight yarn with a smaller hook and you get cute mini motifs for keychains or garlands.

I often add a thin contrasting edgingsuch as reverse single crochet or picotto give a refined finish and a pop of color around the square.

Try joining squares with an invisible join or whipstitch to change the overall look of your finished blanket or project; the joining method matters for the final drape.

I sometimes embroider a small centre dot or add a tiny bead to the middle of the flower for a subtle decorative detail.

For coasters, I add a very thin layer of felt underneath and slipstitch around the edge to tuck and secure the felt for longevity and absorbency.

I like to experiment with yarn fibers too: cotton gives crisp stitches and great blocking; acrylic yields a softer, more forgiving square for everyday use.

Dont be afraid to mix in novelty yarns for one round only to add shimmer or texture; just keep the rest of the rounds in a plainer yarn for balance.

If youre planning a large project, I recommend making a few sample squares and blocking them so you can decide on color placement and joining style before committing to the whole piece.

Common Mistakes & How to Fix Them

βœ— Not counting stitches after each round can throw off your corner placement; always count your stitches at the end of each round to ensure you have the correct totals. βœ— Joining a new color insecurely can create gaps or uneven tension; use a secure join (standing stitch or tidy slip stitch) and weave in tails as you go to prevent gaps. βœ— Skipping the blocking step leaves edges wavy and uneven; block each finished square to even out stitches and shape crisp corners for neat joins. βœ— Placing corners incorrectly by missing the hidden stitch under the corner makes the edge look lopsided; remember to look for the hidden stitch (the first stitch of the previous round) when placing corner groups.

Elloth Granny Square Pattern

Make charming floral granny squares with this clear photo tutorial designed to guide you step-by-step. Youll work from the center flower out to a neat square edge using three colors of Paintbox Cotton DK. Perfect for creating coasters, motifs for blankets, or little decorative squares you can mix and match.

Intermediate 2-3 Hours

Materials Needed for Elloth Granny Square Pattern

β€” Main Fabric

  • 01
    Paintbox Yarns Cotton DK (DK-weight) - small amounts in 3 colors (Daffodil Yellow - C1, Peach Orange - C2, Pistachio Green - C3), total about 8 grams for the sample square
  • 02
    Alternate DK-weight cotton or similar yarn suitable for 3.75 mm hook - adjust quantities if making many squares

β€” Tools Required

  • 01
    Crochet hook size 3.75 mm (F) (pattern sample used Furls White + Rose Gold Odyssey)
  • 02
    Yarn needle for weaving in ends
  • 03
    Scissors
  • 04
    Stitch markers (optional)
  • 05
    Blocking pins and a blocking mat (blocking is essential to even out the stitches and make edges straight)

Progress Tracker

0% Complete

β€” Instructions :

Info :

To start: with C1 (Daffodil Yellow) MR

Round 1 :

CH 1, 12 DC into the ring, join with a SLST to first DC Fasten off. (12 DC)

Round 2 :

Join C2 (Peach Orange) to any DC of last round CH 1, 1 Popcorn ST in same ST, (Alternatively, you can join with a standing DC and make your first Popcorn stitch that way)(Pic 1), CH 2, [1 Popcorn ST in next ST, CH 2] 11 times (Pic 2-3), join with a SLST to first Popcorn ST Fasten off. (12 Popcorn STS, 12 x CH 2 SP)

Round 3 :

Join C3 (Pistachio Green) with a standing DC (video help of how to make a standing double crochet: https://youtu.be/mE51DQl8TpY) to any CH 2 SP of last round (Pic 1), 2 DC in same SP (Pic 2), SK next ST (Popcorn ST), [3 DC in next CH 2 SP (Pic 3), SK next ST (Popcorn ST)] 11 times, join with a SLST to first DC (Pic 4) Fasten off. (36 DC)

Round 4 :

Join C1 (Daffodil Yellow) with a standing SC (video help of how to make a standing single crochet: https://youtu.be/U8_NjvR30vs) to any SP between the 3 DC groups (Pic 1), 1 SC in next 3 STS (Pic 2)(note: the SC between the 3 DC groups might hide the first ST), [1 SC in SP between the 3 DC groups (Pic 3), 1 SC in next 3 STS (Pic 4)] 11 times, join with a SLST to first SC (Pic 5) Fasten off. (48 SC)

Round 5 :

Join C3 (Pistachio Green) with a standing TR (video help of how to make a standing treble crochet: https://youtu.be/Trl1JMxcv94) to any SC between the 3 DC groups, CH 2, 2 TR in same ST (corner) (Pic 1), 1 DC in next 2 STS (Pic 2), 1 HDC in next 2 STS (Pic 3), 1 SC in next 3 STS (Pic 4), 1 HDC in next 2 STS (Pic 5), 1 DC in next 2 STS (Pic 6), [{2 TR, CH 2, 2 TR} in next ST (corner) (Pic 7), 1 DC in next 2 STS, 1 HDC in next 2 STS, 1 SC in next 3 STS, 1 HDC in next 2 STS, 1 DC in next 2 STS] 3 times, 1 TR in first corner (Pic 8), join with a SLST to first TR (Pic 9) Fasten off. (12 SC, 16 HDC, 16 DC, 16 TR, 4 x CH 2 SP)

Round 6 :

Join C2 (Peach Orange) with a standing SC to any CH 2 SP, 1 SC, CH 2, 2 SC in same SP (corner)(Pic 1), 1 SC in each ST on side (Pic 2), [{2 SC, CH 2, 2 SC} in CH 2 SP (corner)(Pic 3), 1 SC in each ST on side] 3 times, join with a SLST to first SC (Pic 4) Fasten off, weave in all ends, block the finished square. (76 SC, 4 x CH 2 SP)

Assembly Instructions

  • Fasten off after Round 6, weave in all ends neatly using a yarn needle, and trim any excess tails close to the work.
  • Block the finished square flat using blocking pins and a blocking mat to even out the stitches and square the corners for neat joining later.
  • When working on corners and joining squares later, remember there may be a hidden stitch under the corner stitches (the first stitch of the previous round); check for this hidden stitch for correct placement.
  • Use stitch markers if desired to mark the start of rounds or corner positions while assembling multiple squares to keep placement consistent.

Important Notes

  • πŸ’‘Slip stitches do not count as stitches.
  • πŸ’‘CH 1 does not count as a stitch, unless stated otherwise.
  • πŸ’‘US terms are used throughout the pattern.
  • πŸ’‘At the end of every round there is a note with the stitch count so you can keep track of your work easily.
  • πŸ’‘When working on the corners, always remember that there might be a hidden stitch hiding under the corner stitches which is the first stitch of the previous row.

This charming Elloth Granny Square pattern brings a sunny floral motif to life with three simple colors and step-by-step photos. Perfect for quick projects, coasters, or a modular blanket you can personalize in endless colorways. Block each square for crisp corners and professional results. 🧢🌸

You ask,

we answer.

FAQs

What size will the finished piece be?

The finished square measures approximately 4 x 4 inches / 10 x 10 cm using Paintbox Cotton DK and a 3.75 mm hook.

Can I use different yarn weights for this pattern?

Yes, you can use different yarn weights, but this will change the final size; choose an appropriate hook for your yarn and remember to block accordingly.

Do I need prior crochet experience for this pattern?

This pattern is rated intermediate; basic knowledge of DC, SC, HDC, TR and how to make popcorn stitches and standing stitches will make it easier to follow.

How long does this project typically take to complete?

Most crocheters finish one square in about 2-3 hours, depending on experience and how often you reference the photo tutorial.