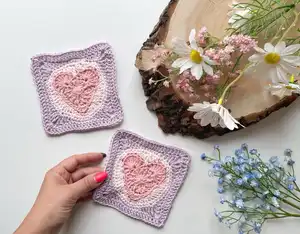
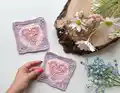
Make a sweet heart-centered granny square with this photo tutorial. Youll follow clear step-by-step photos and concise instructions to crochet a delicate heart in the centre, then build a soft square border. This pattern is perfect for using small amounts of Cotton DK and creating gift-ready squares for coasters, blankets, or decorative projects. Enjoy a relaxing, creative make with charming results.
Progress Tracker
0% Complete
— Materials :
Info :
3.75 mm (F) size hook (I used Furls White + Rose Gold Odyssey). Paintbox Yarns Cotton DK in 3 different colors-a total of 10 grams (Blush Pink-C1, Candyfloss Pink-C2, Dusty Rose-C3) or any other yarn suitable. Yarn needle for weaving in ends. Scissors. Stitch markers. NOTE: Blocking is essential to even out the stitches and make sure your edges are straight.
— Stitches Used and Abbreviations :
Infos :
MR = magic ring. CH = chain. SK = skip. ST/STS= stitch/ stitches. SLST = slip stitch. SC = single crochet. SCBLO = single crochet back loop only. HDC = half double crochet. HDCBLO = half double crochet back loop only. DC = double crochet. DCBLO = double crochet back loop only. FPDC = front post double crochet. ExtDC = extended double crochet. TR = treble crochet. { }=indicates how many stitches go into the same stitch or used to repeat a small set of instructions between these brackets the number of times given. [ ] = used to repeat a longer set of instructions between these brackets, the number of times given.
— Special Stitches :
Infos :
Front Post Double Crochet (FPDC): Yarn over, insert your hook from front to back around the post of given stitch, from right to left, yarn over and finish your double crochet as usual. Extended Double Crochet (ExtDC): Yarn over, insert your hook into given stitch, yarn over, pull through 1 loop, yarn over, pull through 2 loops, yarn over, pull through 2 loops.
— Gauge :
Info :
not critical for this project but may affect the yarn quantities required
— Additional notes :
Infos :
Slip stitches do not count as stitches. CH 1 and CH 2 does not count as a stitch, unless stated otherwise. US terms used throughout. At the end of every round, there’s going to be a note with the stitch count, so you can keep track of your work easily and avoid any mistakes. It’s written in a different color, in bold. When working on the corners, always remember that there might be a hidden stitch hiding under the corner stitches which is the first stitch of the previous row. Notes are written in a different color in (brackets) to help you through the pattern. A FULL VIDEO TUTORIAL IS AVAILABLE HERE: https://youtu.be/GSSdeLnLbN8
— Instructions :
Info :
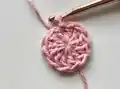
To start: with C1 (Blush Pink) MR
Round 1 :
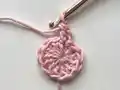
CH 1, 12 DC into the ring, then tighten it, join with a SLST to first DC (12 DC)
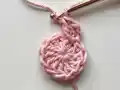
Round 2 :
CH 2 (doesn't count as a ST), 1 DC in same ST (Pic 1), 1 FPDC around the same ST you just put a DC into (Pic 2), [1 DC in next ST (note: the FPDC might hide the next ST you have to work into) (Pic 3), 1 FPDC around same ST (Pic 4)] 11 times, join with a SLST to first DC (Pic 5) (12 FPDC, 12 DC)
Round 3 :
CH 1, 1 SC in same ST (Pic 1), SK 2 STS, 9 TR in next ST (FPDC) (Pic 2), SK 2 STS, 1 SC in next ST (Pic 3), SK 2 STS, 9 TR in next ST (FPDC) (Pic 4), SK 2 STS, 1 SC in next 6 STS (Pic 5), {2 HDC, 1 DC, 2 HDC} in next ST (Pic 6), 1 SC in next 5 STS (Pic 7), join with an invisible join to first SC (video help of how to do the invisible join: https://youtu.be/k6T05vEpo-s) or alternatively you can join with a SLST to first SC (Pic 8). Fasten off. (13 SC, 4 HDC, 1 DC, 18 TR)
Round 4 :
Join C2 (Candyfloss Pink) with a standing DC (video help of how to make a standing double crochet: https://youtu.be/mE51DQl8TpY) to the BLO of last TR on the right (Pic 1) (note: if you are left handed, start in the BLO of last TR on the left), 1 DCBLO in same ST (Pic 2), 1 ExtDC into the DC ST from Round 2 (It has a SC in it already, you just have to work over it) (Pic 3), 2 DCBLO in next ST (Pic 4), 1 HDCBLO in next ST (Pic 5), 2 SCBLO in next ST (Pic 6), {1 SCBLO in next ST, 2 SCBLO in next ST} twice (Pic 7), 1 HDCBLO in next ST (Pic 8), 2 DCBLO in next ST (Pic 9), {1 DCBLO in next ST, 2 DCBLO in next ST} twice (Pic 10), 1 HDCBLO in next ST (Pic 11), 2 HDCBLO in next ST (Pic 12), 1 SCBLO in next ST (Pic 13), {2 SCBLO in next ST, 1 SCBLO in next ST} twice (Pic 14), 2 HDCBLO in next ST, 1 HDCBLO in next ST (Pic 15), 2 DCBLO in next ST (Pic 16), {1 DCBLO in next ST, 2 DCBLO in next ST} twice (Pic 17), 1 HDCBLO in next ST (Pic 18), 2 SCBLO in next ST (Pic 19), {1 SCBLO in next ST, 2 SCBLO in next ST} twice (Pic 20), 1 HDCBLO in next ST (Pic 21), join with a SLST to first DC. (23 SCBLO, 10 HDCBLO, 1 ExtDC, 20 DCBLO)
Round 5 :
CH 1, 1 SC in same ST, 1 SC in next ST (Pic 1), 2 SC in next ST (Pic 2), 1 SC in next 26 STS (Pic 3), 2 SC in next ST (Pic 4), 1 SC in next 24 STS, join with a SLST to first SC (Pic 5). Note: Put a SM in the 4th last ST (Pic 6). Fasten off. (56 SC)
Round 6 :
Join C3 (Dusty Rose) with a standing TR (video help of how to make a standing treble crochet: https://youtu.be/Trl1JMxcv94) to the ST marked with a SM, CH 2, 2 TR in same ST (corner) (Pic 1), 1 DC in next 2 STS (Pic 2), 1 HDC in next ST (Pic 3), 1 SC in next 7 STS (Pic 4), 1 HDC in next ST, 1 DC in next 2 STS (Pic 5), [{2 TR, CH 2, 2 TR} in next ST (corner) (Pic 6), 1 DC in next 2 STS, 1 HDC in next ST, 1 SC in next 7 STS, 1 HDC in next ST, 1 DC in next 2 STS] 3 times, 1 TR in first corner (Pic 7), join with a SLST to first TR (Pic 8). Fasten off. (28 SC, 8 HDC, 16 DC, 16 TR, 4 x CH 2 SP)
Round 7 :
SLST to CH 2 corner SP, CH 1, {1 DC, CH 2, 2 DC} in CH 2 corner SP (corner)(Pic 1), 1 DC in each ST on side (Pic 2), {[2 DC, CH 2, 2 DC] in CH 2 corner SP (corner)(Pic 3), 1 DC in each ST on side} 3 times, 1 DC in first corner (Pic 4), join with a SLST to first DC (Pic 5). Fasten off, weave in all ends, block the finished square. (84 DC, 4 x CH 2 SP)
This Elwen Granny Square tutorial helps you crochet a charming heart-centered square with easy-to-follow photos and clear steps. Perfect for little stash-busting projects, coasters, or a full blanket when joined together. Get creative with colors and borders to make each square uniquely yours. 🧶💖