🧢 Beautiful ✨ Detailed πŸ’ Adorable

EZ Diamond Lattice Blanket Pattern

EZ Diamond Lattice Blanket Pattern
4.1β˜… Rating
12-15 Hours Time Needed
2.4K Made This
βœ‚οΈ

Advanced Level

Designed for experienced crocheters, these patterns involve intricate designs and complex techniques to challenge and inspire.

⏱️

Multi-Day Project

A rewarding 12+ hour journeyβ€”perfect for dedicated crafters who love detailed work.

πŸ€—

Soft Hug

Gentle, plush, and full of warmth, creating a sense of comfort and coziness wherever they find a home.

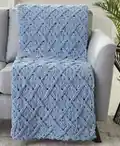
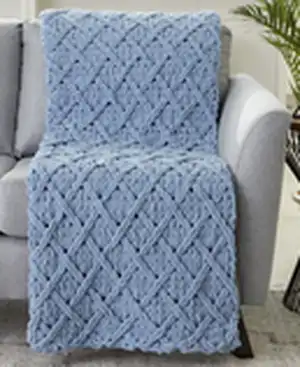
About This EZ Diamond Lattice Blanket Pattern

This pattern creates the EZ Diamond Lattice Blanket using Bernat Alize Blanket-EZ loop yarn for a thick, cozy throw. The lattice texture is formed by crossing loops in a repeat pattern to create diamond motifs. It finishes to approximately 56" x 60" and is ideal for adding a handmade accent to your home.

EZ Diamond Lattice Blanket Pattern crochet pattern - detailed view of completed project

The technique uses loop yarn pulls rather than traditional crochet stitches, so no hook is required. A helpful video tutorial is available to support visual learners and clarify the loop pulling sequence.

Why You'll Love This EZ Diamond Lattice Blanket Pattern

I absolutely love this pattern because the diamond lattice texture looks intricate but works up quickly with loop yarn. I enjoy how the design creates depth and cozy softness without complicated stitchwork. The finished blanket feels luxurious and is extremely snuggly, making it a gift I always feel proud to give. Working with loop yarn gives such immediate satisfaction β€” the progress is fast and very motivating.

EZ Diamond Lattice Blanket Pattern step 1 - construction progress EZ Diamond Lattice Blanket Pattern step 2 - assembly progress EZ Diamond Lattice Blanket Pattern step 3 - details and accessories EZ Diamond Lattice Blanket Pattern step 4 - final assembly and finishing

Switch Things Up

I love customizing blankets like this by changing colors; try alternating two colors every few pattern repeats for a striped lattice effect.

I sometimes make it smaller or larger by adjusting the number of foundation loops; add or remove loop counts in multiples that maintain the lattice repeat.

I recommend experimenting with ombre or variegated blanket-ez yarns to get subtle color transitions while keeping the textured pattern intact.

For a softer edge, add a single-row crochet border using bulky yarn and a large hook, working evenly around the blanket to frame the lattice.

You can add fringe or tassels to the short ends for a boho look; make them from the same yarn color to keep the finish cohesive.

If you want a more structured throw, consider lining the blanket with a backing fabric and whipstitching it in place for extra durability.

I also enjoy adding embroidered initials or a small corner motif after completion to personalize a gift blanket.

Try making a baby-sized version by using fewer foundation loops and stopping at a shorter finished length for a quick, adorable gift.

I sometimes pair this blanket with coordinating pillows by repeating a smaller panel of the lattice for a matching set.

For different textures, use alternative loop yarn brands with similar loop spacing, but check gauge and finished dimensions as they can vary.

Common Mistakes & How to Fix Them

βœ— Not counting the foundation loops accurately; always count and recount to ensure you have exactly 68 loops before starting the first row, as an incorrect foundation causes mismatched pattern repeats. βœ— Turning the work when instructions say Do not turn; follow the direction to maintain the correct fabric orientation and pattern flow throughout the rows. βœ— Pulling loops inconsistently which causes uneven texture; use a consistent method to pull loops from behind and maintain even tension for a uniform lattice. βœ— Skipping the bind off instructions for creating the yarn tail; cut at the base of the loop and tie securely, then weave in the end to prevent unraveling. βœ— Forgetting to place the right side facing at all times; keep the right side facing you throughout to maintain the correct appearance of crosses and diamonds.

EZ Diamond Lattice Blanket Pattern

Make a cozy, textured throw with the EZ Diamond Lattice Blanket pattern using Bernat Alize Blanket-EZ yarn. This pattern creates a plush, lattice-style design that adds a modern handmade touch to any living space. Youll enjoy working with the loop yarn technique for fast, gratifying progress. The finished blanket measures approximately 56 x 60 inches β€” perfect for snuggling on the couch or gifting to someone special.

Advanced 12-15 Hours

Materials Needed for EZ Diamond Lattice Blanket Pattern

β€” Main Fabric

  • 01
    Bernat Alize Blanket-EZ (6.4 oz/180 g; 18 yds/16 m) - Country Blue (37018) - 7 balls (approx.)

β€” Tools Required

  • 01
    Bernat Alize Blanket-EZ yarn (Country Blue 37018) - 7 balls
  • 02
    Scissors to cut yarn
  • 03
    Tapestry/yarn needle to weave in ends and tie yarn tail
  • 04
    Measuring tape to check finished dimensions
  • 05
    Optional blocking pins for finishing

Progress Tracker

0% Complete

β€” Blanket :

Measurements :

Approximately 56" [142 cm] wide x 60" [152.5 cm] long.

Info :

Notes: Right side of project is facing at all times. 'Working yarn' is held behind stitches throughout work.

Info :

Count 68 loops for foundation row.

Round 1 :

1st row: Working from right to left, pull the 69th loop (from 'working yarn') up through 68th loop (last loop of foundation row) from behind to create a knit stitch.

Round 2 :

Pull next loop from working yarn up through next loop of foundation row. *Cross second loop of foundation row in front of first loop of foundation row (to the right). Pull next loop from working yarn up from behind next loop. Pull next loop from working yarn up from behind next loop. Cross next loop of foundation row in front of 2nd loop of foundation row (to the left). Pull next loop from working yarn up from behind next loop. Pull next loop from working yarn up from behind next loop. (Pull next loop from working yarn up from behind next loop of foundation row) twice. Repeat from * to end of row. Do not turn work. 68 stitches in row.

Round 3 :

2nd row: Working from left to right, pull next loop from working yarn up from behind through last stitch worked on previous row. *Cross 2nd stitch over next stitch (to the left). Pull loop from working yarn up from behind 2nd stitch. Pull next loop from working yarn up from behind 1st stitch. (Pull next loop from working yarn up from behind next loop) twice. Cross next stitch in front of 2nd stitch (to the right). Pull next loop from working yarn up from behind 1st stitch. Pull next loop from working yarn up from behind 2nd stitch. Pull next loop from working yarn up from behind next loop. Rep from * to last stitch. Pull loop from working yarn up from behind next loop. Do not turn.

Round 4 :

3rd row: Working from right to left, cross 2nd stitch of previous row over 1st stitch (to the right). Pull loop from working yarn up from behind 2nd stitch. Pull next loop from working yarn up from behind 1st stitch. *(Pull next loop from working yarn up from behind next loop) over next 4 stitches. Cross 2nd stitch in front of next stitch (to the right). Pull next loop from working yarn up from behind 2nd stitch. Pull next loop from working yarn up from behind 1st stitch. Rep from * to last 6 stitches. *(Pull next loop from working yarn up from behind next loop) over next 4 stitches. Cross next stitch in front of 2nd stitch (to the left). Pull next loop from working yarn up from behind 2nd stitch. Pull next loop from working yarn up from behind 1st stitch. Do not turn.

Round 5 :

4th row: Working from left to right, pull next loop from working yarn up from behind through last stitch worked on previous row. *Cross next stitch in front of 2nd stitch (to the right). Pull next loop from working yarn up from behind 2nd stitch. Pull next loop from working yarn up from behind 1st stitch. Pull next loop from working yarn up from behind 2nd loop. Pull next loop from working yarn up from behind 1st loop. Pull next loop from working yarn up from behind last stitch. Rep from * to end of row. Do not turn.

Round 6 :

5th row: Working from right to left, (pull next loop from working yarn up from behind last stitch worked on previous row) twice. *Cross next stitch in front of 2nd stitch (to the left). Pull next loop from working yarn up from behind 2nd stitch. Pull next loop from working yarn up from behind 1st stitch. Cross 2nd stitch in front of next stitch (to the right). Pull next loop from working yarn up from behind 2nd stitch. Pull next loop from working yarn up from behind 1st stitch. (pull next loop from working yarn up from behind last stitch worked on previous row) three times. *Cross 2nd stitch in front of 1st stitch (to the left). Pull next loop from working yarn up from behind 2nd stitch. Pull next loop from working yarn up from behind 1st stitch. Rep from * to last 5 stitches. (Pull next loop from working yarn up from behind next loop) twice. Cross 2nd stitch in front of 1st stitch (to the right). Pull next loop from working yarn up from behind 2nd stitch. Pull next loop from working yarn up from behind 1st stitch. Do not turn.

Round 7 :

6th row: Working from left to right, (pull next loop from working yarn up from behind last stitch worked on previous row) twice. Rep from * to end of row. Do not turn.

Round 8 :

7th row: Working from right to left, (pull next loop from working yarn up from behind last stitch worked on previous row) twice. *Cross 2nd stitch in front of next stitch (to the right). Pull next loop from working yarn up from behind 2nd stitch. Pull next loop from working yarn up from behind 1st stitch. Cross 2nd stitch in front of next stitch (to the left). Pull next loop from working yarn up from behind 2nd stitch. Pull next loop from working yarn up from behind 1st stitch. Pull next loop from working yarn up from behind last stitch worked on previous row three times. Do not turn.

Round 9 :

8th row: Working from left to right, pull next loop from working yarn up from behind through last stitch worked on previous row. *Cross 2nd stitch in front of next stitch (to the left). Pull next loop from working yarn up from behind 2nd stitch. Pull next loop from working yarn up from behind 1st stitch. Pull next loop from working yarn up from behind next loop over next 4 stitches. Cross next stitch in front of 2nd stitch (to the right). Pull next loop from working yarn up from behind 1st stitch. Pull next loop from working yarn up from behind 2nd stitch. Rep from * to last stitch. Pull loop from working yarn up from behind next loop. Do not turn.

Round 10 :

9th row: Working from right to left, cross 1st stitch over 2nd stitch (to the left). Pull next loop from working yarn up from behind 2nd loop. *Pull next loop from working yarn up from behind 1st loop. (Pull next loop from working yarn up from behind next loop) over next 4 stitches. Cross 2nd stitch in front of next stitch (to the left). Pull next loop from working yarn up from behind 2nd stitch. Pull next loop from working yarn up from behind 1st stitch. Rep from * to last 6 stitches. (Pull next loop from working yarn up from behind next loop) over next 4 stitches. Cross next stitch in front of 2nd stitch (to the right). Pull next loop from working yarn up from behind 2nd stitch. Pull next loop from working yarn up from behind 1st stitch. Do not turn.

Round 11 :

10th row: Working from left to right, pull next loop from working yarn up from behind last stitch worked on previous row. Cross next stitch in front of 2nd stitch (to the right). Pull next loop from working yarn up from behind 2nd stitch. Pull next loop from working yarn up from behind 1st stitch. Pull next loop from working yarn up from behind next loop twice. Cross 2nd stitch over next stitch (to the left). Pull next loop from working yarn up from behind 2nd stitch. Pull next loop from working yarn up from behind 1st stitch. Rep from * to last stitch. Pull loop from working yarn up from behind next loop. Do not turn.

Info :

Repeat 5th to 10th rows for pattern. Work in pattern until Blanket measures approximately 60" [152.5 cm], ending on a 5th row.

Bind off row :

Bind off row: Working in same direction as last row, pull 2nd stitch through 1st stitch. Pull 3rd stitch through 2nd stitch. Pull 4th stitch through 3rd stitch. Continue in this manner to end of row. Cut thread at base of loop (thread used to create the loop) to create a yarn 'tail'. Tie to secure and weave in end.

Assembly Instructions

  • Finish blanket to desired length, ending on a 5th row as instructed, then bind off following the bind off row directions to form a yarn tail.
  • Cut the loop yarn at the base of the loop at the bind off and tie the yarn tail securely; weave the tail into the blanket using a yarn needle to hide the end.
  • Lay the blanket flat and check texture alignment; gently block if desired using pins and a light steam or damp blocking, taking care with loop yarn.
  • Weave in any remaining loose ends with a tapestry needle and trim excess yarn, ensuring knots are secure and ends are hidden.

Important Notes

  • πŸ’‘Keep the right side of the blanket facing you at all times during the loop-pulling technique to maintain the correct pattern orientation.
  • πŸ’‘Count exactly 68 loops for the foundation row before beginning to ensure the diamond lattice pattern lines up across the blanket.
  • πŸ’‘Do not turn work unless the instructions explicitly say soβ€”many rows instruct Do not turn, as stitches are built in a continuous direction.
  • πŸ’‘When binding off, cut at the base of the loop used to create loops and tie securely to form a yarn tail; weave in ends to prevent unraveling.

This cozy EZ Diamond Lattice Blanket combines plush loop yarn with a striking lattice texture to warm your space and your heart. Whether youre keeping it for yourself or gifting it to someone special, it makes a gorgeous, snuggly statement. Happy crocheting and enjoy the cozy comfort! 🧢✨

You ask,

we answer.

FAQs

What size will the finished piece be?

The finished blanket measures approximately 56" [142 cm] wide x 60" [152.5 cm] long using the recommended yarn and foundation loop count.

Can I use different yarn or change the size?

You can change yarn weight or adjust the number of foundation loops to change finished size, but the loop technique works best with loop-specific yarn like Bernat Alize Blanket-EZ.

Do I need a crochet hook for this pattern?

No crochet hook is required; the pattern uses loop yarn pulling technique where you pull loops from the yarn and work the crosses and pulls as described.

How long does this project typically take to complete?

This is an experienced-level, multi-day project that often takes 12-15 hours, depending on your pace and familiarity with loop yarn techniques.