🧢 Beautiful ✨ Detailed πŸ’ Adorable

Fanny pack Crochet Pattern

Fanny pack Crochet Pattern
4.0β˜… Rating
5-7 Hours Time Needed
4.2K Made This
βœ‚οΈ

Beginner Friendly Level

Perfect for those just starting their crochet journey, with clear instructions and simple techniques

⏱️

Weekend Treat

Takes 5-7 hours, making it an enjoyable project to finish over a couple of days.

✨

Stylish Touch

An elegant detail to elevate any look, combining traditional techniques with contemporary design sensibilities.

About This Fanny pack Crochet Pattern

This pattern teaches you how to crochet a raffia fanny pack with step-by-step photos and clear rounds. You will make the round back and front panels, shape the side walls, insert a zipper, and add embroidery details. The finished bag is compact and wearable, made from raffia yarn for a summery natural look.

Fanny pack Crochet Pattern crochet pattern - detailed view of completed project

Includes materials list, handy tips for working with raffia, and sewing instructions for the zipper and lining. Ideal for beginners who want a stylish, quick accessory project.

Why You'll Love This Fanny pack Crochet Pattern

I absolutely love this pattern because it transforms simple raffia yarn into a chic, wearable accessory that feels handmade and modern. I enjoy how quickly the circular panels grow β€” you can see progress fast, which is very satisfying. The construction is straightforward but gives a professional-looking finish when you sew in the zipper and press the panels. I also love the opportunity to add embroidery, which lets me personalize each bag. This pattern balances simplicity and style beautifully, making it one of my favorite small projects to make and gift.

Fanny pack Crochet Pattern step 1 - construction progress Fanny pack Crochet Pattern step 2 - assembly progress Fanny pack Crochet Pattern step 3 - details and accessories Fanny pack Crochet Pattern step 4 - final assembly and finishing

Switch Things Up

I love customizing this fanny pack by changing the color of the raffia; try a bold color for a statement bag or neutrals for a natural look.

I sometimes switch to a thicker raffia or ribbon yarn and use a larger hook to make a chunkier tote-style version.

I like to add different closures β€” swap the zipper for a decorative button and loop if you prefer a softer opening.

I often vary the embroidery: use bright acrylic thread for contrast or matching raffia for a subtle textured branch motif.

For a mini version, use thinner yarn and a smaller hook to create a keychain-sized fanny packβ€”great as a gift topper.

I like adding an inner slip pocket to the lining for cards or keys; cut the lining fabric accordingly and sew it before inserting.

To make it crossbody, lengthen the strap and use a swivel hook so you can detach and switch straps easily.

I sometimes include a fabric panel or interfacing in the lining to make the bag stiffer and protect contents better.

Want a waterproof interior? Use laminated cotton for the lining and topstitch it carefully before attaching the zipper.

I enjoy mixing two raffia colors in rounds for a striped effect β€” increase evenly and watch how the color change affects the shape.

Try different zipper colors and hardware finishes (antique brass, silver) to change the overall style of the bag.

Common Mistakes & How to Fix Them

βœ— Failing to straighten or 'fluff' raffia before you begin will create uneven stitches; always prepare and straighten your raffia skein (steam or hand fluff) before crocheting. βœ— Skipping stitch markers while working in spirals can cause you to lose your beginning of row; place or move a marker at the start of each row to maintain correct stitch counts. βœ— Crocheting with inconsistent tension makes the circle warp or ripple; maintain steady tension and periodically flatten your work to check shape. βœ— Sewing the zipper without pinning first causes misalignment; pin the zipper in place and check fit before you sew using backstitch for even results. βœ— Overstuffing or pulling the thread too tight when finishing ends will distort the edges; hide ends gently and strengthen with small pulls rather than forceful tugs. βœ— Not steaming and shaping the panels after finishing leads to a limp shape; steam lightly and shape with hands to set the finished circle and edge.

Fanny pack Crochet Pattern

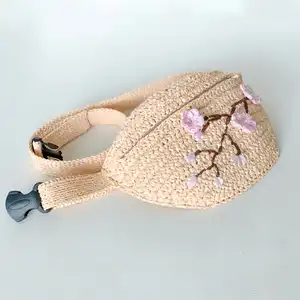
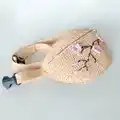
Make a stylish, handmade raffia fanny pack with this clear, step-by-step crochet pattern. You will learn how to crochet the circular panels, shape the bag, add a zipper and finish with pretty embroidery details. Perfect for a warm-weather accessory that is lightweight and unique. Follow the photos and instructions to create a polished, wearable bag for yourself or as a thoughtful gift.

Beginner Friendly 5-7 Hours

Materials Needed for Fanny pack Crochet Pattern

β€” Main Fabric

  • 01
    Raffia Ispie, 197 yards (180 meters) or 2 skeins raffia Fibranatura (Oatmeal color used in example)
  • 02
    Small amount of raffia brown for embroidery (little brown raffia)
  • 03
    Small amount of raffia pink for embroidery (little pink raffia)
  • 04
    Lining fabric (not included in tutorial) - amount depending on finishing, cut to bag interior dimensions

β€” Tools Required

  • 01
    Crochet hook size N3 - 3 mm
  • 02
    2 stitch markers
  • 03
    Plastic needle with large eyelet
  • 04
    Plastic buckle (fastex), width: 1 1/4 inches (3 cm)
  • 05
    Sewing thread (match yarn color)
  • 06
    Zipper, 10 inches (25 cm)
  • 07
    Scissors
  • 08
    Sewing needle and pins
  • 09
    Iron for steaming and shaping

Progress Tracker

0% Complete

β€” Materials and Tools :

Info :

Raffia Ispie, 197 yards (180 meters) or 2 skeins raffia Fibranatura. In my example, I'm using raffia Ispie, Oatmeal color; Little raffia brown and pink colors for embroidery; Hook N3 - 3 mm; 2 markers; Plastic needle with large eyelet; Plastic buckle (fastex), width: 1 1/4 inches (3cm); Sewing thread; Zipper, 10 inches (25 cm); Scissors; Sewing needle, pins; Lining (the process of how to make the lining are not included in this tutorial); Iron.

β€” Abbreviations :

Info :

CH - chain stitch, SlSt - slip stitch, SC - single crochet, DC - double crochet, Inc - increase (2 SC in 1), Dec - decrease (2 SC together).

β€” Recommendation for working with raffia yarn :

Infos :

1. Before crocheting with raffia, it must be straightened. If you have Fibranatura, then you need to 'fluff' the yarn with your hands. If you have Ispie, you can steam yarn with an iron. 2. When crocheting with raffia, so that there are no holes in the canvas when crocheting the SC, we pull the working thread to the level of the hook. 3. When the thread runs out, you need to take a new skein and straighten the end of the thread. Put on the end of the working thread and the thread from a new skein with a clearance of 5 mm. Glue together with PVA glue. After drying, lightly wrap the thread. 4. If you had to rip out your work, steam thread with an iron. The yarn will return to its original shape.

β€” Crochet the back side (circle) :

Round 1 :

Crochet 6 SC in the 2nd loop from the hook. Next crochet a spiral. (6)

Round 2 :

1 Inc*6= 12.

Round 3 :

(1 SC, 1 Inc)*6 = 18. Place the marker in the 1st loop of this row. Then, rearrange the marker in the 1st loop of the each subsequent row.

Info :

Turn the circle to the wrong side. Pull the end of the thread through all loops of the 1st row. Strengthen, cut and hide the end.

Round 4 :

4 row. (2 SC, 1 Inc)*6 = 24. Crochet +2 SC, and repeat this in the each row. Thus, the circle will come out in the correct form.

Round 5 :

5 row. (3 SC, 1 Inc)*6 = 30; +2 SC.

Round 6 :

6 row. (4 SC, 1 Inc)*6 = 36; +2 SC.

Round 7 :

7 row. (5 SC, 1 Inc)*6 = 42; +2 SC.

Round 8 :

8 row. (6 SC, 1 Inc)*6 = 48; +2 SC.

Round 9 :

9 row. (7 SC, 1 Inc)*6 = 54; +2 SC.

Round 10 :

10 row. (8 SC, 1 Inc)*6 = 60; +2 SC.

Round 11 :

11 row. (9 SC, 1 Inc)*6 = 66; +2 SC.

Round 12 :

12 row. (10 SC, 1 Inc)*6 = 72; +2 SC.

Round 13 :

13 row. (11 SC, 1 Inc)*6 = 78; +2 SC.

Round 14 :

14 row. (12 SC, 1 Inc)*6 = 84; +2 SC.

Round 15 :

15 row. (13 SC, 1 Inc)*6 = 90; +2 SC.

Round 16 :

16 row. (14 SC, 1 Inc)*6 = 96.

Info :

Crochet more 4 SC, gradually reduce the height of the SC.

Info :

Cut the thread, pull out the end. Skip one loop. Insert the hook under the 2nd loop of the row, pull out the end, tighten the end back to the wrong side. Strengthen and hide the end.

Info :

Steam the circle with an iron. Don't press hard on the face, but steam workability. Shape with hands. The finished circle should be about 8 inches (20 cm) in diameter.

Info :

If you crochet with raffia Fibranatura, then take an adhesive material (similar to gauze), cut out a circle 5 mm smaller than the diameter of the back side. Steam with an iron the back side through a damp cloth together with an adhesive material.

β€” Crochet the front side :

Info :

Turn the circle to the front side. Insert the hook on the back loop and jumper only. Pull the loop, crochet CH.

Round 1 :

1 row. 40 SC on the back loop and jumper only, CH. Crochet in the end of the thread in this row.

Round 2 :

2 row. 40 SC, CH. Turn.

Round 3 :

3 row. 4 SC, 32 CH, 4 SC = 40, CH. Crochet the chain freely so that the lower part don't tighten the zipper. Turn.

Round 4 :

4 row. 40 SC, CH. (SC crochet in each CH of previous row). Turn.

Round 5 :

5 row. 40 SC, CH. Turn.

Round 6 :

6 row. 40 SC, CH. Turn.

Round 7 :

7 row. 1 Dec, 36 SC, 1 Dec = 38, CH. Make the decrease in the simple method (Place the hook into the stitch and pull up the loop. Place the hook into the next stitch and pull up the 2nd loop. Now there are 3 loops on the hook. Yarn over and then pull through all the 3 loops). Turn.

Round 8 :

8 row. 38 SC, CH. Turn.

Round 9 :

9 row. 1 Dec, 34 SC, 1 Dec = 36, CH. Turn.

Round 10 :

10 row. 36 SC, CH. Turn.

Round 11 :

11 row. 1 Dec, 32 SC, 1 Dec = 34, CH. Turn.

Round 12 :

12 row. 1 Dec, 30 SC, 1 Dec = 32, CH. Turn.

Round 13 :

13 row. 1 Dec, 28 SC, 1 Dec = 30, CH. Turn.

Round 14 :

14 row. 1 Dec, 26 SC, 1 Dec = 28, CH. Turn.

Round 15 :

15 row. 1 Dec, 24 SC, 1 Dec = 26, CH. Turn.

Round 16 :

16 row. 1 Dec, 22 SC, 1 Dec = 24, CH. Turn.

Round 17 :

17 row. 1 Dec, 20 SC, 1 Dec = 22, CH. Turn.

Round 18 :

18 row. 1 Dec, 18 SC, 1 Dec = 20, CH. Turn.

Round 19 :

19 row. 1 Dec, 16 SC, 1 Dec = 18.

Info :

Cut the thread, pull out the end, strengthen and hide the end on the wrong side. Steam the front side with an iron. Shape with hands. Now, you can cut the lining.

β€” Sewing in the zipper :

Step 1 :

Take the sewing needle and the sewing thread in the same colour as the yarn.

Step 2 :

Attach the zipper with pins.

Step 3 :

Sew the lower part from left to right, using the 'backstitch' seam. Use sewing machine if available.

Step 4 :

At the end of the lower part of the zipper, sew a few stitches. Turn over and sew the top part of the zipper.
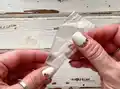
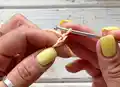
Step 5 :

At the end of the top part of the zipper, sew a few stitches. Melt the ends of zipper with lighter.

Info :

Steam the seam with an iron through a damp cloth. Check the zipper opens and closes without problems.

β€” Embroidery :

Step 1 :

Take the brown yarn.

Assembly Instructions

  • Attach the zipper to the front opening by pinning it in place, then sew the lower part from left to right using a backstitch so the zipper is secure.
  • Turn the canvas as directed and sew the top part of the zipper, adding a few reinforcement stitches at both ends and melting zipper ends if needed.
  • Pin the lining inside the bag and trim the lining to fit the inner dimensions before stitching it into place (lining making process not included).
  • Sew the plastic buckle strap ends securely to the bag strap pieces, ensuring correct placement and strap length for comfortable wear.
  • Steam and shape both front and back panels after sewing to set the shape; press through a damp cloth and shape gently with hands.
  • Add embroidery after assembling the bag: stitch branches and flowers using brown and pink raffia, securing ends on the inside.

Important Notes

  • πŸ’‘Prepare raffia before using by straightening or steaming to avoid twists and uneven stitches during crocheting.
  • πŸ’‘Use stitch markers to keep track of the first stitch of each round, especially when working in spirals or increasing rounds.
  • πŸ’‘Steam panels gently through a damp cloth to set shapeβ€”do not press hard on the face of the raffia to avoid flattening.
  • πŸ’‘Pin the zipper carefully and test open/close before final sewing to avoid misalignment and ensure smooth operation.

This fanny pack crochet pattern makes a lightweight, stylish raffia bag perfect for sunny days and handmade gift giving. The pattern includes circular panel construction, zipper installation, and simple embroidery for a finished look. Give it a try and enjoy making a chic accessory that shows off your craftiness! 🧢✨

You ask,

we answer.

FAQs

What size will the finished piece be?

The finished bag measures approximately 9 inches (23 cm) width, 6 inches (15 cm) height and 3 inches (8 cm) depth when using the recommended raffia and hook size.

Can I use different yarn weights for this pattern?

Yes, you can use different yarns but the final size and stiffness will change; if using thicker yarn, choose a larger hook and expect a chunkier bag, and adjust lining and zipper length accordingly.

Do I need prior crochet experience for this pattern?

This pattern is beginner friendly and uses basic stitches like single crochet and simple increases, but some familiarity with stitch counts, chains, and sewing a zipper will be helpful.

How long does this project typically take to complete?

Most crocheters complete this project in 5-7 hours, though time may vary depending on experience, finishing steps, and whether you add embroidery.