🧢 Beautiful ✨ Detailed πŸ’ Adorable

Feather Locklear the Chick Amigurumi Pattern

Feather Locklear the Chick Amigurumi Pattern
4.6β˜… Rating
5-7 Hours Time Needed
2.4K Made This
βœ‚οΈ

Intermediate Level

Ideal for those with basic crochet experience, featuring slightly more advanced stitches and techniques to expand your skills.

⏱️

Weekend Treat

Takes 5-7 hours, making it an enjoyable project to finish over a couple of days.

🧸

Cute Companion

An adorable friend to cherish, handcrafted with love to bring comfort and joy for years to come.

About This Feather Locklear the Chick Amigurumi Pattern

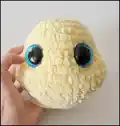
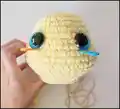
This pattern creates a sweet amigurumi chick crocheted from the top of the head to the bottom of the body using worsted weight yarn. It includes full round-by-round instructions for head, body, wings, feet, tail, beak, and optional hair. The pattern provides placement tips for safety eyes and an optional sunken eye technique with photo and video support.

Feather Locklear the Chick Amigurumi Pattern crochet pattern - detailed view of completed project

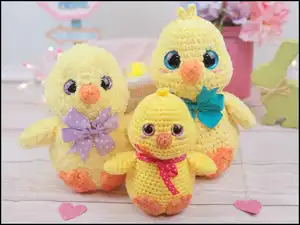
Youll find variations for fluffy and chenille versions with suggested hook sizes and eye sizes. The pattern also includes clear assembly steps and helpful tips for finishing touches and customization.

Why You'll Love This Feather Locklear the Chick Amigurumi Pattern

I absolutely love this pattern because it combines simple amigurumi construction with charming facial expression options that really bring the chick to life. I enjoy offering both classic and fluffy yarn variations so you can tailor the final look to your style. The step-by-step photos and the linked video make tricky steps like eye sinking much easier to follow. Working this pattern always brightens my day β€” theres something so satisfying about seeing the personality appear as you stuff and shape the head.

Feather Locklear the Chick Amigurumi Pattern step 1 - construction progress Feather Locklear the Chick Amigurumi Pattern step 2 - assembly progress Feather Locklear the Chick Amigurumi Pattern step 3 - details and accessories Feather Locklear the Chick Amigurumi Pattern step 4 - final assembly and finishing

Switch Things Up

I love customizing this chick with different yarns; using a fluffy chenille yarn or fuzzy novelty yarn gives a totally different soft look.

If you want it smaller or larger, change yarn weight and hook size β€” bulky yarn with a larger hook makes a chunky chick while thinner yarn makes a mini version.

I often swap eye sizes and placements to change the expression; larger eyes produce a cuter, more wide-eyed look, while smaller eyes are subtler.

Try embroidery for eyelashes, blushing, or tiny eyebrows to give your chick more personality and character.

For a seasonal twist, add a little crocheted bow, scarf, or tiny hat to dress up the chick for holidays or gifts.

I sometimes make the feet and beak in variegated or contrast yarn for a whimsical touch that stands out against the body color.

Consider adding a small loop at the top to make it into an ornament or keychain β€” just use a sturdy cord or a crocheted chain for hanging.

To make a posable version, insert thin craft wire into the wings or legs before sewing them in place, securing the wire ends well inside the body.

I like experimenting with different stuffing amounts and techniques; firmer stuffing gives structure while softer stuffing makes a cuddlier toy.

Try combining yarns β€” for example, holding a sparkly thread with main yarn for a subtle shimmer effect that makes the chick extra special.

Common Mistakes & How to Fix Them

βœ— Placing safety eyes without checking spacing can make the face look lopsided; always mark and count the stitches between eyes before inserting them to ensure symmetry.
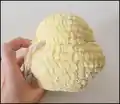
 βœ— Filling the head too early or too firmly will make reshaping difficult; stuff gradually and adjust stuffing as you form the sunken eyes to keep the shape smooth. βœ— Skipping stitch markers when working in a spiral causes lost rounds and miscounts; place a marker at the start of each round and move it after completing a round. βœ— Not removing stuffing before adding eye washers can prevent proper placement; remove most stuffing, fit the washers on the eyes, then re-stuff to keep the eye secure and neat. βœ— Using incorrect hook size for yarn weight results in a misshapen chick; match the recommended hook to your yarn (3.25 mm for worsted #4 or F hook for alternate yarns) to get the correct gauge.

Feather Locklear the Chick Amigurumi Pattern

Make a charming Feather Locklear chick with step-by-step crochet instructions designed for crafters who love cute amigurumi. This pattern walks you through the head, body, wings, feet, beak, tail, and assembly with clear guidance. Youll enjoy creating a 6-inch tall chick with options for fluffy or chenille yarn versions and adjustable eye sizes. Perfect for gifting or decorating, this pattern includes helpful photos and a video link for tricky steps.

Intermediate 5-7 Hours

Materials Needed for Feather Locklear the Chick Amigurumi Pattern

β€” Main Fabric

  • 01
    Worsted Weight yarn (#4), approximately 50g main color (Color A: Yellow)
  • 02
    Accent yarn (Color B: Orange) approximately 20g for beak and feet
  • 03
    Fluffy option: Little Bunny Yellow or Parfait Mango for a chenille/fluffy chick (see Helpful Tips)
  • 04
    Chenille option: Parfait Yellow, Parfait Mango, Flecks yarn loops and thread Sunshine (double strand together for chenille look)

β€” Tools Required

  • 01
    Crochet hook size D / 3.25 mm (recommended for main version)
  • 02
    F hook (3.75 mm) suggested for some fluffy/chenille versions
  • 03
    18 mm safety eyes (standard recommendation; eye sizes for different versions listed on pg. 12)
  • 04
    Alternative eye sizes: 23 mm (fluffy chick) and 28 mm (chenille chick)
  • 05
    Scissors
  • 06
    Sewing needle for assembly
  • 07
    Stitch markers
  • 08
    Polyester fiberfill stuffing
  • 09
    Pins for assembly

Progress Tracker

0% Complete

β€” Head and Body :

Round 1 :

Make 12 sc into a magic ring= 12

Round 2 :

Increase in each st around= 24

Round 3 :

(3 sc, inc) x 6= 30

Round 4 :

sc in each st around

Round 5 :

(4 sc, inc) x 6= 36

Round 6-8 :

sc in each st around

Info :

Mark the 6th and 7th inc with a st marker on round 9 for placement of eyes

Round 9 :

inc x 6, 6 sc, inc x 6, 18 sc= 48

Round 10-12 :

sc in each st around

Round 13 :

dec x 6, 6 sc, dec x 6, 18 sc= 36

Round 14 :

sc in each st around

Round 15 :

(dec, 4 sc) x 6= 30

Info :

Place eyes between rounds 8 and 9, leaving 9 holes between them. With the eyes facing you, the left eye will be placed before the stitch marker between rounds 8 and 9. The right eye will be placed after the stitch marker. If you want the sunken eye look, do not place the backs of the eyes on until round 29.

Round 16 :

(dec, 3 sc) x 6= 24

Round 17 :

sc in each st around

Info :

Now for the eyes. Stuff the head well. Cut a long piece of yarn and remove the eyes. Place the needle in the hole where the first eye was and insert the needle into a hole next to the eye hole. Go back and forth between each eye hole repeating the process from the first eye. Pull slightly on the yarn after going through each hole. Do this about 3 times on each side until you reach the look you want. Follow the pictures on pg. 5 for help. There is also a youtube video I have for extra help on this process. https://www.youtube.com/watch?v=9XoBnTY6k70&t=55s

β€” Head and Body Continued :

Info :

To place the backs of the eyes you will need to remove most of the stuffing to place the washers on the eyes, then re stuff it.

Round 18 :

(inc, 3 sc) x 6= 30

Round 19 :

(inc, 4 sc) x 6= 36

Round 20 :

sc in each st around

Info :

Stuff the body as you work

Round 21 :

(inc, 11 sc) x 3= 39

Round 22 :

sc in each st around

Round 23 :

(inc, 12 sc) x 3= 42

Round 24 :

sc in each st around

Round 25 :

(6 sc, inc) x 6= 48

Round 26 :

(7 sc, inc) x 6= 54

Round 27-29 :

sc in each st around

Round 30 :

(7 sc, dec) x 6= 48

Round 31 :

(6 sc, dec) x 6= 42

Round 32 :

(5 sc, dec) x 6= 36

Round 33 :

(4 sc, dec) x 6= 30

Round 34 :

(3 sc, dec) x 6= 24

Round 35 :

(2 sc, dec) x 6= 18

Round 36 :

(sc, dec) x 6= 12

Round 37 :

dec x 6 = 6

Info :

F/O and sew the hole closed

β€” Beak :

Round 1 :

Make 6 sc into a magic ring= 6

Round 2 :

(sc, inc) x 3= 9

Info :

F/O and leave a long tail for sewing

β€” Wings (Make 2) :

Round 1 :

Make 6 sc into a magic ring= 6

Round 2 :

(sc, inc) x 3= 9

Round 3 :

(2 sc, inc) x 3= 12

Round 4 :

sc in each st around

Info :

Do not stuff the wings

Round 5 :

(sc, inc) x 6= 18

Round 6 :

sc in each st around

Round 7 :

(sc, dec) x 6= 12

Round 8 :

(2 sc, dec) x 3= 9

Round 9 :

(sc, dec) x 3= 6

Info :

Fold the wings in half and sc the opening closed. F/O and leave a long tail for sewing

β€” Tail :

Round 1 :

Make 6 sc into a magic ring= 6

Round 2 :

(sc, inc) x 3= 9

Round 3 :

Inc x 3, 6 sc= 12

Info :

F/O and leave a long tail for sewing

β€” Feet (Make 2) :

Round 1 :

Make 6 sc into a magic ring= 6

Round 2 :

Increase in each st around= 12

Round 3 :

(sc, inc) x 6= 18

Round 4 :

(ch 3, sl st in 2nd ch from hook, sl st in next ch, sl st in next 2 sts on circle) x 3

Info :

F/O and leave a long tail for sewing

β€” Hair on Head (optional) :

Info :

With Color A: Attach yarn in the magic ring with a sl st (Ch 4, sl st in 2nd ch from hook and across) x 2 F/O and weave in the tail end

β€” Assembly :

Item Name (Face) :

1. Take a long strand of white yarn and thread your needle. Insert the needle into a hole in between the eyes. Bring the needle to the lower corner of the eye. Wrap the needle around the outside of the eye. Insert the needle into a hole on the top of the eye. Pull a little tightly to create a highlight for the eye. Repeat for the 2nd eye. 2. Optional: Take a long strand of yellow yarn and insert the needle into a hole on the head. Bring the needle up to a corner on the eye. Wrap the needle in front of the eye. Make an eyelid. Repeat one more time. Repeat on the 2nd eye. Weave in the tail end. 3. Optional: Cut a strand of pink yarn or thread. Embroider 2 cheeks.

Item Name (Beak) :

1. Pin the beak onto the front of the face in between the eyes. I did not stuff my beak.

Item Name (Wings) :

1. Pin the wings onto the side of the body approximately between rounds 18 and 19. 2. Sew the wings onto the body.

Item Name (Feet) :

1. Pin the feet onto the front of the body. 2. Sew the feet onto the body.

Item Name (Tail) :

1. Pin the tail onto the back of the body. 2. Sew the tail onto the body.

Info :

You have your finished chick! Thank you for your purchase! If you have any questions or concerns please email me at sweetoddityart@gmail.com or etsy convo me. I will get back to you asap. Please share your finished chick with me as often as you want! I love seeing them!

Assembly Instructions

  • Attach the beak by pinning it centered on the face between the eyes, then sew it in place using the long tail left when fastening off; I did not stuff the beak.
  • Position and pin the wings on each side of the body approximately between rounds 18 and 19, checking symmetry, then sew the wings securely to the body.
  • Place the feet on the front bottom of the body matched evenly, pin for spacing, then sew each foot in place using the tails left after fastening off.
  • Remove most stuffing before placing eye washers: fit the washers on the safety eyes, then re-stuff the head and close the hole to secure the eyes.
  • Pin the tail onto the back center of the body using the tail yarn, then sew the tail down securely and weave in ends for a neat finish.

Important Notes

  • πŸ’‘Do not join rounds unless stated; work in a continuous spiral throughout the pattern unless instructed otherwise.
  • πŸ’‘Use a stitch marker to mark the beginning of each round to help keep track of your rounds and avoid miscounts.
  • πŸ’‘All stitches are worked in both loops unless the pattern specifically instructs BLO or FLO for special shaping.
  • πŸ’‘Place safety eyes between rounds 8 and 9 with nine stitches between them, and adjust placement if you change eye size.
  • πŸ’‘Stuff the head and body gradually and adjust stuffing when creating the sunken eye effect to control facial shaping.

This sweet Feather Locklear chick is designed to be both lovable and fun to crochet, with options for fluffy or chenille looks. Make it for yourself, as a sweet handmade gift, or as a cheerful decoration for spring and baby showers. Share your finished chicks and spread handmade joy β€” theyre tiny bundles of happiness. 🧢🐣

You ask,

we answer.

FAQs

What size will the finished piece be?

The finished amigurumi measures approximately 6 inches from bottom to top of the head when using worsted weight #4 yarn and a 3.25 mm hook.

Can I use different yarn weights for this pattern?

Yes, you can use different yarn weights but your finished size will change; use an appropriate hook for your yarn and adjust eye placement accordingly.

Do I need prior crochet experience for this pattern?

This pattern is rated intermediate, so basic crochet skills, working in spirals, increases and decreases, and some assembly experience are recommended.

How long does this project typically take to complete?

Most crocheters complete this project in 5-7 hours, though time will vary based on experience, yarn choice, and how many details you add.

What eye sizes can I use for different looks?

Standard version uses 18 mm eyes; fluffy chick photos used 23 mm eyes and a chenille version used 28 mm eyes β€” adjust spacing as needed.