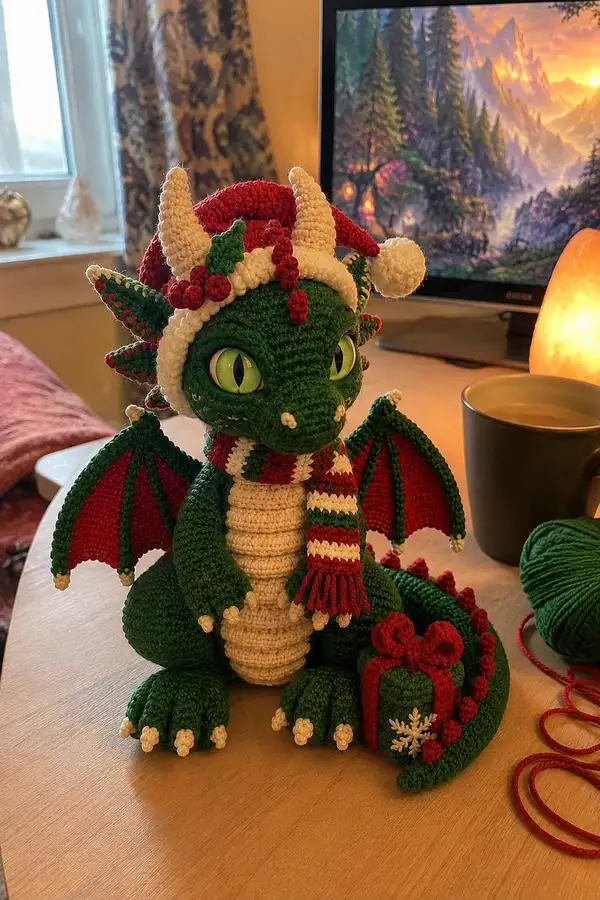
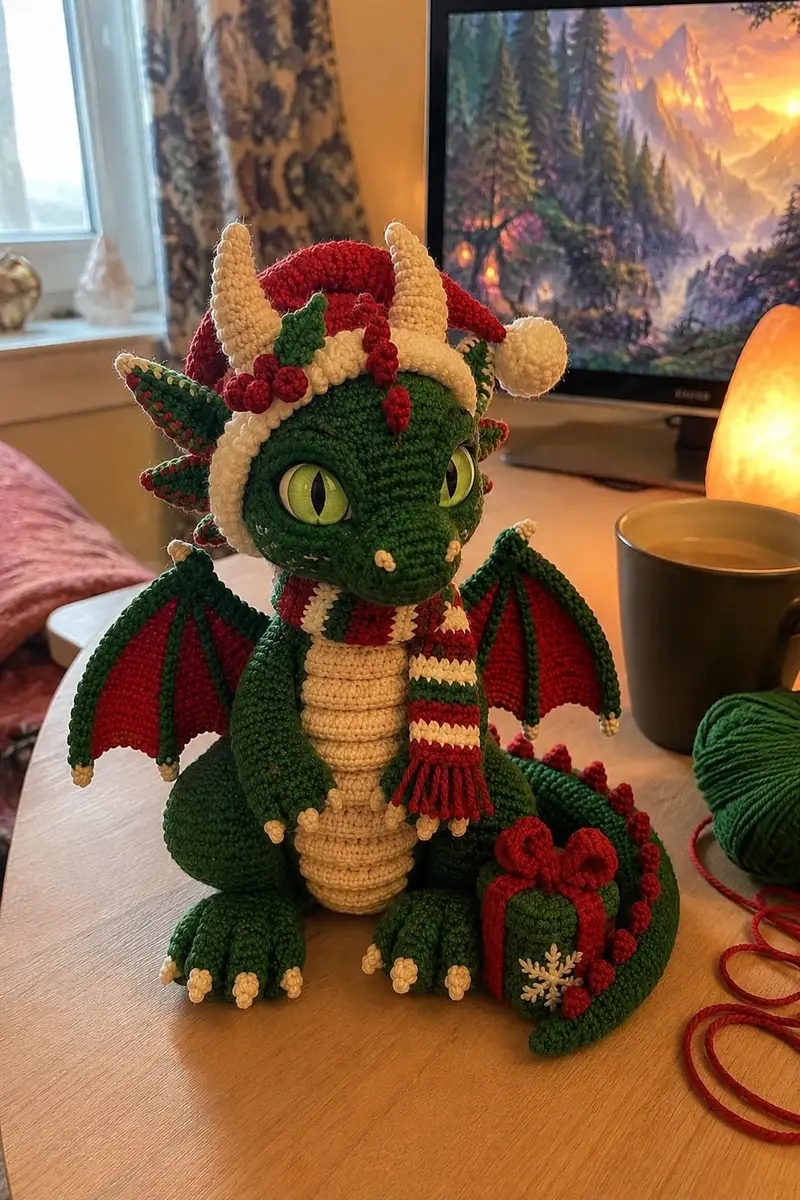
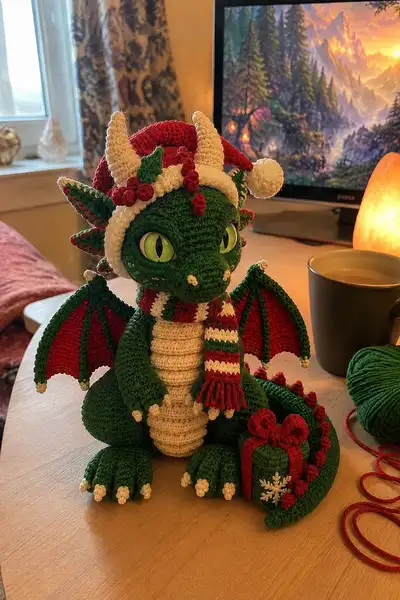
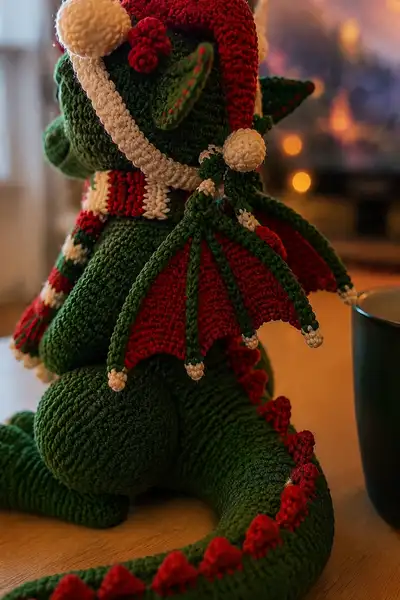
Create a charming holiday dragon dressed in Santa colors — complete with a slouchy Santa hat, striped scarf, tiny present, and curled tail spikes. This richly detailed amigurumi features bright green body, red accents, cream claws and belly, and whimsical embroidered features. The finished dragon sits upright, with articulated wings, curled tail, and decorative holiday trims perfect for gifting or display.
Progress Tracker
0% Complete
— Head :
Round 1 :
6 sc in magic ring (6)
Round 3 :
(1 sc, inc) x 6 (18)
Round 4 :
(2 sc, inc) x 6 (24)
Round 5 :
(3 sc, inc) x 6 (30)
Round 6 :
(4 sc, inc) x 6 (36)
Round 7 :
(5 sc, inc) x 6 (42)
Round 8 :
(6 sc, inc) x 6 (48)
Round 9-12 :
1 sc in each st (48)
Info :
Place stitch marker in first stitch of every round. Work tightly so stuffing does not show; these rounds build forehead and upper head depth.
Round 13 :
1 sc in each st (48)
Round 14 :
1 sc in each st (48)
Info :
Place safety eyes between rounds 13 and 14, approximately 10-12 stitches apart center-to-center for large expressive eyes. Use pins to check spacing before inserting eyes. If using embroidered eyes, mark same points with yarn.
Round 15 :
(6 sc, inc) x 6 (54)
Round 16 :
1 sc in each st (54)
Round 17 :
(7 sc, inc) x 6 (60)
Round 18-19 :
1 sc in each st (60)
Info :
Use these even rounds to embroider subtle eyebrows and position nostrils: mark four small points on the muzzle area (two nostril dots, two small cheek highlights) roughly two rounds below the eyes.
Round 20 :
(7 sc, dec) x 6 (54)
Round 21 :
(6 sc, dec) x 6 (48)
Round 22 :
(5 sc, dec) x 6 (42)
Info :
Begin stuffing head firmly now, especially under the brow and around the jaw. Use small amounts of fiberfill and a stuffing tool to shape the snout and cheek contours.
Round 23 :
(4 sc, dec) x 6 (36)
Round 24 :
(3 sc, dec) x 6 (30)
Round 25 :
(2 sc, dec) x 6 (24)
Round 26 :
(1 sc, dec) x 6 (18)
Info :
Do not close completely; stop at 6 sts and change to cream yarn for small snout details or continue in green and embroider nose dots later. Leave a long tail for sewing into neck area later. If you plan to sculpt a pronounced muzzle, before final decreases stuff firmly and do not over-decrease — you can stop at 12 sts and make a neck tube.
Round 28 :
Attach green and work 12 sc around to form neck opening (12)
Round 29-33 :
1 sc in each st (12)
Info :
Neck tube length can vary; four to six rounds of 12 sc gives a short neck, increase if you want a longer neck. Keep stuffing snug but not overbearing so head will sit naturally on torso.
— Snout/Nostril Sculpting & Face Details :
Round 34 :
Using cream yarn for small nostril bumps: make 2 tiny 3-sc bumps each made as: mr, 3 sc, pull tight, leave tail and sew to muzzle. Repeat for second nostril, place symmetrically just above the mouth line.
Info :
Use embroidery to add small smile lines: a short backstitch under the eyes will create a gentle smile. Use darker green or embroidery thread for definition.
— Horns (Make 2) :
Round 1 :
6 sc in magic ring (6) in cream
Round 2 :
(1 sc, inc) x 3 (9)
Round 3 :
(2 sc, inc) x 3 (12)
Round 4 :
1 sc in each st (12)
Round 5 :
(3 sc, dec) x 3 (9)
Round 6-8 :
1 sc in each st (9)
Round 9 :
(1 sc, dec) x 3 (6)
Info :
Stuff horns lightly and leave a long tail to sew to head. Add small green holly leaf (see holly instructions) and tiny red berry cluster at the base to mimic the festive decoration seen in the photos. Sew horns at slightly outward angle above the eyes.
— Ears/Fronds (Make 2 large lateral ears + small frills) :
Round 1 :
6 sc in magic ring (6) in green
Round 2 :
(1 sc, inc) x 3 (9)
Round 3 :
(2 sc, inc) x 3 (12)
Round 4 :
1 sc in each st (12)
Round 5 :
FLO: 1 sc in each st (12) (creates ridge)
Round 6 :
Change to red for inner embroidered detail: sl st across inner edge then use surface slip stitch to add dotted red pattern, or work 6 sc along inner half to create a red lining (optional)
Round 7 :
Fasten off leaving tail. Sew ears to sides of head at rounds 10-12 level, tilt slightly forward. Add small red picot stitches along outer edge for frilled look if desired.
Info :
On the finished dragon, each ear has a tiny red dotted line along the inner edge — this can be embroidered after assembly using contrasting yarn.
— Body :
Round 1 :
6 sc in magic ring (6)
Round 3 :
(1 sc, inc) x 6 (18)
Round 4 :
(2 sc, inc) x 6 (24)
Round 5 :
(3 sc, inc) x 6 (30)
Round 6 :
(4 sc, inc) x 6 (36)
Round 7 :
(5 sc, inc) x 6 (42)
Round 8 :
(6 sc, inc) x 6 (48)
Round 9-14 :
1 sc in each st (48)
Info :
If adding the cream belly later, now is a good time to mark the front center. The body will be slightly wider at the top and taper toward the seat; mark stitch positions for legs and arms (use pins) — leave about 10-12 sts between limb attachment points for natural spacing.
Round 15 :
(6 sc, dec) x 6 (42)
Round 16 :
(5 sc, dec) x 6 (36)
Round 17 :
(4 sc, dec) x 6 (30)
Round 18 :
1 sc in each st (30)
Round 19 :
(3 sc, dec) x 6 (24)
Round 20 :
(2 sc, dec) x 6 (18)
Round 21 :
1 sc in each st (18)
Info :
Leave a long tail for sewing the head. Stuff torso firmly but leave some give so the dragon can sit; use heavier stuffing in the lower belly and seat to stabilize the seated posture.
Round 22 :
(1 sc, dec) x 6 (12)
Round 23 :
Work 12 sc in BLO to create a defined waist ridge (12)
Round 24 :
Fasten off leaving long tail for assembly
— Belly Panel (Cream) :
Round 1 :
Make an oval: ch 10, 2 sc in 2nd ch from hook, 1 sc across until last ch, 3 sc in last ch, continue around working 1 sc across opposite side, 2 sc in final stitch to complete oval (approx 22 sts)
Round 2 :
1 sc in each st around (22)
Round 3-8 :
1 sc in each st (22)
Info :
Work in rows for a slightly ribbed belly: after round 2 you can work alternating BLO rounds to produce horizontal ridges. The belly should be slightly narrower at the top. Stuff lightly and sew to front of body from round 9 down to 18, aligning center with body front.
— Arms (Make 2) :
Round 1 :
6 sc in magic ring (6)
Round 3 :
(1 sc, inc) x 6 (18)
Round 4 :
(2 sc, inc) x 6 (24)
Round 5-8 :
1 sc in each st (24)
Info :
Start stuffing the hand/hand-paw area firmly so it has a nice rounded shape. For poseable arms, insert wire now, leaving ends folded inside the arm to avoid poking out.
Round 9 :
(3 sc, dec) x 6 (18)
Round 10-14 :
1 sc in each st (18)
Round 15 :
(2 sc, dec) x 6 (12)
Round 16 :
1 sc in each st (12)
Round 17-18 :
Fasten off leaving long tail for sewing; shape wrist area by flattening slightly and sewing seam across inner arm if necessary (12)
Info :
Make small cream claws: mr, 6 sc, pull tight (x3 per hand). Sew three claws to the tip of each hand evenly spaced. Secure firmly and weave in ends.
— Legs (Make 2) :
Round 1 :
6 sc in magic ring (6)
Round 3 :
(1 sc, inc) x 6 (18)
Round 4 :
(2 sc, inc) x 6 (24)
Round 5 :
(3 sc, inc) x 6 (30)
Round 6-10 :
1 sc in each st (30)
Info :
These rounds form the foot and ankle. Stuff the foot pad firmly, leaving room in the upper leg to attach to body. Use additional fiberfill in the heel area for stability so the finished dragon can sit upright.
Round 11 :
(3 sc, dec) x 6 (24)
Round 12-15 :
1 sc in each st (24)
Round 16 :
(2 sc, dec) x 6 (18)
Round 17-19 :
1 sc in each st (18)
Round 20-22 :
Shape hip by decreasing: (1 sc, dec) x 6 (12), stuff leg, fasten off leaving long tail for sewing
Info :
Sew toes as three small cream knobs per foot (mr, 6 sc each) and attach along front edge of foot. Pin legs to lower body at previously marked positions — legs should sit a few stitches in from the body edge for a natural look.
— Tail (Long Tube with Spikes) :
Round 1 :
6 sc in magic ring (6)
Round 3-40 :
1 sc in each st (12) — continue until desired length (about 38-40 rounds for a long curling tail)
Info :
If you want a wired tail, insert a length of armature wire before stuffing. Leave both ends folded back and embedded in stuffing to avoid sharp points. Add more stuffing toward the base for stability; taper stuffing toward the tip.
Spikes (Make 12) :
For each spike: mr, 6 sc (or ch 4, 3 sc across, sl st back for triangular spike), fasten off leaving tail. Make 12 in red. Sew spikes along tail top spaced by 2-3 rounds, starting near base and finishing toward tip in diminishing size.
Info :
On the finished piece, the red spikes are cluster-styled with small surface texture. For that look, make picot or popcorn-style small clusters (e.g., ch 3, 4 dc in same st, ch 1, sl st) and sew in place tightly.
— Wing Panels (Make 2) :
Panel Base Round 1 :
Ch 30, turn and sc across (29 sc) — counts vary by desired wing width
Round 2 :
Ch1, sc across, add 3 sc in last st, continue on remaining chain working both sides to create semi-oval (approx 34 sts)
Round 3-8 :
1 sc in each st (34)
Round 9 :
Change to red for inner membrane: join red at the inner edge and work 1 sc in each st for 6 rows to form a red triangular membrane inset. Fasten off red and return to green edge.
Round 10 :
Work in green around the outer edge; FLO round to create a ridge where ribs will attach (34)
Info :
Make 6 vertical ribs: create 6 narrow green tubes (ch 18, sc back making a small tube) and attach them evenly across the red membrane by sewing one end at the wing base and the other at the outer edge; this creates the ribbed look seen in the photos. Tip ends get cream dots.
Round 11 :
Fasten off leaving a long tail for sewing. Add tiny cream picots to each rib tip (mr, 6 sc) and sew to end of each rib for contrast.
— Wing Ribs (Make 12 small tubes) :
Each Rib :
Ch 18, 17 sc back, sl st to join tube, fasten off leaving tail for sewing (17)
Info :
Sew ribs across the red membrane as vertical supports, evenly spaced. Bend slightly for natural curvature and sew both ends securely to wing base and outer edge.
— Scarf (Striped) :
Round 1 :
Ch 65 (or desired length), sc in 2nd ch from hook and across (64)
Round 2-6 :
Work in alternating color stripes: 2 rows green, 2 rows white, 2 rows red etc. Use 6-8 total color bands to achieve thick stripes. Work in rows to keep scarf flat.
Round 7 :
Add fringe by cutting multiple strands of yarn (about 6 cm each) and attaching along ends with lark's head knots. Trim evenly to form tassels.
Info :
Carry yarn along the side or cut and weave ends for a cleaner look. The scarf in the photo has short fringes and bold stripes; maintain tight tension to produce a dense scarf that sits well around the neck.
— Santa Hat :
Round 1 :
6 sc in magic ring (6) in red
Round 3 :
(1 sc, inc) x 6 (18)
Round 4 :
(2 sc, inc) x 6 (24)
Round 5-12 :
1 sc in each st (24) — continue until hat measures about 10-12 rounds tall; create a slouching point by decreasing gradually if desired
Round 13 :
Change to cream and work 6-8 rounds of 1 sc in each st to create the hat trim band (24)
Round 14 :
Make pom-pom: using cream, densely wrap, tie and trim to form a small pom, or crochet a dense ball: mr, 12 sc, inc rounds to 18, stuff and close. Sew pom to hat tip.
Info :
The hat in the photograph is slightly over-sized and slouches back over the horns; pin in place before sewing. You can make hat removable by sewing only to a couple of stitches or by adding a snap behind the ears.
— Present (Small Wrapped Gift) :
Box Body Round 1 :
Make a small cube: ch 6, join to form ring, sc 6 around for first face, continue working in rounds creating sides by adding 2 sc in corner chains to square out (approx 6-8 rounds, final dimension about 3-4 cm)
Ribbon & Bow :
Using red, ch 20, fold and whip stitch to make a looped bow; make two loops and a knot. Sew on top of present. Add cream snowflake with embroidery thread or small crocheted snowflake motif sewn to box side.
Info :
Sew the present to the base of the tail or beside the dragon. Add a small cluster of red pom-berries and green holly leaves near the bow for a festive look.
— Holly Leaf & Berry Cluster :
Leaf :
Ch 6, sc 5, 3 sc in last ch, continue back across chain working decreases to create pointed leaf (approx 8 sc). Pinch to shape and sew. Make 2-3 leaves.
Berry Cluster :
Make 3 small red picot balls: mr, 6 sc each, fasten off, sew together into a tiny cluster and attach to horns or hat rim.
Info :
Attach holly cluster at bases of horns and at the hat brim intersection as seen in the images for that festive accent.
— Assembly & Final Finishing :
Info :
Stuff all parts firmly but allow the head to be slightly firmer around the brow for expression. Weave in ends as you go to keep your workspace tidy. Block wings lightly if fabric is loose to shape curvature.
Step :
Sew head to body by aligning neck tube with body opening around body round 1-3; insert head and whip stitch evenly to neck stitches. Ensure head faces forward and sits level.
Step :
Pin and sew arms to body sides at approx body rounds 9-12 level. Sew securely with mattress stitch and reinforce through a few central stitches to support weight when displaying.
Step :
Sew legs to the bottom of the body; position them symmetrically so the dragon can sit stably. Add extra whip stitches across the inner thigh to secure firmly.
Step :
Sew tail to the rear lower body center; curve tail and pin spikes before sewing each spike in place. Use extra stitches at the base to secure heavy tails.
Step :
Sew wings to upper back between rounds 8-12 depending on your preferred placement. Attach ribs first then the outer edges, shaping wings into a slight forward curve.
Step :
Sew horns and ears to head: horns sit above the eyes and ears slightly behind and to the sides. Add holly clusters and red berry accents at both horn bases and at the hat edge.
Info :
Embroider small nostril dots and mouth seam with darker green thread. Add a few white embroidered star-like highlights near the eyes for expression if desired.
Step :
Dress your dragon with the scarf and hat, sew or secure the hat in a few stitches if you want it fixed. Attach the present next to the tail or on the lap using concealed stitches.
Final Info :
Check all seams for security, weave in or burn ends (if using synthetic yarn safely) and trim. Optionally add a little blush by rubbing a small amount of pastel chalk on cheeks to accent features.
This festive dragon is full of holiday character — a perfect combination of fantasy and seasonal cheer. With careful shaping and color changes, every part becomes a charming detail: a slouchy Santa hat, a striped scarf, and a tiny present that complete the scene. The finished amigurumi makes a memorable gift or seasonal decoration, and each stitch tells a story of handmade joy. 🎁🧶 Warm wishes and happy crocheting as you bring this merry dragon to life! 🎄