๐Ÿงถ Beautiful โœจ Detailed ๐Ÿ’ Adorable

Flower Pouch Pattern

Flower Pouch Pattern
4.1โ˜… Rating
5-7 Hours Time Needed
1.5K Made This
โœ‚๏ธ

Intermediate Level

Ideal for those with basic crochet experience, featuring slightly more advanced stitches and techniques to expand your skills.

โฑ๏ธ

Weekend Treat

Takes 5-7 hours, making it an enjoyable project to finish over a couple of days.

โœจ

Stylish Touch

An elegant detail to elevate any look, combining traditional techniques with contemporary design sensibilities.

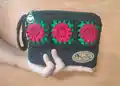
About This Flower Pouch Pattern

This pattern shows you how to crochet a stylish Flower Pouch featuring floral granny squares joined to a spiral body. You will learn to make front-loop popcorn petals, build an oval base, and combine panels into a neat zipper pouch. The pattern includes detailed photos and step-by-step written instructions to guide you through each stage.

Flower Pouch Pattern crochet pattern - detailed view of completed project

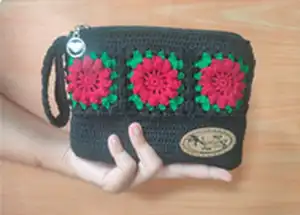
Perfect for gifting, organizing small items, or selling at craft fairs, this pouch is both practical and decorative. Techniques used are clearly explained so you can follow along and customize colors and finishes.

Why You'll Love This Flower Pouch Pattern

I absolutely love this pattern because it transforms simple granny square flowers into a practical, everyday accessory that feels special. I am always excited by how the popcorn petals pop on the surface and add texture without complicated shaping. I enjoy the combination of simple stitches with careful joining to create a professional finish. I also love that you can personalize it easily by changing colors or adding lining and a label to make each pouch unique.

Flower Pouch Pattern step 1 - construction progress Flower Pouch Pattern step 2 - assembly progress Flower Pouch Pattern step 3 - details and accessories Flower Pouch Pattern step 4 - final assembly and finishing

Switch Things Up

I love how easy it is to customize this pattern by changing the colors for very different looks; try a pastel palette for a soft, romantic pouch or bright contrasting shades for a bold statement.

I often swap the red flower color for pink or coral to make seasonal variations, and changing the green to a neutral tone creates a subtler effect.

To make a smaller coin purse version, use a finer yarn and smaller hook; to make a larger tote-style pouch, use a bulky yarn and larger hook and increase the base chain proportionally.

I sometimes replace the popcorn petal with a puff stitch or bobble stitch for a different textureโ€”experiment to see which texture you prefer.

I like adding a fabric lining in a contrasting print and a metal zipper for a premium finish; you can also add an inner pocket for cards or receipts.

I occasionally sew on a decorative leather or fabric label for a professional touch and to personalize gifts with a name or logo.

I recommend trying different handle styles: a short wrist strap, a longer crossbody strap, or even a detachable chain for versatility.

If you want a sturdier pouch, use interfacing in the lining or double up the yarn for the base rows to reinforce structure.

I also enjoy making matching setsโ€”create a small coin pouch and a larger makeup pouch in the same colors to make coordinated gifts.

Don't be afraid to experiment with stitch patterns on the body; substituting rows of alternating HDC and DC can create subtle striping and texture changes that look great with the floral top.

Common Mistakes & How to Fix Them

โœ— Skipping counting stitches when making the granny squares causes an uneven number of petals; count your stitches after each round to ensure you have the correct totals and fix any missed stitches immediately. โœ— Joining granny squares without pinning first can result in misaligned seams; pin or clip squares in place and check alignment before you slip stitch or sew to keep edges straight. โœ— Working the body in a spiral without marking the start can make it hard to track rows; use a stitch marker to note the beginning of the row or the first HDC to maintain consistent row counts. โœ— Pulling your yarn too tight when switching colors distorts the motif and makes joining difficult; carry yarn loosely at color changes or fasten off and weave in ends neatly to keep edges flat.

Flower Pouch Pattern

Make a charming Flower Pouch using granny squares and simple crochet techniques. This pattern guides you through creating floral granny squares, building an oval base, joining pieces, and adding an edge and handle so you can make a useful and beautiful pouch. You will enjoy step-by-step photos and clear written instructions to complete this lovely handmade accessory for gifts or everyday use.

Intermediate 5-7 Hours

Materials Needed for Flower Pouch Pattern

โ€” Main Fabric

  • 01
    Paintbox Yarn Baby DK (45% Acrylic, 55% Nylon) Light DK weight yarn, total approximately 485 yards / 444 meters
  • 02
    Black (main color) - 279 yards / 255 meters
  • 03
    Red (flower color) - 138 yards / 126 meters
  • 04
    Green (leaf/edging color) - 68 yards / 63 meters

โ€” Tools Required

  • 01
    Crochet hook size 4/0 (2.5mm) or 5/0 (3.0mm)
  • 02
    Scissors
  • 03
    Matches
  • 04
    Measuring tape (meter)
  • 05
    Stitch marker
  • 06
    Yarn needle for sewing and weaving in ends
  • 07
    Zipper and zipper slider (optional for finishing)
  • 08
    Fabric for lining (optional)
  • 09
    Sewing needle and thread for attaching lining and label (optional)

Progress Tracker

0% Complete

โ€” Granny Square :

Round 1 :

MR + 12SC. And make a slip stitch in first SC (12sts)

Round 2 :

4CH + (1DC + 1CH)11x. And make a slip stitch in the 3rd chain (24sts)

Round 3 :

Slip stitch in space 1 chain. And then, (1 Popcorn stitch and 1DC in same stitch + 2CH)12x. Make a slip stitch in the last step. Cut the yarn and tidy up (36sts)

Round 4 :

Follow the steps below to create the green edging (56sts): Start from space 2 CH. 1) 3DC + 2CH + 3DC in the corner. 2) 3DC + 2CH + 3DC (corner cluster). 3) (3HDC in the next 2CH space)2x. 4) Repeat steps 2-3 around to complete the square. Make a slip stitch and then cut the yarn & tidy up.

Info :

Make 6 granny squares with the same pattern for the pouch front (one center and five additional squares but pattern uses 6 total across the pouch top as shown in photos).

โ€” Bottom of the pouch :

Round 1 :

41CH (41sts)

Round 2 :

3HDC Inc + 39HDC + 5HDC Inc + 39HDC + 2HDC Inc (88sts)

Round 3 :

(2HDC Inc)3x + 39HDC + (2HDC Inc)5x + 39HDC + (2HDC Inc)2x. Pattern of Corner section: (2HDC Inc)5x (98sts)

Round 4 :

(2HDC Inc + 1HDC)3x + 39HDC + (2HDC Inc + 1HDC)5x + 39HDC + (2HDC Inc + 1HDC)2x. Pattern of Corner section: (2HDC Inc + 1HDC)5x (108sts)

โ€” Body of the pouch :

Row 1 :

108DC (108sts)

Row 2 :

108HDC (108sts)

Row 3-8 :

Odd Row pattern: 108DC. Even Row pattern: 108HDC. And make a slip stitch on the first HDC in the 8th row. Then cut the yarn and tidy up.

โ€” Combine Granny Square with Body :

Info :

To combine granny squares with the body, change yarn to the base color of the bag and use chain, double crochet, and slip stitch to join. Follow the photographic steps and written sequence below.

Step 1 :

(3DC + 2CH + 3DC) in the Corner of Granny Square

Step 2 :

(3DC in the next between HDC and DC space) 3x

Step 3 :

3DC first in the next corner of granny Square

Step 4 :

1CH + Slip Stitch in the corner body + 1CH

Step 5 :

3DC in the same corner of granny square, skip 3 sts on the body section and slip stitch on the 4th stitch

Step 6 :

(3DC in the next between HDC and DC space), then skip 2 sts on the body section and slip stitch on the 3rd stitch) 3x

Step 7 :

(3DC + 1CH) in the corner first, then skip 3 sts on the body section and slip stitch on the 4th stitch

Step 8 :

(1CH + 3DC in the same corner of granny square)

Step 9 :

Continue until finished with the pattern below: a. (3DC in the next between HDC and DC space) 3x. b. (3DC + 2CH + 3DC) in the Corner of Granny Square. Then, cut the yarn and tidy up. Repeat until the next corner of Granny Square.

Step 10 :

(3DC + 2CH + 3DC) in the Corner of Granny Square then (3DC in the next between HDC and DC space) 3x and (3DC + 1CH) in the corner first as needed for continuing the join

Step 11 :

(3DC in the next between HDC and DC space), then skip 2 sts on the body section and slip stitch on the 3rd stitch) 3x

Step 12 :

(3DC + 1CH) in the corner first

Step 13 :

Slip stitch in the corner of first Granny square, then (1CH + 3DC in the same corner of second Granny Square) and slip stitch between HDC and DC space of first Granny square

Step 14 :

(3DC in the next between HDC and DC space of second Granny square) and slip stitch in the next between HDC and DC space of first Granny square. Repeat until the next corner of Granny Square. Then, make (3DC + 1CH) first in the Corner of Granny Square

Step 15 :

First slip stitch in the corner of first Granny square and second slip stitch in the next body section

Step 16 :

(1CH + 3DC in the same corner of granny square) and skip 3 sts on the body section and slip stitch on the 4th stitch

Step 17 :

(3DC in the next between HDC and DC space), then skip 2 sts on the body section and slip stitch on the 3rd stitch) 3x

Step 18 :

(3DC + 1CH) in the corner first, then skip 3 sts on the body section and slip stitch on the 4th stitch

Step 19 :

(1CH + 3DC in the same corner of granny square)

Step 20 :

Continue until finished with the pattern below: a. (3DC in the next between HDC and DC space) 3x. b. (3DC + 2CH + 3DC) in the Corner of Granny Square. Then cut the yarn and tidy up. Repeat the steps above until all the Granny Squares are attached to the body of pouch.

โ€” Making the Edge and Handle :

Row 1 :

Make HDC around starting from 3 stitches before the corner of the pouch. Then slip stitch front loop only for end this row (102sts)

Row 2 :

In this 2nd row make the handle. Follow the steps: 1) 6HDC Front Loop Only. 2) (1TCH + 6HDC)40x. 3) (1TCH + 6HDC Back Loop Only). 4) HDC around and slip stitch in the first HDC

Row 3 :

Make SC around (102sts)

Row 4 :

Make slip stitch around. Then cut the yarn and tidy up (102sts). To make it more beautiful, give lining to the pouch and add a label.

Info :

NB: This is link Tutorial Video Flower Pouch : https://youtu.be/uArYJo2ula0

Assembly Instructions

  • Attach each Granny Square to the top edge of the body by following the joining sequence: position the square, make (3DC + 2CH + 3DC) in the granny corner, work 3DC between HDC and DC spaces and slip stitch into the body according to the steps until the square is fully joined.
  • After joining all granny squares, tidy the joins and fasten off. Make sure corners line up and seams are evenly spaced for a neat top row.
  • Work the edge and handle: HDC around the top starting 3 stitches before a corner, construct the strap across the 2nd row as instructed, then SC around and finish with slip stitches; weave in ends securely.
  • Optional: sew a fabric lining into the pouch and install a zipper before finishing the top edge to make the pouch more durable and polished.
  • Add a label to the front of the pouch and weave in all loose ends; check seams and reinforce any areas that feel loose with additional stitching.

Important Notes

  • ๐Ÿ’กUse a stitch marker to mark the start of rounds or the first HDC when working in spiral for the body to keep your row counts accurate.
  • ๐Ÿ’กWhen changing to the base color to join granny squares, carry the yarn or fasten off neatly and weave ends to avoid bulky joins.
  • ๐Ÿ’กPin granny squares in place before joining to ensure they align correctly and the final top edge is straight.
  • ๐Ÿ’กGive the pouch a fabric lining and a sewn-in zipper if you want a more finished internal look and extra durability.

This Flower Pouch pattern gives you a beautiful and practical handmade pouch that showcases floral granny squares and tidy finishing details. Make it for yourself, as a thoughtful gift, or to sell at craft marketsโ€”each one will be unique with your color choices. Add lining and a label to elevate your finished piece into a polished accessory. ๐ŸŒธ๐Ÿงต

You ask,

we answer.

FAQs

What size will the finished piece be?

The finished pouch measures approximately 18.5 x 3.5 cm at the base and about 13.5 cm high, using the recommended DK yarn and hook size.

Can I use different yarn weights for this pattern?

Yes, you can use different yarn weights but the pouch size and stitch counts will change; choose an appropriate hook for your yarn and be prepared to adapt counts and placement of granny squares.

Do I need prior crochet experience for this pattern?

This pattern is rated intermediate and uses techniques like popcorn stitch, front loop only HDC, and joining granny squares, so basic crochet skills and familiarity with these stitches are recommended.

How long does this project typically take to complete?

Most crocheters complete this project in 5-7 hours, depending on experience, speed, and whether you add lining or a zipper.

Is there a video tutorial to follow?

Yes, the pattern includes a tutorial video link: https://youtu.be/uArYJo2ula0 to help with visual steps for the granny square and joining process.