🧢 Beautiful ✨ Detailed πŸ’ Adorable

Fluffy Bunny LaBuBu Amigurumi Pattern

Fluffy Bunny LaBuBu Amigurumi Pattern
4.1β˜… Rating
3-4 Hours Time Needed
3.2K Made This
βœ‚οΈ

Beginner Friendly Level

Perfect for those just starting their sewing journey, with clear instructions and simple techniques

⏱️

Bite-Sized Project

Complete in under 2 hoursβ€”quick, fun, and perfect for a little creative escape.

🧸

Cute Companion

An adorable friend to cherish, handcrafted with love to bring comfort and joy for years to come.

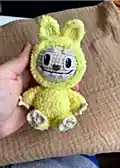
About This Fluffy Bunny LaBuBu Amigurumi Pattern

This fluffy bunny pattern creates the softest, most huggable amigurumi you'll ever make! Using fuzzy Alize Softy yarn in sunny yellow with beige accents, your finished bunny will have an irresistibly soft texture that's perfect for snuggling. The simple construction makes it ideal for beginners, while the adorable results will delight crafters of all skill levels.

Fluffy Bunny LaBuBu Amigurumi Pattern crochet pattern - detailed view of completed project

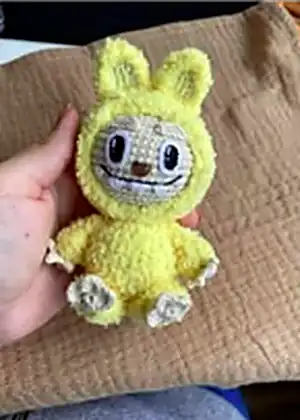
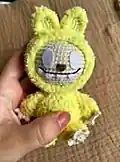
Standing at 12cm tall, this little bunny is the perfect size for tiny hands or as a charming desk companion. The pattern includes detailed facial embroidery instructions to give your bunny that sweet, sleepy expression.

Why You'll Love This Fluffy Bunny LaBuBu Amigurumi Pattern

I absolutely love how this pattern combines simplicity with the most satisfying results! The fuzzy yarn creates such a unique texture that you'll find yourself constantly wanting to squeeze your finished bunny. I also appreciate how the pattern uses basic stitches but achieves such a professional-looking result that makes it perfect for gifting to babies or anyone who needs a little extra comfort in their life.

Fluffy Bunny LaBuBu Amigurumi Pattern step 1 - construction progress Fluffy Bunny LaBuBu Amigurumi Pattern step 2 - assembly progress Fluffy Bunny LaBuBu Amigurumi Pattern step 3 - details and accessories Fluffy Bunny LaBuBu Amigurumi Pattern step 4 - final assembly and finishing

Switch Things Up

I love experimenting with different color combinations for this pattern! While the original sunny yellow is absolutely adorable, I've also made versions in soft pink, baby blue, and even a lovely lavender shade that turned out gorgeous. You could try using variegated fuzzy yarn for a rainbow effect, or stick with neutrals like cream and gray for a more minimalist look.

Another fun variation I enjoy is adjusting the ear size - making them slightly longer creates more of a lop-eared bunny effect, while shorter ears give a more compact, teddy bear-like appearance. I've also experimented with adding a tiny crocheted bow tie or flower crown for special occasions.

For those wanting to challenge themselves slightly, try embroidering different facial expressions. I've made sleepy bunnies with closed eyes, happy bunnies with little smile lines, and even winking versions that are absolutely charming. The beauty of this pattern is how much personality you can add with just small modifications!

Common Mistakes & How to Fix Them

βœ— Not counting stitches carefully when working with fuzzy yarn - the texture can hide your stitch count βœ— Stuffing too firmly which can cause the fuzzy yarn to compress and lose its fluffy appearance
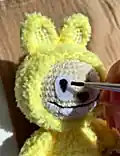
 βœ— Pulling embroidery thread too tight when creating facial features which can distort the face shape βœ— Not leaving long enough tails when changing colors as fuzzy yarn can be harder to weave in securely

Fluffy Bunny LaBuBu Amigurumi Pattern

Create this absolutely adorable fluffy bunny amigurumi with soft fuzzy yellow yarn that feels like a real teddy bear! This charming little character features a sweet embroidered face, tiny ears, and the most huggable texture you've ever crocheted. Perfect for gifting or adding to your own collection, this 12cm tall bunny will steal hearts wherever it goes. The pattern uses simple stitches with detailed step-by-step instructions to help you create your own cuddly companion.

Beginner Friendly 3-4 Hours

Materials Needed for Fluffy Bunny LaBuBu Amigurumi Pattern

β€” Main Fabric

  • 01
    YarnArt Jeans 05 (beige) and 67 (lime green) for structural elements
  • 02
    Alize Softy 187 (yellow) for the main fluffy body and head overlay

β€” Tools Required

  • 01
    Crochet hook size 1.75mm
  • 02
    Crochet hook size 2.0mm
  • 03
    Stuffing
  • 04
    Thin threads in white, black, and brown for facial embroidery
  • 05
    Needle for sewing details
  • 06
    White soft felt
  • 07
    White and black acrylic paint
  • 08
    Moment-Crystal glue
  • 09
    Stitch markers
  • 10
    Scissors

Progress Tracker

0% Complete

β€” Head :

Round 1 :

6 sc in MR (6). Place marker.

Round 2 :

6 inc (12)

Round 3 :

(1 sc + inc) *6 (18)

Round 4 :

(2 sc + inc) *6 (24)

Round 5 :

(3 sc + inc) *6 (30)

Round 6 :

(4 sc + inc) *6 (36)

Round 7 :

(5 sc + inc) *6 (42)

Round 8 :

(6 sc + inc) *6 (48)

Round 9 :

(7 sc + inc) *6 (54)

Round 10-17 :

54 sc (8 rounds)

Round 18 :

(7 sc + dec) *6 (48)

Round 19 :

(6 sc + dec) *6 (42)

Round 20 :

(5 sc + dec) *6 (36)

Round 21 :

(4 sc + dec) *6 (30)

Round 22 :

(3 sc + dec) *6 (24)

Round 23 :

(2 sc + dec) *6 (18)

Round 24 :

(1 sc + dec) *6 (12). Stuff.

Round 25 :

6 dec (6)

Info :

Pull opening tight, cut yarn and hide end.

β€” Head Overlay :

Round 1 :

6 sc in MR (6). Place marker.

Round 2 :

6 inc (12)

Round 3 :

(1 sc + inc) *6 (18)

Round 4 :

(2 sc + inc) *6 (24)

Round 5 :

(3 sc + inc) *6 (30)

Round 6 :

(4 sc + inc) *6 (36)

Round 7 :

(5 sc + inc) *6 (42)

Round 8 :

(6 sc + inc) *6 (48)

Round 9 :

(7 sc + inc) *6 (54)

Round 10-20 :

54 sc (11 rounds)

Info :

Put overlay on head and crochet decreases.

Round 21 :

(7 sc + dec) *6 (48)

Round 22 :

(6 sc + dec) *6 (42)

Info :

Leave long yarn tail for sewing and sew to head.

β€” Body :

Round 1 :

6 sc in MR (6). Place marker.

Round 2 :

6 inc (12)

Round 3 :

(1 sc + inc) *6 (18)

Round 4 :

(2 sc + inc) *6 (24)

Round 5 :

(3 sc + inc) *6 (30)

Round 6 :

(4 sc + inc) *6 (36)

Round 7-11 :

36 sc (5 rounds)

Round 12 :

(4 sc + dec) *6 (30)

Round 13 :

30 sc. Stuff.

Round 14 :

(3 sc + dec) *6 (24)

Round 15 :

24 sc

Round 16 :

(2 sc + dec) *6 (18). Stuff.

Info :

Leave long yarn tail for sewing. Sew to head, stuff neck well so head doesn't wobble.

β€” Ears :

First Detail :

Chain 5 from 2nd chain from hook: 3 sc, 3 sc in last stitch, 3 sc (9). Change to beige yarn. Make 1 ch and turn.

Row 2 :

3 sc, 3 inc, 3 sc (12). Cut yarn.

Second Detail :

Chain 5 from 2nd chain from hook: 3 sc, 3 sc in last stitch, 3 sc, 1 ch, turn (9)

Row 2 :

3 sc, 3 inc, 3 sc, 1 ch, turn (12)

Info :

Attach first detail to second on wrong sides and crochet binding:

Row 3 :

5 sc, 2 inc, 5 sc, 1 ch, down 5 sc and sl st (19)

Info :

Leave yarn tail for sewing. Sew ears to head.

β€” Arms :

Round 1 :

6 sc in MR (6). Place marker.

Info :

In next round crochet fingers.

Round 2 :

1 sc, (chain 3 from 2nd ch from hook: 2 sl st, BLO 1 sc) *3, 2 sc behind both walls (6)

Round 3 :

1 sc, behind remaining loop 3 sc, 2 sc (6)

Round 4 :

6 inc (12)

Round 5-9 :

12 sc (5 rounds)

Info :

Fold in half and crochet through both walls 6 sc. Leave yarn tail for sewing. Sew arms to body slightly angled.

β€” Legs :

Round 1 :

6 sc in MR (6). Place marker.

Info :

In next round crochet toes.

Round 2 :

1 sc, (BLO 3 sl st, 2 ch and sl st in same loop) *3, 2 sc (6)

Round 3 :

1 sc, behind remaining loop 3 sc, 2 sc (6)

Round 4 :

6 inc (12)

Round 5 :

(1 sc + inc) *6 (18)

Round 6-7 :

18 sc (2 rounds)

Round 8 :

(1 sc + dec) *6 (12)

Info :

Fold in half and crochet through both walls 6 sc. Leave yarn tail for sewing. Sew to bottom of body. Pinch leg slightly to tummy.

β€” Eyebrows :

Info :

Chain 5 from 2nd ch from hook: 4 sc. Leave yarn tail for sewing.

Assembly Instructions

  • Sew the fuzzy yellow head overlay onto the beige crocheted head, making sure it covers evenly
  • Attach the completed head to the body using the neck opening, stuffing the connection well to prevent wobbling
  • Sew the ears to the top sides of the head at a slight angle for a natural look
  • Position and sew arms to the sides of the body with a slight downward angle
  • Attach legs to the bottom of the body, pinching them slightly toward the tummy for a cute sitting pose
  • Sew eyebrows above where the eyes will be embroidered

Important Notes

  • πŸ’‘Use stitch markers consistently when working with fuzzy yarn as stitches can be difficult to see
  • πŸ’‘Don't stuff the fuzzy overlay pieces too firmly to maintain the soft, squishy texture
  • πŸ’‘Take extra care when embroidering the face features to ensure symmetry
  • πŸ’‘Leave longer yarn tails than usual when working with fuzzy yarn for easier weaving in
  • πŸ’‘Pin all pieces in place before final sewing to ensure proper positioning

This fluffy bunny pattern brings together the softest textures and sweetest design to create a truly special amigurumi friend! The combination of structured beige base with fuzzy yellow overlay creates depth and dimension that makes this little guy irresistibly huggable. Every stitch contributes to creating a companion that's perfect for snuggling, gifting, or simply brightening up any space with its sunny disposition. 🧢 Don't forget to share your adorable creations and tag us when you make your own fluffy LaBuBu! Happy crocheting! 🐰✨

You ask,

we answer.

FAQs

Can I use different yarn if I don't have Alize Softy?

Yes! Any fuzzy or plush yarn will work for the overlay. Just make sure to adjust your hook size accordingly to match the gauge.

Why do I need two different head pieces?

The beige head provides structure while the yellow fuzzy overlay gives the soft, plush texture. This technique creates better shape retention.

How do I keep track of rounds with fuzzy yarn?

Use stitch markers religiously! The fuzzy texture makes it very difficult to see individual stitches, so marking your rounds is essential.

Can I make this bunny bigger?

Absolutely! Use a larger hook and thicker yarn, but you may need to adjust the number of increase rounds to maintain proportions.