About This Freestyle Beanie Pattern
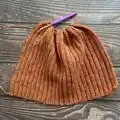
This Freestyle Beanie pattern shows you how to make a classic ribbed hat with a folded brim using half-double crochet back-loop ribs. The pattern is flexible—use any yarn weight and appropriate hook for a customized result. It includes tips for measuring, shaping, seaming, and adding embellishments like pompoms, embroidery, studs, or flowers.
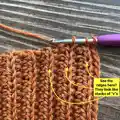
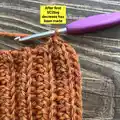
The instructions walk you step-by-step through the foundation chain, HDC back-loop rows, top shaping with SC decreases, and final finishing. Photos and notes help you adapt the size and style for kids or adults.
Why You'll Love This Freestyle Beanie Pattern
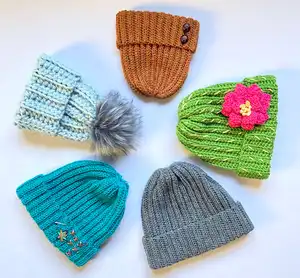
I absolutely love this pattern because it is so flexible and forgiving—you can use whatever yarn you have on hand and still get a great result. I love the clean ribbed texture created by working HDC into the back loop; it looks professional and wears beautifully when the brim is folded. The pattern allows for fun personalization, from oversized pom-poms to embroidered cactus spines or studs. Making a hat this way is relaxing and quick, and I enjoy how each version has a unique personality depending on yarn and accessories. It makes a wonderful, practical gift and a satisfying weekend project.
Switch Things Up
I love how easy it is to change the look of this beanie just by swapping yarns; try pastel worsted for a soft baby hat or chunky super-bulky for a warm, slouchy style.
If you want a mini keychain version, use fingering weight yarn and a much smaller hook to create a tiny hat perfect for gifts.
Try working the HDC rows in the front loop only (FLO) instead of BLO for a different rib texture and more subtle ridges.
Add an oversized pom-pom or a faux-fur pom for a playful, on-trend finish—attach securely through both layers of the brim.
Make a cuffed brim by folding the bottom up more or less, or stitch the fold down for a permanent cuffed look to suit your style.
Embroider long whip-stitches along the ridges (as in the cactus sample) using contrasting scrap yarn held double for graphic, tactile accents.
Attach leather buttons or metal studs to the folded brim for a librarian-chic or punk-inspired aesthetic—be sure to secure through both layers with a backing if needed.
Create a floral applique using a small hook and attach it to one side of the brim for a feminine touch or make several for a cluster of blooms.
Switch to stripes by changing color every few rows—this pattern adapts easily to colorwork since each row is worked in the back loop only.
I often add a tiny interior fabric square to the inside of the brim to create a secure base when adding heavy studs or an enamel pin so the hardware won\'t pull through the yarn.
Common Mistakes & How to Fix Them
✗ Starting with a foundation chain that is too short will produce a hat that is undersized; measure the chain length against your target hat height and add about 1 inch for safety before working your first row.
✗ Working into the turning chain instead of the actual stitches will distort the edge and width; always begin HDC in the second chain from hook and make the listed turning chain but do not work into it.
✗ Ignoring the back loop rib technique will flatten the texture and ruin the look; be sure to make each HDC into the back loop of each stitch unless you intentionally want a different texture.
✗ Skipping periodic measurement while making rows can create a hat that is too long or short; measure across the long sides of the rectangle every few rows so the piece will match the head circumference when seamed.
✗ Pulling yarn too tightly on decreases can cause puckering at the top of the hat; use even, moderate tension while making SC2tog decreases across the ridges and adjust if seams look tight.
✗ Failing to secure the seam properly will allow the brim to shift or the hat to come undone; whipstitch using the long yarn tail and insert the needle under the top loop of the last row and under both foundation loops for a neat, secure seam.