🧢 Beautiful ✨ Detailed πŸ’ Adorable

French Countryside Blanket Pattern

French Countryside Blanket Pattern
4.0β˜… Rating
12-15 Hours Time Needed
3.1K Made This
βœ‚οΈ

Beginner Friendly Level

Perfect for those just starting their crochet journey, with clear instructions and simple techniques

⏱️

Multi-Day Project

A rewarding 12+ hour journeyβ€”perfect for dedicated crafters who love detailed work.

πŸ€—

Soft Hug

Gentle, plush, and full of warmth, creating a sense of comfort and coziness wherever they find a home.

About This French Countryside Blanket Pattern

This pattern creates a medium sized textured blanket using the Paris Stitch for a beautiful, slightly open fabric. It was written for DK / Light Worsted yarn and worked with a 4.5mm hook to give a soft drape and good stitch definition. Clear step-by-step instructions and photos are included so you can place each stitch and corner correctly.

French Countryside Blanket Pattern crochet pattern - detailed view of completed project

The pattern includes sizing tables to customize width and length, plus a simple border made in Paris Stitches and slip stitches. It is perfect for making baby blankets or larger throws by changing the starting chain and number of rows.

Why You'll Love This French Countryside Blanket Pattern

I absolutely love this pattern because it takes a simple combination of double crochet and single crochet and turns it into a lovely textured fabric with the Paris Stitch. I love how forgiving the stitch is β€” it creates a pretty surface without being fussy, so I can relax while I crochet. I also adore that the pattern includes photo-by-photo guidance for the border and corners which makes finishing the blanket stress-free. Making this blanket in different colours or yarns always gives a fresh result, and it is so satisfying to watch the texture grow row by row.

French Countryside Blanket Pattern step 1 - construction progress French Countryside Blanket Pattern step 2 - assembly progress French Countryside Blanket Pattern step 3 - details and accessories French Countryside Blanket Pattern step 4 - final assembly and finishing

Switch Things Up

I love how easy it is to customize this blanket β€” you can change the width by using Table 1 and the length by using Table 2 to make the perfect size for you.

I often make a baby version by using thinner yarn and a smaller hook; this creates a delicate mini blanket perfect for a crib or to gift at a baby shower.

Want a chunkier throw? Use a bulkier yarn and a larger hook for a cozy, quick-to-make blanket that is great for cuddling on cold nights.

I like to add stripes by alternating colours every 10-20 rows; the Paris Stitch shows colour changes beautifully without looking busy.

For a fun variation, try a self-striping or variegated yarn β€” the textured Paris Stitch adds subtle movement that looks great with tonal shifts.

I sometimes add tassels or a simple crochet fringe to the ends for a boho finish β€” attach securely and trim evenly for a professional look.

If you prefer a more solid border, replace the Paris Stitch round with a round of sc or hdc to create a cleaner frame around the textured body.

For wearable pieces, experiment with shorter rows and increased stitch counts to turn the pattern into a poncho or wrap β€” the stitch pattern drapes nicely.

I recommend making a small swatch to test substitution yarns; this helps me decide if I need to adjust hook size or starting chains for the look I want.

Finally, try embroidering a small motif or adding a crocheted applique on one corner for a personal touch that makes each blanket truly unique.

Common Mistakes & How to Fix Them

βœ— Skipping the correct starting chain multiple of 4 + 2 and then wondering why the pattern edges look wrong; check Table 1 and start with a chain that is a multiple of 4 + 2 to guarantee the stitch repeats align correctly. βœ— Not checking your tension and skipping the swatch can make the finished blanket much larger or smaller than expected; make a tension square and compare to the given measurements before committing to the full project. βœ— Omitting the ch2 turning chain or adding the extra dc in the turning chain will change the stitch count at the edge; always follow the Row 1 and Row 2 instructions exactly and make the turning dc as instructed. βœ— Placing Paris stitches in the wrong edge spaces when making the border can produce uneven sides; follow the photo guidance and place Paris stitches in the smaller / third spaces as indicated to keep a neat border. βœ— Forgetting to fasten off and weave in ends before blocking can leave loose tails showing through the fabric; fasten off and weave in yarn ends securely at the end of the border and before final blocking.

French Countryside Blanket Pattern

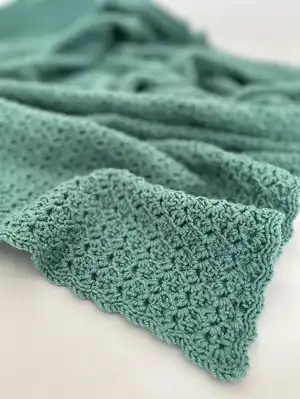
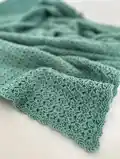
This French Countryside Blanket uses the textured Paris Stitch to create a soft, slightly lacy throw that evokes the rolling green hills of France. You will enjoy an easy-to-follow stitch pattern that combines double crochet, single crochet and chains for a satisfying repetitive rhythm. The finished blanket is cosy and versatile β€” perfect for gifting or brightening up your home. Detailed photos and sizing tables are included to help you customize the size.

Beginner Friendly 12-15 Hours

Materials Needed for French Countryside Blanket Pattern

β€” Main Fabric

  • 01
    Ouma Ralie Feels Like Cashmere from Kismet Yarns - Seafoam Green - 9 x 100g (used in sample blanket)
  • 02
    Yarn weight: Light (3) / DK
  • 03
    Wraps per inch: 11 wpi
  • 04
    Meterage: 273 yards / 250 meters per 100g
  • 05
    Unit weight: 3.53 ounces / 100 grams
  • 06
    Gauge / Tension (pattern body sample): 22 stitches & 28 rows = 4 x 4 inches (using sample yarn and hook)
  • 07
    Alternate yarn suggestions listed in the pattern: Rico Essentials Acrylic Antipilling DK; King Cole Cherished Baby DK; Stylecraft Bambino DK; Lion Brand Jeans; Lion Brand Mandala Ombre; Lion Brand Jamie; Lion Brand Vanna's Style; Schachenmayr Original Soft and Easy; Schachenmayr Bravo; Red Heart Baby Hugs Light; Scheepjes Softfun; Scheepjes Colour Crafter; Scheepjes Softfun Denim

β€” Tools Required

  • 01
    4.5mm crochet hook (H)
  • 02
    Crochet hook size US G / 4mm (alternative)
  • 03
    Knitting needle size US 4-7 or 3.5-4.5mm (for gauge reference)
  • 04
    Photos provided in pattern for stitch placement and border guidance

Progress Tracker

0% Complete

β€” Yarn Substitutions :

Info :

The thickness of the yarn used for this pattern is called DK in some countries and Light Worsted in other countries. It is classified as a Light (3) yarn according to the Craft Yarn Council's Standard Yarn Weight System (https://www.craftyarncouncil.com/standards/yarn-weight-system). Here are the exact specifications of the yarn used in this pattern to help you find a substitute: Weight: Light (3). Wraps per inch: 11 wpi. Meterage: 273 yards / 250 meters. Unit Weight: 3.53 ounces / 100 grams. Gauge / Tension: 22 stitches & 28 rows = 4 x 4 inches. Knitting Needle size: US 4-7 or 3.5-4.5mm. Crochet Hook size: US G or 4mm. Fibers: 100% Acrylic.

Info :

You will find a wide variety of yarns that are similar on www.lovecrafts.com, where you can search by yarn weight. Here are also suggestions for current similar yarns: Rico Essentials Acrylic Antipilling DK, King Cole Cherished Baby DK, Stylecraft Bambino DK, Lion Brand Jeans, Lion Brand Mandala Ombre, Lion Brand Jamie, Lion Brand Vanna's Style, Schachenmayr Original Soft and Easy, Schachenmayr Bravo, Red Heart Baby Hugs Light, Scheepjes Softfun, Scheepjes Colour Crafter, Scheepjes Softfun Denim.

β€” Customizing the Blanket Size :

Infos :

* If you don't want to change the size, skip this part and go straight to the pattern Instructions on page 5 *. The pattern is written for a medium size blanket. However, you can customize the size of the blanket to any size you want by consulting Table 1 to determine the number of starting chains, and Table 2 to determine the number of rows you need to work to achieve your specific size (the amount of yarn specified in Materials is based on the medium size blanket). If you use a different yarn weight, the sizes specified in Table 1 & 2 will not apply anymore. Width: Start with the number of chains in Table 1 that is closest to the width you want your blanket to be or with any multiple of 4 + 2 (add about 1 inch / 3 cm for the border). Length: Simply crochet until you have your desired length. If you are aiming for a specific length, use Table 2 as a guideline. * If you don't want to change the size, skip this part and go straight to the pattern Instructions on page 5 *

β€” Tables :

Info :

Table 1 - Number of starting chains and Width without border and Number of Paris stitches per row: 102 -> 53 cm / 20.75 inches -> 25 Paris stitches per row; 142 -> 74.5 cm / 29.25 inches -> 35 Paris stitches per row; 182 -> 96 cm / 37.75 inches -> 45 Paris stitches per row; 222 -> 117 cm / 46 inches -> 55 Paris stitches per row; 262 -> 138.5 cm / 54.5 inches -> 65 Paris stitches per row; 302 -> 160 cm / 63 inches -> 75 Paris stitches per row; 342 -> 181 cm / 71.25 inches -> 85 Paris stitches per row. The border will add about 1.5 cm / 1/2 inch per side, thus a total of about 3 cm / 1 inch to the width.

Info :

Table 2 - Number of rows and Length without border: 63 -> 72.5 cm / 28.5 inches; 73 -> 84 cm / 33 inches; 83 -> 95.5 cm / 37.5 inches; 93 -> 107 cm / 42 inches; 103 -> 115 cm / 45.25 inches; 113 -> 130 cm / 51 inches; 123 -> 141.5 cm / 55.75 inches; 133 -> 153 cm / 60.25 inches; 143 -> 165 cm / 65 inches; 153 -> 176 cm / 69.25 inches. The border will add about 1.5 cm / 1/2 inch per side, thus a total of about 3 cm / 1 inch to the width.

β€” Special Stitches :

Info :

Paris Stitch: Each (2 dc, ch 2, sc) makes one Paris Stitch.

Info :

CORNER: For the CORNER, make: (dc, ch 1) x 3, dc, sl st in the indicated st.

β€” Instructions :

Info :

Instructions are written for a medium size blanket, consult Table 1 on page 3 for number of starting chains for other blanket sizes.

β€” BLANKET :

Info :

With a 4.5mm H, make 222 ch

Row 1 :

(RS) 2 dc in 4th ch from H (photo 1-2), ch 2, sc in next ch (photo 2-3), *skip 2 ch, 2 dc in next ch, ch 2, sc in next ch*, rep from * to * until last ch, dc in last ch (photo 4-5), turn [55 Paris Stitches]

Row 2 :

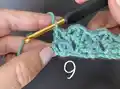
ch 2, *(2 dc, ch 2, sc) in ch2-sp (photo 6-7)*, rep from * to * until end of row, dc around turning ch (photo 8-9).

Info :

Repeat Row 2 until your desired length (the blanket in the photo has 103 rows). Last Row should be made with RS facing:

Last Row :

(RS) rep Row 2, but don't make the last dc in turning ch,

β€” BORDER :

Info :

The border will consist of one round of Paris stitches and one round of slip stitches. The last row made for the body of the blanket, will count as the first side (top side) of the border, detailed instructions with photo's will help you to place the stitches for the other 3 sides of the blanket.

Round 1 :

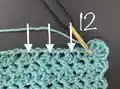
Left Side: The first corner will be made in the first dc of the 2 dc indicated by the purple arrow in the photo 10 (the red arrow indicates where you normally would have made the last dc of the row, which is omitted in the last row): for the CORNER, make: (dc, ch 1) x 3, dc, sl st in the indicated st (photo 11), turn so that the left side is now on top (photo 12), locate the space on the left side made by the last dc at the end of each row (it is the smaller (third) space, not the big space, indicated by the white arrows in photo 12), make a Paris st in each of these spaces until the next corner (it works out as 1 Paris st for every 2 rows, photo 13), don't make a Paris st in the last sp, make a CORNER in the last sp (photo 14-15)
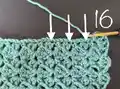
Round 1 Bottom :

Bottom: turn so that the bottom is now on top, make a Paris st in the bottom of the same ch where the 2 dc of row 1 was made (photo 16-17) until the next corner, make a CORNER in the ch2-sp at the end of this side (photo 18-19)

Round 1 Right Side :

Right Side: locate the space indicated by the arrows in photo 20-21 (it is the dc at the end of each row, one of the smaller spaces), make a Paris st in each of these spaces (photo 21, it works out as very third space) until the end of this side, make a CORNER in the last space before the ch2-starting-chain of the top row (photo 22-23),

Round 2 :

sl st in the BLO of each st around (insert your H from the top into each st, photo 24-26, the first 2 sl sts will be in the ch2-starting-chain, see arrows in photo 27), fasten off.

Info :

Weave in yarn ends.

Assembly Instructions

  • The last row made for the body of the blanket counts as the first (top) side of the border; work the border around the remaining three sides following the photo guidance for corners and placement of Paris stitches.
  • Make the first CORNER on the left side as instructed: (dc, ch 1) x 3, dc, sl st into indicated stitch, then work Paris stitches down the left side into the smaller (third) spaces until the next corner.
  • When you reach the bottom, make Paris stitches in the bottom chain space where the 2 dc of Row 1 were made, then make a CORNER in the ch2-space at the end of the side to turn up the right side.
  • Complete the right side by making Paris stitches in the smaller end-of-row spaces (every third small space as described) until you reach the top and make a final CORNER in the last space before the ch2 starting chain.
  • Work Round 2 by slip stitching in the back loops only around the entire blanket (insert the hook from the top into each stitch), place the first two slip stitches into the ch2 starting-chain, then fasten off and weave in all ends.

Important Notes

  • πŸ’‘This pattern is written in US terminology and the photos at the end are included to help you place stitches and corners correctly.
  • πŸ’‘Work a gauge swatch before starting if you plan to change yarn or hook size; the tables and yarn amounts are based on the sample yarn and tension.
  • πŸ’‘Place the last row with RS facing when starting the border so the top side of the blanket counts as the first side of the border.
  • πŸ’‘Follow the photo guidance carefully when locating the smaller (third) spaces on the edges β€” placing Paris stitches in the wrong spaces will result in an uneven border.

This French Countryside Blanket is a soothing, textured design that makes a beautiful gift or a cozy throw for your home. The Paris Stitch gives lovely depth and movement without being fussy, and the border instructions make finishing neat and satisfying. Whether you make it in the sample Seafoam Green or choose striped colours, this blanket will bring a warm handmade touch to any room. πŸ§ΆπŸ’š

You ask,

we answer.

FAQs

What size will the finished piece be?

The finished blanket in the sample measures approximately 48 inches x 50 inches (123 cm x 127 cm) using the listed yarn and hook size.

Can I use different yarn weights for this pattern?

Yes, you can substitute yarns but the sizes specified in the tables will no longer apply; make a swatch to determine the correct hook and expected size and adjust your starting chains and row count accordingly.

Do I need prior crochet experience for this pattern?

This pattern is beginner friendly and uses basic stitches (dc, sc, ch) but some familiarity with reading rows and placing stitches in edge spaces is helpful.

How long does this project typically take to complete?

Most crocheters will finish this medium sized blanket in multiple sessions; the pattern estimates around 12-15 hours depending on pace, yarn, and any custom sizing.