🧢 Beautiful ✨ Detailed πŸ’ Adorable

Frog Prince Amigurumi Pattern

Frog Prince Amigurumi Pattern
4.0β˜… Rating
5-7 Hours Time Needed
3.1K Made This
βœ‚οΈ

Intermediate Level

Ideal for those with basic crochet experience, featuring slightly more advanced stitches and techniques to expand your skills.

⏱️

Weekend Treat

Takes 5-7 hours, making it an enjoyable project to finish over a couple of days.

🧸

Cute Companion

An adorable friend to cherish, handcrafted with love to bring comfort and joy for years to come.

About This Frog Prince Amigurumi Pattern

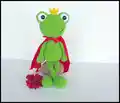
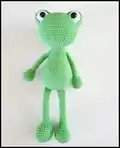
This pattern creates a charming Frog Prince amigurumi with long legs, expressive eyes, and a tiny crown. It walks you through every piece β€” head, body, eyes, eyelids, arms, legs and crown β€” with round-by-round instructions. The finished frog measures approximately 17 inches tall using worsted weight yarn and the recommended hook.

Frog Prince Amigurumi Pattern crochet pattern - detailed view of completed project

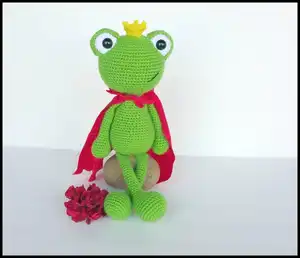
Designed for intermediate crocheters, the pattern uses continuous spiral rounds and simple shaping techniques. Clear assembly notes and a no-sew cape reference help you finish a polished, characterful toy.

Why You'll Love This Frog Prince Amigurumi Pattern

I absolutely love this pattern because it captures so much personality with very simple shapes and stitches. I enjoy how the large eyes and tiny crown instantly give the frog charm and character. I also appreciate that the body shaping creates a lovely elongated silhouette which makes the finished toy feel special. Making this frog gives me a relaxed, satisfying crochet session with a delightful result that I am proud to gift or display.

Frog Prince Amigurumi Pattern step 1 - construction progress Frog Prince Amigurumi Pattern step 2 - assembly progress Frog Prince Amigurumi Pattern step 3 - details and accessories Frog Prince Amigurumi Pattern step 4 - final assembly and finishing

Switch Things Up

I love customizing this Frog Prince by changing yarn colors to create different personalities; try mint greens, teals, or even speckled yarns for a fresh look.

I sometimes swap the worsted weight yarn for a bulkier yarn and larger hook to make a chunkier, cuddlier version that works great as a pillow buddy.

I also like making a mini version for keychains by using thinner yarn and a smaller hook; it makes an adorable portable gift.

Try embroidering a smile or freckles with black embroidery thread instead of using safety eyes for a softer, child-friendly face.

I often add small accessories like a crocheted bow tie, tiny scarf, or removable felt cape to give my frog distinct outfits.

For a playful twist, alternate colors every few rounds to create stripes on the body or legs for a whimsical effect.

I sometimes use safety joints for the arms and legs to make posable limbs, which adds fun articulation to the finished toy.

To make the crown more decorative, add small seed beads or french knots to each point to mimic gems and add sparkle.

If you prefer a vintage look, use cotton yarn and slightly tighter tension for a firmer, retro-style amigurumi finish.

I recommend experimenting with eye placement: moving the eyes slightly wider or closer together changes the frog's expression dramatically, so test with pins before securing.

For a themed set, make multiple frogs in different colorways and give each one a unique accessory like a tiny flower, scarf, or embroidered initial.

Common Mistakes & How to Fix Them

βœ— Skipping stitch markers during continuous rounds leads to losing track of the round start; use a stitch marker at the beginning of every round and move it as you crochet to stay accurate. βœ— Stuffing too much or too little results in misshapen pieces that are hard to sew; stuff gradually and evenly, checking shape frequently to maintain smooth curves and proper proportions. βœ— Placing safety eyes incorrectly will misalign facial features; position the safety eyes between rounds 5 and 6 as instructed and pin them first to confirm symmetry before securing. βœ— Ignoring tension consistency creates uneven rows and mismatched parts; maintain the same yarn tension and hook throughout the project and check gauge by comparing completed pieces as you go.

Frog Prince Amigurumi Pattern

Create an adorable Frog Prince amigurumi with this friendly intermediate crochet pattern. You will make a tall, charming frog with big eyes, removable eyelids, and a tiny crown β€” perfect as a gift or decorative buddy. The pattern includes full round-by-round instructions, materials, and assembly guidance so you can follow along with confidence. Enjoy stitching a whimsical handmade friend that will bring personality and fun to your projects.

Intermediate 5-7 Hours

Materials Needed for Frog Prince Amigurumi Pattern

β€” Main Fabric

  • 01
    Worsted weight yarn (#4), approximately 150g main color (Color A: Green)
  • 02
    Accent yarns approximately 50g total (Color B: White and Color C: Yellow) for eyes and crown

β€” Tools Required

  • 01
    Crochet hook 3.25 mm
  • 02
    Crochet hook F (3.75 mm)
  • 03
    18 mm safety eyes (2 pieces)
  • 04
    Scissors
  • 05
    Sewing needle / yarn needle for sewing
  • 06
    Stitch markers
  • 07
    Polyester fiberfill stuffing
  • 08
    Black embroidery thread

Progress Tracker

0% Complete

β€” Head :

Info :

Worked from top to bottom. With Color A:

Round 1 :

Make 6 sc into a magic ring= 6

Round 2 :

Increase in each st around= 12

Round 3 :

(sc, inc) x 6= 18

Round 4 :

sc, inc, (2 sc, inc) x 5, sc= 24

Round 5 :

(3 sc, inc) x 6= 30

Round 6 :

2 sc, inc, (4 sc, inc) x 5, 2 sc= 36

Round 7 :

(5 sc, inc) x 6= 42

Round 8 :

3 sc, inc, (6 sc, inc) x 5, 4 sc= 48

Round 9 :

(7 sc, inc) x 6= 54

Round 10 :

4 sc, inc, (8 sc, inc) x 5, 4 sc= 60

Round 11 :

(9 sc, inc) x 6= 66

Round 12-19 :

sc in each st around

Round 20 :

(9 sc, dec) x 6= 60

Round 21 :

4 sc, dec, (8 sc, dec) x 5, 4 sc= 54

Round 22 :

(7 sc, dec) x 6= 48

Round 23 :

3 sc, dec, (6 sc, dec) x 5, 3 sc= 42

Round 24 :

(5 sc, dec) x 6= 36

Round 25 :

2 sc, dec, (4 sc, dec) x 5, 2 sc= 30

Round 26 :

(3 sc, dec) x 6= 24

Round 27 :

(2 sc, dec) x 6= 18

Info :

F/O

β€” Body :

Info :

With Color A:

Round 1 :

Make 6 sc into a magic ring= 6

Round 2 :

Increase in each st around= 12

Round 3 :

(sc, inc) x 6= 18

Round 4 :

(2 sc, inc) x 6= 24

Round 5 :

(3 sc, inc) x 6= 30

Round 6 :

(4 sc, inc) x 6= 36

Round 7 :

(5 sc, inc) x 6= 42

Round 8 :

(6 sc, inc) x 6= 48

Round 9-15 :

Sc in each st around

Round 16 :

(6 sc, dec) x 6= 42

Round 17-18 :

Sc in each st around

Info :

Start stuffing the body

Round 19 :

(5 sc, dec) x 6= 36

Round 20-21 :

Sc in each st around

Round 22 :

(4 sc, dec) x 6= 30

Round 23-25 :

Sc in each st around

Round 26 :

(3 sc, dec) x 6= 24

Round 27-29 :

Sc in each st around

Round 30 :

(2 sc, dec) x 6= 18

Round 31-32 :

Sc in each st around

Info :

F/O and leave a long tail for sewing

β€” Eyes(Make 2) :

Info :

With Color B:

Round 1 :

Make 6 sc into a magic ring= 6

Round 2 :

Increase in each st around= 12

Round 3 :

(sc, inc) x 6= 18

Round 4-6 :

sc in each st around

Info :

Place the safety eyes between rounds 5 and 6.

Info :

F/O and leave a long tail for sewing

β€” Eyelids(Make 2) :

Info :

With Color A:

Round 1 :

Make 6 sc into a magic ring= 6

Round 2 :

Increase in each st around= 12

Round 3 :

(sc, inc) x 6= 18

Round 4 :

(2 sc, inc) x 6= 24

Round 5 :

(3 sc, inc) x 6= 30

Round 6-9 :

Sc in each st around

Info :

Fold the eyelid in half and sc it closed.

Info :

F/O and leave a long tail for sewing

β€” Arms(Make 2) :

Info :

With Color A:

Round 1 :

Make 6 sc into a magic ring= 6

Round 2 :

Increase in each st around= 12

Round 3 :

(sc, inc) x 6= 18

Round 4-6 :

sc in each st around

Info :

Start stuffing the arms

Round 7 :

(4 sc, dec) x 3= 15

Round 8 :

(3 sc, dec) x 3= 12

Round 9 :

(2 sc, dec) x 3= 9

Info :

Stop stuffing the legs

Round 10-27 :

sc in each st around

Info :

Fold the arms in half and sc the opening closed. F/O and leave a long tail for sewing

β€” Legs(Make 2) :

Info :

With Color A:

Round 1 :

Make 6 sc into a magic ring= 6

Round 2 :

Increase in each st around= 12

Round 3 :

(sc, inc) x 6= 18

Round 4 :

(2 sc, inc) x 6= 24

Round 5 :

(3 sc, inc) x 6= 30

Round 6-9 :

Sc in each st around

Info :

Start stuffing the legs

Round 10 :

(2 sc, dec) x 4, 14 sc= 26

Round 11 :

(sc, dec) x 4, 14 sc= 22

Round 12 :

Dec x 4, 14 sc= 18

Round 13 :

(sc, dec) x 6= 12

Round 14 :

(2 sc, dec) x 3= 9

Info :

Stop stuffing the legs

Round 15-35 :

sc in each st around

Info :

Fold the legs in half and sc the opening closed. F/O and leave a long tail for sewing

β€” Crown :

Info :

With Color C:

Round 1 :

Ch 12

Round 2 :

sl to to 1st ch to make a ring

Round 3-4 :

sc in each st around

Round 5 :

ch 3, sl st in 2nd ch from hook, sc in next chain, sc in next st on crown.

Info :

Repeat 5 more times to have 6 points

Info :

F/O and leave a long tail for sewing

β€” Assembly :

Info :

Sew the eyes onto the head. Sew the eyelids around the eyes. Sew the head onto the body. Sew the arms and legs onto the body. Sew the crown in between the eyes onto the head. For the cape I used a no sew tutorial here http://www.littlepinkmonsters.com/no-sew-superhero-cape/

Assembly Instructions

  • Sew the eyes onto the head and place them between rounds 5 and 6, ensuring symmetry before securing.
  • Sew the eyelids around the eyes and fold each eyelid in half, single crocheting closed to create the eyelid shape.
  • Attach the head to the top opening of the body and sew securely using a whipstitch or slip stitch alignment.
  • Sew the arms to the sides of the body and the legs to the bottom of the body, checking placement and spacing with pins first.
  • Sew the crown in between the eyes onto the head using the long tail left from the crown; secure tightly and weave in ends.

Important Notes

  • πŸ’‘Do not join rounds unless stated; work in a continuous spiral for smooth amigurumi shaping.
  • πŸ’‘Use a stitch marker to mark the beginning of each round to avoid losing your place during increases and decreases.
  • πŸ’‘All stitches are worked in both loops unless otherwise stated, so check for BLO or FLO directions carefully.
  • πŸ’‘Place and pin safety eyes before final assembly to verify placement and facial symmetry.

This Frog Prince pattern makes a delightful handcrafted friend that is perfect for gifting or display. The kit includes adorable features like big eyes, a petite crown, and long, floppy legs that bring personality to every stitch. Make your own regal amphibian and enjoy the whimsy of a handmade companion. 🧢🐸✨

You ask,

we answer.

FAQs

What size will the finished piece be?

The finished amigurumi measures approximately 17 inches from bottom to top of head when using worsted weight yarn and the recommended hook size.

Can I use different yarn weights for this pattern?

Yes, you can use different yarn weights, but this will affect the final size. Adjust your hook accordingly and expect changes in stitch counts and proportions.

Do I need prior crochet experience for this pattern?

This pattern is rated intermediate, so basic knowledge of crochet stitches and continuous spiral technique is recommended for best results.

How long does this project typically take to complete?

Most crocheters complete this project in 5-7 hours, though time may vary based on experience level and working pace.

What size safety eyes are recommended?

The pattern uses 18 mm safety eyes; position them between rounds 5 and 6 of the eye piece for the correct look.