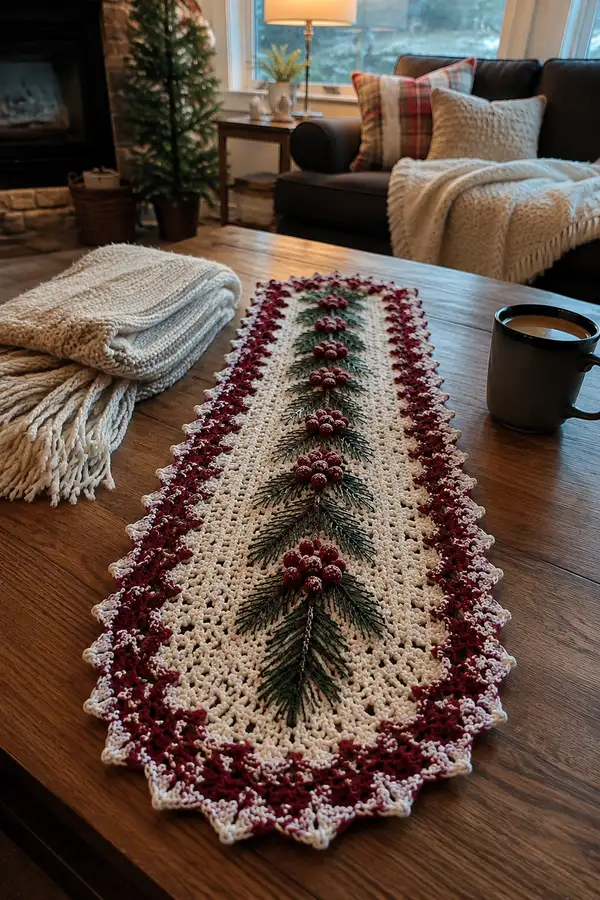
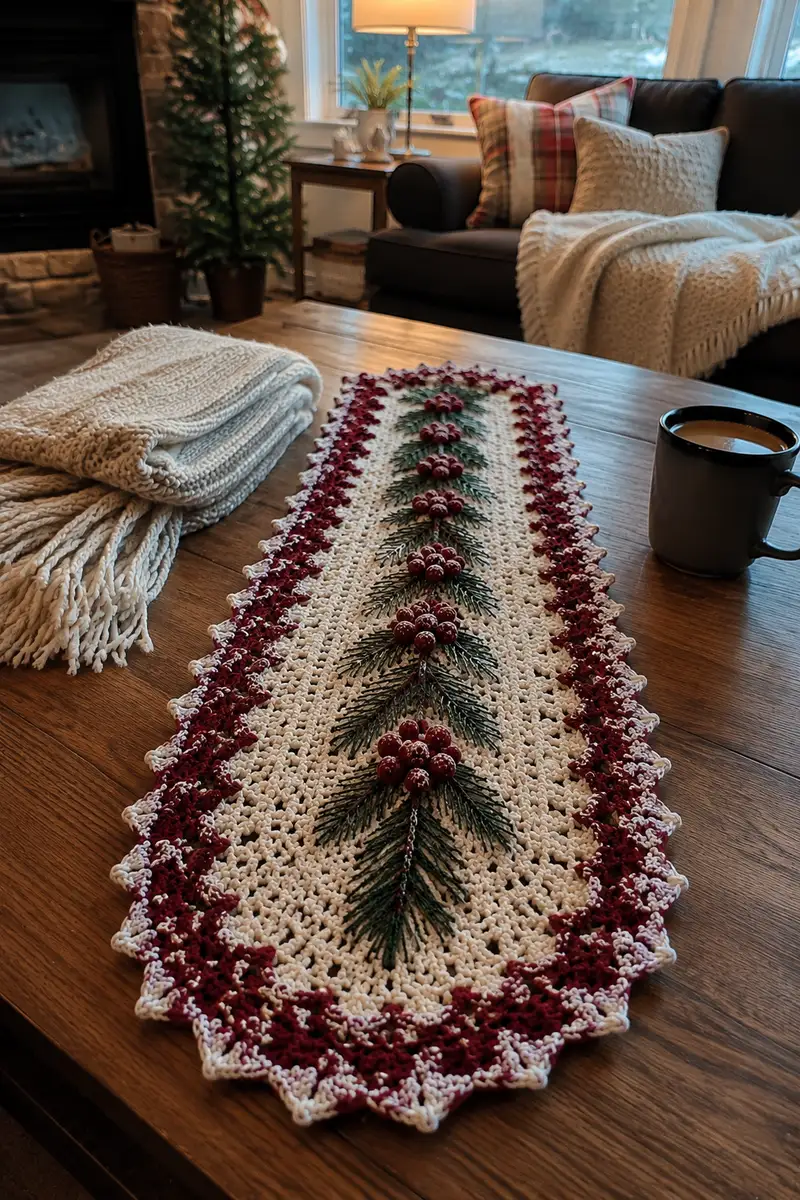
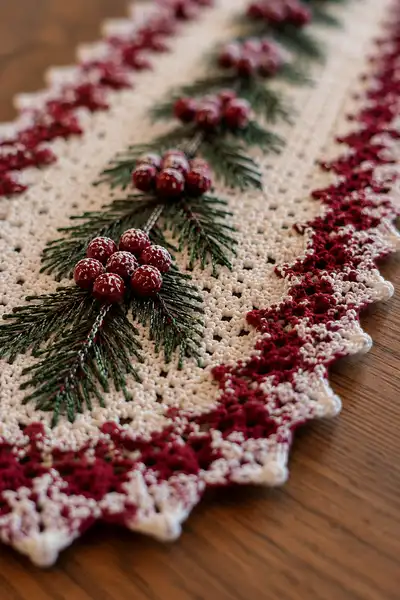
Create a festive long table runner inspired by frosted cranberries and pine sprigs. This pattern combines a lacy neutral center panel with deep cranberry scalloped borders and clustered berries with embroidered pine needles for lovely holiday texture. The finished runner lies flat and elegant on a dining or coffee table and is perfect for seasonal decor or handmade gifts.
Progress Tracker
0% Complete
— Overview & Gauge :
Info :
Gauge isn't critical for a decorative runner, but for sizing aim for 10 cm = 18 dc x 8 rows in worsted weight using 3.5mm hook measured after blocking. Finished length ~36-44 inches; width ~8-10 inches depending on tension and bead choice. This pattern uses a foundation chain measured in multiples of 6 plus 1 to maintain lacy repeat symmetry.
— Materials & Prep :
Info :
Prepare yarns: Cream main for center, Cranberry for borders and berries (if crocheting), Evergreen for embroidered needles. If using beads, pre-drill or sort beads and thread them onto the yarn with a small embroidery needle or bead needle. Mark center line of foundation chain with a removable marker to help align pine sprigs later.
— Center Panel (Foundation & Main Lace Body) :
Row 1 :
Foundation chain 121 (multiple of 6 + 1). Turn. (121)
Info :
Check your foundation: 121 chains gives a long narrow runner. If you want a shorter runner, reduce in multiples of 6 keeping +1. Work evenly and do not twist foundation chain before joining if working in rows (do not join).
Row 2 :
In 2nd ch from hook, 1 sc in each ch across. (120 sc)
Row 3 :
Ch2 (counts as hdc), turn. *Skip next ch, 3 dc in next ch (shell), skip next ch, 1 hdc in next ch; rep from * across until last ch, end 1 hdc in last ch. (20 shells + connecting hdc stitches; stitch count 120 approx due to shells)
Info :
Work shells evenly; the repeated unit is (sk1, 3dc, sk1, hdc). Count shells: 20 shells fit across 121 chain foundation with this spacing. Mark center panel edges so borders align later.
Row 4 :
Ch1, turn. 1 sc in each st and in each space across, working 3 sc into the center of each shell to flatten them. (approx 120 sc)
Row 5 :
Ch3 (counts as dc), turn. *In next sc, dc, ch1, dc (V-st in previous row's sc), sk next sc; rep across to last sc; dc in last sc. (Approx 40 V-sts)
Row 6 :
Ch1, turn. 1 sc in each st and in each ch-1 sp across to create stable ground row. (approx 120 sc)
Info :
This pair of a decorative row (shells or V-sts) followed by a sc grounding row creates the lacy texture shown in the photos. Keep these two-row sequences consistent for the main body.
Rows 7-46 :
Repeat Rows 3-6 (i.e. two-row repeat: decorative V or shell row then sc grounding row) for a total main-body height of 40 rows after Row 6. This brings total to Row 46. Maintain stitch pattern and count shells/V-sts equally across. (approx consistent stitch count across rows)
Info :
Every 8-10 rows check edges for straightness; if edge drifting occurs, add an extra sc at ends of grounding rows as needed to square up. Use stitch markers at beginning and end of each row until edges remain straight.
Row 47 :
Ch2, turn. Work a row of alternating shell motif but use 3 dc clusters worked into the previous V-st centers: *work (dc, ch1, dc) into ch-1 sp; sk sc; rep across. This row defines the center where pine sprigs will be anchored. (approx 40 clusters)
Info :
Mark the center line of the runner lengthwise by using a removable marker pinned to the center clusters. You will later align five or seven pine sprig anchor points along this center line. Place markers at equal intervals—measure evenly to place berry clusters later.
Rows 48-52 :
Ch1, turn. 1 sc across each st to stabilize the top of the center panel and prepare for border attachment. (approx 120 sc each row)
Info :
These rows create a stable edge for the border. If you prefer a taller runner, repeat the Row 3-6 repeat additional times before proceeding to border. The pattern here assumes the center panel has 52 rows total; adjust proportionally if you changed foundation chain length.
— Pine Sprigs (Embroidery / Surface Crochet) :
Info :
Decide whether to use stranded yarn for long needle-like stitches or to surface-crochet very fine loops. I recommend DK or sport-weight Evergreen yarn held single for fine realistic needles. Make 7 pine sprigs spaced evenly along the marked center line for the length of the runner. You can do 5 sprigs for a shorter runner.
Sprig Placement :
Mark 7 anchor points along the center row (Row 47 clusters), spaced evenly: roughly at Rows 6, 12, 18, 24, 30, 36, 42 from one end (or adjust if you lengthened the runner). Each anchor point will receive a stitched base and several long needle stitches fanning outward.
Sprig 1 - Step 1 :
Thread a long tapestry needle with Evergreen DK. From the wrong side, bring the needle up at the center cluster base (Row 47 center cluster). Leave a 6-8 cm tail on the wrong side and secure later.
Sprig 1 - Step 2 :
Make foundational couching: Insert needle back down 1-2 stitches ahead along the center cluster row to create a short anchored stem. Repeat couching with a second strand (or hold two plies) to form a visible central stem about 2.5-3 cm long.
Sprig 1 - Step 3 :
Create needles by bringing needle up along the central stem area and making straight stitches diagonally outwards: work 8 short straight stitches on each side of the stem, each 1.5-2.5 cm long, staggered in a fan to mimic real pine needles. Secure each stitch by returning needle back through the fabric close to the point of origin (no knot visible on right side).
Info :
Use lighter tension for the outer-most needles so they lie flat. For a frosted effect, you can twist a fine metallic thread with the Evergreen strand and couch them together. Repeat for each anchor point across the length. This method gives realistic long thin needles as shown.
Sprig 1 - Step 4 :
Finish sprig by weaving tails to the wrong side and anchoring with a few small whip stitches. Trim any excess. Repeat Sprig Steps for each anchor point (Sprigs 2-7).
Info :
If you prefer crocheted needles, you can chain 6-10 then sl st back to runner at staggered intervals to create a similar fan. Embroidery gives the most delicate result close to the photo.
— Cranberry Berries (Bead Option & Crocheted Option) :
Info :
Decide on beads or crocheted berries. Photo shows glossy round berries that resemble beads with a frosting effect. Bead option is quickest and neatest; crocheted berries allow fully handmade look. We provide both methods. Place one cluster centered on each pine sprig (7 clusters).
Bead Option - Step 1 :
Using a small beading/embroidery needle thread 7 beads onto a doubled length of strong sewing thread or thin worsted yarn tail. Bring threaded tail up through the runner at the center of the pine sprig, slide beads down so they cluster on the right side.
Bead Option - Step 2 :
Using the thread, insert the needle back into the fabric at the same spot and bring it up 3-4 mm away to create a small loop that secures the beads on top. Weave the thread several times in a spiral pattern behind the beads to make the cluster secure. Tie small knots or use a dab of fabric glue on the wrong side and weave ends into the runner.
Info :
For a frosted look, use beads with speckled white paint or dip bead tops lightly in white acrylic and dry. Secure beads well; they will receive handling when the runner is placed and moved.
Crocheted Berry - Make 7 (Each Berry) Round 1 :
Make magic ring, 6 sc into ring (6).
Round 2 :
Inc in each st around (12).
Round 3 :
(1 sc, inc) x 6 (18).
Round 4 :
1 sc in each st around (18).
Info :
Stuff very lightly with a small pinch of fiberfill so berries remain slightly soft but not squishy. If you will use beads instead, skip this section.
Round 5 :
(1 sc, sc2tog) x 6 (12).
Round 6 :
6 sc2tog (6). Fasten off leaving a 20 cm tail for sewing. Weave tail through remaining 6 sts and pull tight to close. Sew berry cluster of 7 small berries together in circular formation or sew them directly to the runner at each sprig center.
Info :
To get glossy 'frosted' effect, after sewing berries into clusters dip very lightly in diluted white paint or apply tiny dry-brushed white specks with acrylic paint. Allow to fully dry before using runner.
— Berry Cluster Assembly :
Info :
At each pine sprig center, sew a cluster of 6-7 beads or crocheted berries arranged in a compact circle about 2.5 cm wide. Use long tapestry needle and secure thread or yarn to wrong side, then weave in ends. Space clusters evenly along the runner centered on the marked Row 47 anchors.
— Side Border Foundation (Attach to Center Panel) :
Info :
With runner right side up and cream yarn, work sc evenly along one long side of the center panel to create a foundation for border rounds. Place 1 sc in each row edge stitch across top and bottom edges plus one sc per sc edge—aim for an even count. Repeat on the opposite side after finishing one border side.
Round 1 (Border Foundation) :
Using Cranberry yarn, join with sl st to the first sc at one long edge corner. Ch1, work 1 sc evenly in each available edge st across entire long side (approx 52 sc). At corner, work 3 sc down the short edge and continue along the opposite long side to other corner mirroring stitches. Join with sl st to first sc. (Approx total sc around runner = 260 including edges)
Info :
Exact stitch count will vary with your stitch gauge; keep an even distribution of sc along sides so scallops align later. If you get slightly more or fewer stitches, the scallop repeat will still work but adjust repeats at the corners slightly.
— Border Decorative Rounds (scaffold for scallops) :
Round 2 :
Ch3 (counts as dc), *sk next sc, 1 dc in next sc, ch1; rep across each long side. At short edges work (dc, ch1, dc) across to form a rounded corner. Join with sl st. (approx same number of dc + ch-1 spaces across)
Round 3 :
Ch1, sl st into ch1 sp, *(sc, ch2, sc) in next ch1 sp (forming a picot base), sk next dc; rep across. This establishes picot points for scallops. Join with sl st.
Info :
Border decorative rounds make a scaffold for the cranberry scallops. Keep the pattern consistent and count repeats so that you'll have an integer number of scallops along each long side (aim for 20 scallops per long side for a balanced look). Adjust spacing by adding or subtracting one ch2 between scallops if necessary.
Round 4 :
Switch to Cranberry if not already. Ch1, 1 sc in first picot base, *ch3, 5 dc cluster into next picot base, ch3, 1 sc into next picot base; rep across. Join with sl st. (Each scallop is 5 dc cluster separated by ch spaces)
Round 5 :
Ch1, turn work so scallops are facing you; *work 3 sc into the 5-dc cluster (one in each of the outer dc and one in the center dc), ch1, skip to next cluster; rep across. Join with sl st. This stabilizes scallops.
Info :
Border rounds will be repeated and layered to create the deep cranberry scalloped edge shown. For the two-tone frosted look, you'll later add a cream picot ridge over the cranberry scallops to highlight edges.
Round 6 :
Ch1, *(sc2tog over first two sc of cluster, 1 sc in center sc, sc2tog over last two sc) to shape scallop into a pointed fan; ch2 between scallops; rep across. Join. (This deepens scallop definition.)
Round 7 :
Ch2, *work (dc, ch2, dc) into the top of each scallop to create a shell cap; rep across. Join. (Scallop count unchanged)
Info :
Work three decorative rounds total for the cranberry scallops to build the raised border. Each scallop should show a small picot edge; keep tension firmer on border than center so scallops hold shape.
Round 8 :
Ch1, sc in each st and in ch2 spaces around scallops to create a neat foundation for the final cream frosting ridge. Join. (Approx same total st count as Round 1 scaffold plus a few extras from scallop shaping)
— Final Frosted Cream Edge (Two-Color Highlight) :
Info :
Switch to Cream yarn for the frosted effect. You will work a narrow scalloped picot ridge across the outermost points to mimic the pictured white-flocked look. Crochet tightly so the cream edge stands out against cranberry.
Round 9 :
With cream, join at the tip of a scallop, ch1, (sc, ch2, sc) into tip to create small picot; sl st to next scallop tip; rep around to make small picot points at each scallop. Join.
Round 10 :
Ch2 (counts as hdc), *work (hdc, ch1, hdc) into each picot space to form a tiny shell, sl st into the sl st join between shells; rep around. Join. This softens the edge and creates a frosted border look.
Round 11 :
Ch1, *sc around each tiny shell and make a small reverse picot (sc, ch3, sl st into first ch of ch3) to make a crisp white peak over cranberry; rep across. Join and fasten off. Weave in ends neatly on wrong side. (Final edge will show alternating red scallops and cream peaks.)
Info :
For extra crispness, steam block lightly or use a spray starch on the cream edge only, taking care not to alter bead sheen. This produces the 'frosted' look visible in the photos.
— Corner & Short Edge Detail :
Round 12 :
Short edges receive mirrored scallops. At each short edge, work an increased number of shells so the scallop pattern turns the corner smoothly: work (5 dc cluster, ch3, 5 dc cluster) across short edge into foundation sc stitches, then continue along adjacent side. This keeps scallops continuous around corners. Join.
Info :
Make sure corners are smooth and not puckered. If corners pull, unpick and redistribute a few sc stitches on the foundation round to even the fabric tension.
— Optional: Raised Seed Stitch Border (Extra Texture) :
Info :
If you want an additional narrow raised seed-stitch-like ridge between the center panel and cranberry scallops, after fastening the cranberry scallops but before the cream frosting round, work one round of 1 sc, 1 hdc alternation in cream or green to create a thin ridge. This step is optional but adds depth.
— Finishing Touches & Blocking :
Info :
Once embroidery and bead or berry clusters are sewn on, wet-block the runner to square it and set scallops. Pin scallops out to points and use light steam or wet-block method recommended for your yarn. Allow to dry fully on blocking board with pins in place so scallops retain shape.
Info :
Weave all yarn tails to wrong side and secure with small whip stitches before final blocking. If beads were used, check that threads are anchored and knot tucked into fabric with a touch of glue if desired for extra permanence.
— Alternate: Fully Crocheted Pine Needles (If Not Embroidering) :
Row 1 :
Using very fine green crochet thread or sport yarn and 2.75-3.0mm hook, ch6, sl st back into chain to create looped 'needle'; Fasten off leaving long tail to sew in place. Repeat to form a small bundle of 16-20 looped needles and sew them at each center anchor point in a fan. Repeat for each sprig. (Each needle unit counts as one 'row' of detail)
Info :
Looped crocheted needles give a slightly thicker look than embroidery; adjust quantity per sprig so needles remain delicate and proportional to berries.
— Care Instructions :
Info :
Hand wash gently in lukewarm water with mild detergent, reshape while damp, and lay flat to dry. Avoid tumbling. If beads are used, hand wash carefully and do not soak for long periods. Store flat or rolled to avoid crushing scallops.
— Final Notes :
Info :
Adjust foundation chain and number of repeats to scale the runner longer or shorter. The proportions are preserved by keeping multiples of 6 + 1 and repeating the central two-row lace unit. Embroidery placement can be shifted for alternate configurations (e.g., clustered at one end for an asymmetrical look).
You did it — a charming Frosted Cranberry and Pine runner that brings handmade holiday cheer to your table! The lacy cream center, jewel-like berries, and crisp cranberry scallops create a balanced, cozy centerpiece. Pinning and blocking really make the scallops pop and the embroidered pine needles add that natural elegance. 🎄 I hope this project becomes a seasonal favorite you bring out year after year. Happy stitching and enjoy arranging your festive table! 🧶✨